Table of Contents
Advertisement
Available languages
Available languages
Quick Links
Item #1000 017 535
Model #7803SSHD
USE AND CARE GUIDE
OVER-THE-SHOWER-DOOR CADDY
Questions, problems, missing parts?
Before returning to the store, call Glacier Bay Customer Service
8 a.m. - 6 p.m., EST, Monday - Friday
1-855-HD-GLACIER
HOMEDEPOT.COM
THANK YOU
We appreciate the trust and confidence you have placed in Glacier Bay through the purchase of this over-the-shower-door caddy.
We strive to continually create quality products designed to enhance your home. Visit us online to see our full line of products
available for your home improvement needs. Thank you for choosing Glacier Bay!
Advertisement
Chapters
Table of Contents

Related Manuals for Glacier bay 7803SSHD


Summary of Contents for Glacier bay 7803SSHD
- Page 1 THANK YOU We appreciate the trust and confidence you have placed in Glacier Bay through the purchase of this over-the-shower-door caddy. We strive to continually create quality products designed to enhance your home. Visit us online to see our full line of products...
-
Page 2: Table Of Contents
Table of Contents Table of Contents ........2 Installation . -
Page 3: Pre-Installation
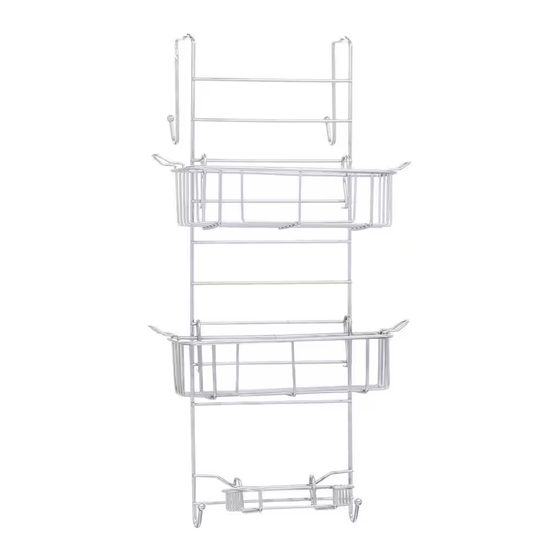
Pre-Installation PLANNING INSTALLATION □ Please identify all the parts and hardware pieces before you begin. □ When laying out the parts, place them on a soft surface to prevent scratching. PACKAGE CONTENTS Part Description Quantity Ladder Shelf Soap dish Suction cup HOMEDEPOT.COM Please contact 1-855-HD-GLACIER for further assistance. -
Page 4: Installation
Installation Connecting the shelves and the soap dish to the ladder □ In the desired locations, hook the shelves (B) and the soap dish (C) onto the ladder (A). - Page 5 Installation (continued) Attaching the suction cups to the assembly NOTE: Thoroughly clean the shower door surface and the suction cups with a mild household cleaner and allow to dry before proceeding. □ Attach the suction cups (D) to the side bars on the ladder (A).
-
Page 6: Care And Cleaning
[Heading goes here] Care and Cleaning □ Cleaning with a dry cloth may be sufficient. □ For other stains or marks, wipe gently with a damp cloth. □ Do not use strong detergents or abrasive cleaners; they may damage the surface of this product. Troubleshooting □... - Page 7 Questions, problems, missing parts? Before returning to the store, call Glacier Bay Customer Service 8 a.m. - 6 p.m., EST, Monday - Friday 1-855-HD-GLACIER HOMEDEPOT.COM Retain this manual for future use. IS7809-I...
- Page 8 GRACIAS Le agradecemos la confianza depositada en Glacier Bay al comprar este módulo para colocar sobre la puerta de la regadera. Dedicamos esfuerzos a crear productos de calidad todo el tiempo, que puedan embellecer su hogar. Vaya a nuestro sitio web para ver la línea...
- Page 9 Tabla de contenido Tabla de contenido ........2 Instalación .
-
Page 10: Pre-Instalación
Pre-instalación PLANIFICACIÓN DE LA INSTALACIÓN □ Identifique todas las piezas y las piezas de tornillería antes de comenzar. □ Al esparcir las partes, colóquelas sobre una superficie suave para evitar que se rayen. CONTENIDO DEL PAQUETE Pieza Descripción Cantidad Base Repisa Jabonera Ventosa... -
Page 11: Instalación
Instalación Adose las repisas y la jabonera a la base □ En los lugares previstos, enganche las repisas (B) y la jabonera (C) a la base (A). - Page 12 Instalación (continuación) Fije las ventosas al producto ensamblado NOTA: limpie completamente la superficie de la puerta de la regadera y las ventosas con un producto de limpieza suave para el hogar y deje secar antes de continuar con la instalación. □...
-
Page 13: Cuidado Y Limpieza
[Heading goes here] Cuidado y limpieza □ Limpiar con un paño seco puede ser suficiente. □ Para otras manchas o marcas, limpie suavemente con un paño humedecido. □ No use detergentes fuertes o limpiadores abrasivos; pueden dañar la superficie de este producto. Solución de problemas □... - Page 14 ¿Tiene preguntas, problemas, le faltan piezas? Antes de regresar a la tienda, llame al Servicio al Cliente de Glacier Bay de 8 a.m. — 6 p.m, Hora Estándar del Este, de lunes a viernes 1-855-HD-GLACIER HOMEDEPOT.COM Conserve este manual para uso futuro.
Need help?
Do you have a question about the 7803SSHD and is the answer not in the manual?
Questions and answers