
Subscribe to Our Youtube Channel
Related Manuals for RADWAG XA 4Y.M.A PLUS


Summary of Contents for RADWAG XA 4Y.M.A PLUS
- Page 1 IMMB-02-02-11-21-EN Start up Guide Micro-balances and Analytical Balances Microbalances: • XA 4Y.M.A PLUS • XA 4Y.M.A.P PLUS • XA 4Y.M PLUS Analytical balances: • XA 4Y.A PLUS • XA 4Y PLUS • XA 4Y.F...
- Page 2 To view a complete User Manual go to the website or scan QR code: Microbalances: Analitycal balances: XA 4Y.M.A PLUS XA 4Y.A PLUS XA 4Y.M.A.P PLUS XA 4Y PLUS XA 4Y.M PLUS XA 4Y.F radwag.com/en/manuals/3615...
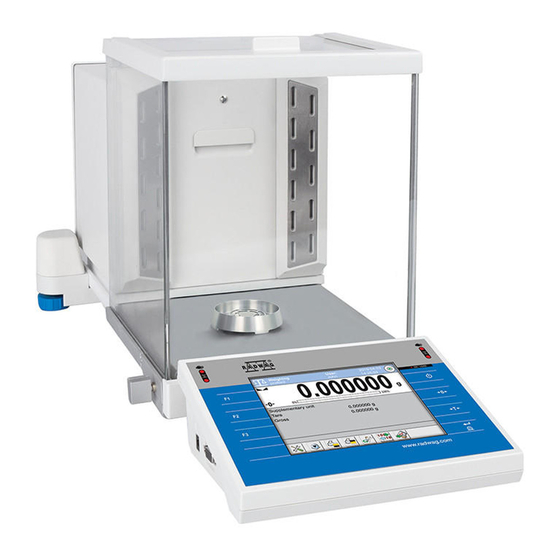
- Page 3 1. CONTENT XA 4Y.M.A PLUS Weighing Weighing pan Microbalance shield Power supply* Brush Fabric dust cover RS232 cable ×1 ×1 ×1 ×1 ×1 ×1 ×1 XA 4Y.M.A.P PLUS Weighing Weighing Microbalance pan shield Power supply* Base Bottom ring Glass vessel ×1...
- Page 4 XA 4Y.A PLUS (d= 0,01mg) Weighing pan centring Analytical balance Weighing pan shield ring Power supply* Brush ×1 ×1 ×1 ×1 ×1 ×1 Hook for under Fabric dust cover RS232 cable -pan weighing ×1 ×1 ×1 XA 4Y.A PLUS (d=0,1mg) Weighing Weighing pan Analytical balance...
- Page 5 XA 4Y PLUS (d=0,1mg) Weighing Weighing Analytical balance pan shield Bottom cover Power supply* Brush Fabric dust cover ×1 ×1 ×1 ×1 ×1 ×1 ×1 Hook for under -pan weighing ×1 XA 4Y.F (d=0,01mg) Weighing pan Centring Weighing pan Analytical balance Weighing pan shield ring...
-
Page 6: Recommendations And Warnings
2. UNPACKING Keep the packaging should a warranty claim or service be required. 3. RECOMMENDATIONS AND WARNINGS Operate the device in a room where the temperature ranges between 10–40 °C +104 (50–104 °F) and where the relative humidity is below 80%. Temperature must change slowly and gradually. -
Page 7: Components Assembly
4.2. Grounding spring check Check whether the earthing spring takes its intended location. Make sure that the earthing spring juts slightly out of the hole. 5. COMPONENTS ASSEMBLY Models: XA 4Y.M.A PLUS... - Page 8 Models: XA 4Y.A PLUS (d=0,001g) XA 4Y.A PLUS (d=0,01g) XA 4Y PLUS (d=0,001g) XA 4Y PLUS (d=0,01g) XA 4Y.F (folding the weighing pan assembly for filter weighing)
-
Page 9: Preparing For Work
XA 4Y.F (folding the standard weighing pan assembly) XA 4Y.M.A.P PLUS 6. PREPARING FOR WORK Place the device at the workstation, wait untilit reaches room temperature. 6.1. Temperature stabilization Prior switching the device on let it reach Connect the power adapter to DC Connect the power room temperature (estimated stabilization connector located at the back... - Page 10 6.2. Switching the balance on Automatic adjustment Automatic adjustment To switch the device on, press ON / OFF key. Confirm or cancel the start of the automatic adjustment process. 6.3.1. Balance levelling (for models with automatic levelling system only) If your balance features an automatic levelling system, it will launch automatically upon turning the device on.
- Page 11 6.3.2. Balance levelling (for models with semi-automatic levelling only) Weighing Log in 0.000000 Leveling Home Levelling 100% Supplementary unit Tare 0.000000 g Gross 0.000000 g Packaging Press “Levelling” icon. Check the balance level state. The arows shows how to move the balance foots to level the balance.
-
Page 12: Home Screen
7. PANEL AND SCREEN 7.1. Panel keys Proximity sensor Proximity sensor Selecting working mode Switching on / off (programmable button) Weighing Log in 0.000000 Home Selecting profile 100% Zeroing Supplementary unit (programmable button) Tare 0.000000 g Gross 0.000000 g Packaging Internal adjustment SETUP Taring... -
Page 13: Basic Operations
8. BASIC OPERATIONS 8.1. Adjustment Weighing Log in 0.000000 Home Automatic adjustment 100% Supplementary unit Completed Tare 0.000000 g Gross 0.000000 g Packaging Press “Adjustment” button and wait Adjustment completed. Press button for completion of the adjustment proces. for confirmation. 8.2. -
Page 14: Working Modes Settings
8.4. Working modes / units selection Press the icon of the current working mode, to display the list of working modes. Weighing Solids density Gram [g] Chinese tael [tlc] Dosing Liquids density Miligram [mg] Momme [m] Checkweighing Peak hold Carat [c] Grain [gr] Formulations Pound [lb]... -
Page 15: User Settings
9. SETTINGS Some balance settings are accessible for Administrator exclusively. Prior to balance parameters setup, log in as the Administrator. 9.1. Administrator’s logging in Log in Log in Weighing Operators 0.000000 Home Log out 100% Admin Admin Supplementary unit Tare 0.000000 g Gross 0.000000 g... - Page 16 Operators Edit record Admin Name Name Code Password ******* Name ad Surname Acces level User Account active Press “Add” button. Select “Name” parameter. Name Edit record John Smith Name John Smith Code Password ******* Name ad Surname Acces level Operator Account active Enter user name and press button to confirm.
- Page 17 9.3. Proximity sensors setup Prior to balance proximity sensors setup, log in as Administrator (point 9.1.). You can assign the proximity sensors with different functions for each working mode (the sensors will trigger different operation for each working mode). See the below procedure of sensors setup for the weighing mode. Admin Weighing Admin...
- Page 18 10. PERIPHERAL DEVICES CONNECTORS PLC controller Stack-light DB15 RFID reader Barcode scanner THB ambient Printer conditions sensor Wi-Fi® is a registered trademark of Wi-Fi® Alliance.
-
Page 19: Device Cleaning
11. DEVICE CLEANING 11.1. Guidelines and precautions Prior to cleaning it is necessary to Use soft cloth made of either natural or Apply the cleanser onto the cloth. Mind disconnect the device from the mains! synthetic fiber exclusively. Avoid using not to apply the cleanser directly onto Remove the plug from the outlet, cloth made of stiff/hard fabric, this... - Page 20 11.3. Weighing chamber elements disassembly Prior disassembling weighing chamber elements make sure the balance is turned off and unplugged from the mains. When disassembling the elements, use tweezers that come standard with the instrument. Model: XA 4Y PLUS Press the latches on the sides of the front pane and pull the pane up. Pull the front pane up.
- Page 21 Models: XA 4Y.M.A PLUS | XA 4Y.A | XA 4Y PLUS Grab the grips of the back pane Pull the top pane out. and pull it out. Press the latch under the door Pull the side door out. to release the lock.
Need help?
Do you have a question about the XA 4Y.M.A PLUS and is the answer not in the manual?
Questions and answers