
Related Manuals for Challenge PADDY WAGON


Summary of Contents for Challenge PADDY WAGON
- Page 1 CHALLENGE PADDY WAGON PADDING PRESS Instruction Manual Provided By http://www.MyBinding.com http://www.MyBindingBlog.com...
- Page 2 NSTRUCTION AND ARTS ANUAL PADDY WAGON ® PADDING PRESS Sold and Serviced by The Challenge Machinery Company 6125 Norton Center Drive Norton Shores, MI 49441-6081 USA ChallengeMachinery.com F.1722-B August 2000...
-
Page 3: Introduction
Be sure to fill out the warranty card accompanying your machine and return it DIRECTLY TO CHALLENGE. If you bought a used machine, it is important to have the following information on record at Challenge. Copy this page, fill in the information and send it care of The Challenge Service Department, 6125 Norton Center Drive •... -
Page 4: Table Of Contents
1.0 Introduction TABLE OF CONTENTS 1.0 Introduction............................2 2.0 Safety ............................... 4 2.1 Precautions ..........................4 3.0 Packing List ............................5 4.0 Specifications ........................... 6 5.0 Assembly Instructions ........................7 6.0 Operating Instructions ........................13 7.0 Padding Tips........................... 16 8.0 Drawings & Schematics ......................... 17 8.1 Main Assembly –... -
Page 5: Safety
KEEP THE FLOOR around the machine free of trim, debris, oil and grease. • If the machine operates unusually, have it checked by a qualified service person or your Authorized Challenge Dealer. • DO NOT STAND OR SIT ON THE MACHINE. -
Page 6: Packing List
3.0 Packing List 3.0 Packing List Part No. Description Qty. 7402 Table Assembly A-7410 Stand Assembly S-1886-1 End Caps, Top S-1886 End Caps, Bottom 7411 Clamp Bar S-1881 Caster W-175 Caster Wrench S-1883 Handle A-7422-1 Stop Rod Assembly 7426 Plastic Handle, Stop Rod 7427 Plated Spacer S-1729-8... -
Page 7: Specifications
30” x 30” 76 x 76cm Height 66” 168cm Net Weight (@) 100lbs. 45kg Shipping Weight (@) 120lbs. 55kg Challenge reserves the right to make changes to any product or specification without notice and without incurring responsibility to existing units. -
Page 8: Assembly Instructions
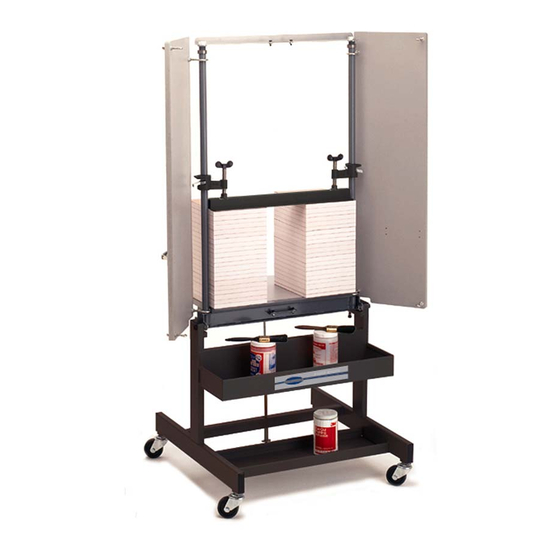
5.0 Assembly Instructions 5.0 Assembly Instructions You will need the following tools to assemble your Paddy Wagon: • Phillips Screwdriver; • 1/4” Hex Wrench and; • 9/16” Open End Wrench. Immediately after unpacking, check off parts received against the packing list (Figure 1 on page 5 &... - Page 9 5.0 Assembly Instructions Install the four casters into the bottom of the stand and tighten with the caster wrench supplied, Figure 4. Figure 4 Set the stand assembly upright, position the table assembly on the stand and while one person holds the table assembly, Figure 5.
- Page 10 5.0 Assembly Instructions The other person should insert the pivot screw with a large washer between the stand and the table frames, Figure 6. Figure 6 Place a second large washer on the bolt, then secure one of the smaller washers with one of the hex nuts.
- Page 11 5.0 Assembly Instructions Attach the Stop Rod to the bottom of the table with the pin and “E” rings. Use the two remaining 3/8” washers between the “U” and the brace if necessary to fill the gap, Figure 9. Figure 9 Thread a hex nut onto the Stop Rod all the way to the top of the threads, Figure 10.
- Page 12 5.0 Assembly Instructions side to side in the same direction as the center brace. If necessary, loosen the nut slightly, reposition the weld-nut and tighten the nut. (Figure 11 on page 10shows the weld-nut in the vertical-lock position.) Figure 12 shows the Stopper in the Tilt position. Figure 12 To release the locking mechanism, lift up on the handle and tilt the top of padder back, Figure 13.
- Page 13 5.0 Assembly Instructions These are used as stops when the padder is in the vertical position. These should be adjusted to prevent uneven alignment of the padder. Tilt the padder to the vertical position and tighten the screws until they make contact and adjust them so they have equal pressure on each side. Then tighten the jam nuts.
-
Page 14: Operating Instructions
6.0 Operating Instructions 6.0 Operating Instructions Always lower top section slowly. Do not allow top to free-fall into position. Lift the stop rod to tilt the machine forward, load the paper against the doors and the side pipe, tap any loose sheets flush to the doors, Figure 17. You can load the paper to within 5 inches of the top brace and the padder will still be steady. - Page 15 Tighten the wing-screws of the clamps until they are snug, Figure 20. Figure 20 Do not allow the Paddy Wagon to drop into position. Hold as shown in Figure 21 and ease into the upright position. Tilt the padder to the vertical position, as shown, Figure 21.
- Page 16 6.0 Operating Instructions Do not stand on the machine to tilt the top section back into vertical position. Open the doors by lifting the handles and swinging them out, Figure 22. Figure 22 Paint the padding compound on the paper and spread it out thinly and evenly. Let it dry about 10 minutes or until it’s dry to the touch, Figure 23.
-
Page 17: Padding Tips
Loading The Paddy Wagon is on wheels to save you time while handling paper. You can load it directly from the cutter after a trim or you can take it out of the press, jog it, and load it directly into the padder there.
Need help?
Do you have a question about the PADDY WAGON and is the answer not in the manual?
Questions and answers