Advertisement
Quick Links
STEP 1:
Determine Installation Type
Depending upon the requirements, the TT1SPSATsolar can be installed in two
Option1: TT1SPSATsolar ONLY
Option2: TT1SPSATsolar with Input Cable (optional)
The input cable allows for transmission of up to two input statuses, as well as
connecting to a power source
There are two ways the inputs can be connected
Type A: "Dry Contact" – Input without voltage
Type B: "With Voltage" – Input with voltageways.
STEP 2:
Determine Mounting Location
Device should be mounted face up on a flat horizontal surface that is
perpendicular to the sun with a clear view of the sky
Secure with double-sided adhesive tape and/or screw directly to the asset
If using double-sided adhesive tape:
Surface must be clean, smooth and dry
Ambient temperature must be above 10C
Apply at 80lb (350N) force to the asset for a minimum of three seconds to
achieve full bonding strength
Failure to adhere to these instructions could lead to the device becoming
detached from the asset in the field
If using screws:
Use existing mounting holes with four #6 machine screws (Pan head
recommended). Use 316 grade stainless steel for longevity
DO NOT
use countersunk screws as this may damage housing
DO NOT
over-tighten screws (DO NOT exceed 1.2 N.m (10 in.lb) torque)
Mounting hole diameter = 3.81mm (0.150")
These guidelines are meant to maximize
the performance of the unit.
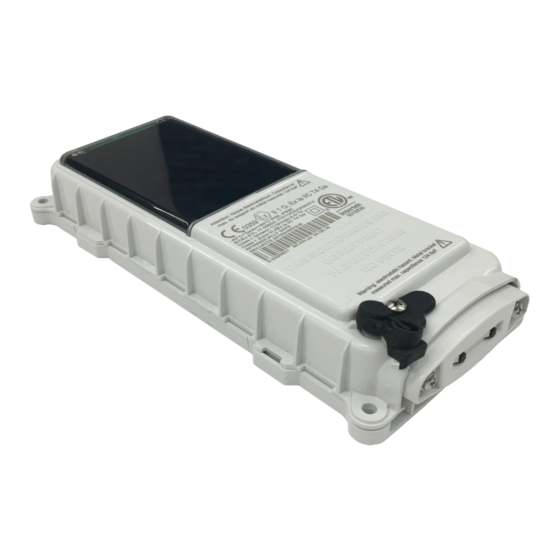
TT1SPSATsolar
STEP 3:
Complete Mounting and Wire Connections (if necessary)
Option 1: Mounting the device WITHOUT Input Cable
a) Mount device as per "Determine Mounting Location" recommendations
b) Proceed to "Testing the Device"
Option 2: Mounting the device WITH Input Cable
a) Connect Input(s) and/or power according to Input Types below
IMPORTANT: The
Input TYPE must be pre-programmed
which method to use, please contact us as incorrect installation may damage the device.
INPUT CONNECTIONS
Type A : "Dry Contact" – Input WITHOUT Voltage
IMPORTANT: If device programmed for Dry Contact input(s) then
TO ANY POWER SOURCE
Doing so may void the warranty.
INPUT1:
Dry Contact 1 (Recommended for Ignition/Engine Status Input)
White:
Ground
Dark Blue:
INPUT2:
Dry Contact 2
Light Blue:
Ground
Green:
Type B : "With Voltage" – Input WITH Voltage
IMPORTANT: If device programmed for "With Voltage" Inputs
INPUT1:
Ignition/Engine Status Input (+) (10 to 48V DC)
White:
Ground
Dark Blue:
INPUT2:
Input 2 (+)
Light Blue:
Ground
Green:
POWER CONNECTION
IMPORTANT: Connect to 10-48V DC Only
Line Power +
Violet (+):
MUST FUSE within 1 foot of source (1 Amp Fuse)
Line Power-
Grey(-):
b) Mount device as per "Determine Mounting Location" recommendations
c) Connect Input Cable into TT1SPSATsolar
d) Tighten Input Cable Connections (Be careful not to over-tighten)
e) Proceed to "Testing the Device"
QUICK INSTALL GUIDE
into the device. If unsure of
DO NOT CONNECT DIRECTLY
connect to 10 to 48V DCI
Advertisement

Related Manuals for TitanGPS TT1SPSATsolar


Summary of Contents for TitanGPS TT1SPSATsolar
- Page 1 STEP 1: Determine Installation Type INPUT CONNECTIONS Depending upon the requirements, the TT1SPSATsolar can be installed in two Type A : “Dry Contact” – Input WITHOUT Voltage Option1: TT1SPSATsolar ONLY IMPORTANT: If device programmed for Dry Contact input(s) then...
- Page 2 IMPORTANT: Always be sure to “test” the device BEFORE sending the asset into the field CARE AND USE The clear plastic on the TT1SPSATsolar should be kept free of soil or debris to NO Input Cable maximize battery charging capacity...
Need help?
Do you have a question about the TT1SPSATsolar and is the answer not in the manual?
Questions and answers