Honeywell Home TuxedoW User Manual
Home automation and security system
Hide thumbs
Also See for TuxedoW:
- Quick installation manual (2 pages) ,
- Quick installation manual (2 pages) ,
- Installation and setup manual (56 pages)
Table of Contents
Advertisement
Quick Links
Advertisement
Table of Contents
Troubleshooting

Related Manuals for Honeywell Home TuxedoW


Summary of Contents for Honeywell Home TuxedoW
- Page 1 TuxedoW Home Automation and Security System User Guide 800- 4/19 Rev. B 25177B...
- Page 2 NOTE: This device is a Security Enabled Z Wave Controller...
-
Page 3: Table Of Contents
Table of Contents INTRODUCTION ......................................1 About this guide ....................................1 Features ......................................1 NAVIGATING THE TUXEDOW INTERFACE ............................2 On the Home screen ................................... 2 System Information ....................................2 Weather Forecast ....................................2 Wi-Fi Cameras ..................................... 2 Icons and Their Meanings ................................... 3 System Trouble Icons .................................. - Page 4 MULTIMEDIA APPLICATION .................................. 17 Slideshow Setup ....................................18 Video Setup ....................................... 19 TIME/DATE SETUP ....................................20 Daylight Savings Time ..................................20 CS SETUP ........................................ 21 USER SETUP ......................................21 Authority Levels ....................................21 How to Add a User .................................... 22 How to Add an Existing User to a Second Keypad ..........................
- Page 5 Creating Scenes with Total Connect ..............................43 Enabling Devices for Total Connect ..............................43 Total Connect Server Screen for Troubleshooting ..........................44 NOTES ON Z-WAVE DEVICES AND TUXEDOW ........................... 44 COMPATIBLE DEVICES ..................................45 WIRELESS RANGE ....................................46 ROUTINE CARE ...................................... 46...
-
Page 7: Introduction
See Introduction to Security System Operation on page for more about the zones on your premises. Total Connect TuxedoW supports the Total Connect remote service for controlling Z-Wave devices and Scenes. For more information, see page 42. -
Page 8: Navigating The Tuxedow Interface
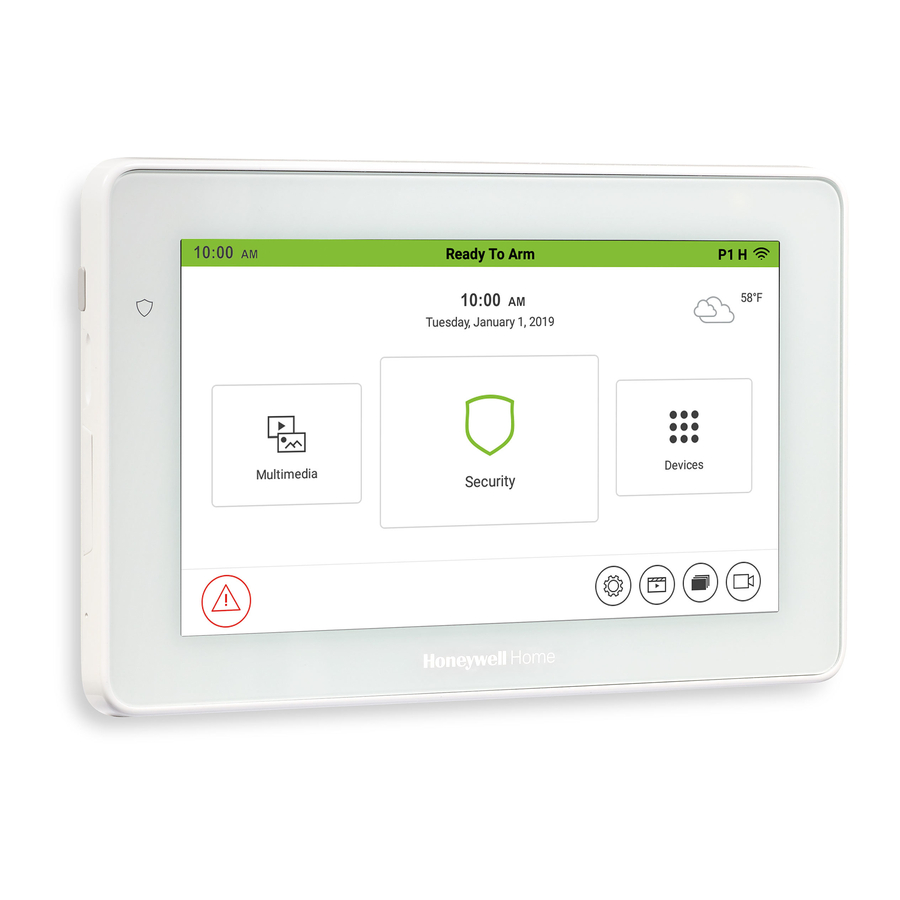
Navigating the TuxedoW interface Working with TuxedoW typically begins on the Home screen. This is the default display you'll see once system setup is complete. By default, the Home screen is displayed at most times; it can be customized via the Multimedia application. -
Page 9: Icons And Their Meanings
TuxedoW Home Automation and Security System User Guide Icons and Their Meanings ICON FUNCTION ICON FUNCTION Authorized Code: Home: Returns display to the Home screen. Use to enter 4-digit user code. Security: When green, arms the system in one Multimedia: of three arming modes. -
Page 10: System Trouble Icons
TuxedoW Home Automation and Security System User Guide System Trouble Icons The Security screen displays one or more of these icons if system troubles occur. If a Trouble icon appears, contact your security professional. ICON FUNCTION AC Loss – The system is not receiving AC power. -
Page 11: User Codes
Safe Mode In the rare event your TuxedoW cannot successfully communicate in its graphic mode with the rest of the system, Safe Mode offers a backup method to ensure that you can operate the system. See Safe Mode on page... -
Page 12: Operating Your Security System
TuxedoW Home Automation and Security System User Guide Operating Your Security System Arming Modes You can enable protection in any of these three arming modes: Away, Stay and Night. Exit Perimeter Interior Mode Function Entry Delay Delay Armed Armed Press to arm when no one is staying on the AWAY premises. -
Page 13: Arming The System
TuxedoW Home Automation and Security System User Guide Arming the System Note: Close all protected exterior ("perimeter") windows and doors before arming. To arm the system: ICON ACTION NOTES 1. From the Home screen, touch the Security icon. NOTE: If Quick Arm is not enabled in your system, a prompt to enter your User Code is displayed. -
Page 14: How To Bypass Zones
TuxedoW Home Automation and Security System User Guide How to Bypass Zones The Bypass function is used when you want to arm the system with one or more zones left open. Bypassed zones are unprotected and do not cause an alarm when violated while the system is armed. -
Page 15: Disarming The System
TuxedoW Home Automation and Security System User Guide Disarming the System IMPORTANT: If you return to your home or business and the main burglary alarm is sounding, DO NOT enter the premises, but call the police from a safe location nearby. If you return to your home or business after an alarm has occurred and the main sounder has shut itself off, the keypad beeps rapidly upon entering, indicating that an alarm has occurred during your absence. - Page 16 TuxedoW Home Automation and Security System User Guide How to Check the Status of Other Partitions This system supports between one and eight Partitions (depending on the system.) Partitioning enables a single physical alarm system to control up to eight areas of protection (partitions) depending on the system you have purchased. Each Touchscreen is assigned a default partition for display purposes and shows only that partition's information.
-
Page 17: Fire And Carbon Monoxide Alarm Operation
TuxedoW Home Automation and Security System User Guide Fire and Carbon Monoxide Alarm Operation Your fire alarm system and carbon monoxide detector (if installed) is on 24 hours a day, providing continuous protection. In the event of an emergency, the installed smoke, heat, carbon monoxide detectors automatically send signals to your Control/Communicator, triggering a loud interrupted sound from the touchscreen. -
Page 18: More Choices
TuxedoW Home Automation and Security System User Guide More Choices How to Clear/Hide a Control Panel Message icon alerts the user to a control panel message. When a Control Panel Message is displayed, the user has two options. The user can clear the message immediately or minimize the window and clear it at a later time. -
Page 19: How To View The Event Log
TuxedoW Home Automation and Security System User Guide How to View the Event Log Your system records events in its operation in a log; each event is logged with the time and date of its occurrence. Logging must be set up by your installer. -
Page 20: Setup
TuxedoW Home Automation and Security System User Guide Setup The Setup screen is used to set your preferences and configure other details of the system's operation. Setup provides access to System Info, System Setup, System Wi-Fi, Account, Display & Audio Setup, Brightness and Volume. -
Page 21: System Wi-Fi
TuxedoW Home Automation and Security System User Guide System Wi-Fi TuxedoW supports the 2.4GHz and 5GHz Wi-Fi standards. ICON ACTION NOTE: If the Wi-Fi network you want to connect to isn't listed, touch the button to scan (or re-scan) the area for available Wi-Fi networks. -
Page 22: Display & Audio
TuxedoW Home Automation and Security System User Guide Display & Audio You may be required to enter your 4-digit user code to access these settings. IMPORTANT: Panic alarms cannot be initiated while the keypad is in cleaning mode ICON ACTION... -
Page 23: Brightness And Volume Controls
Photo and video files are transferred to your system via Micro SD/SDHC memory card (not supplied). The memory card must remain in the TuxedoW in order to use these features. When a memory card is loaded, the icon appears in the upper right corner of the screen. -
Page 24: Slideshow Setup
TuxedoW Home Automation and Security System User Guide Slideshow Setup ICON ACTION NOTES 1. Insert a Micro SD card containing pictures in a Two other still-image options are available from the Multimedia supported file format. menu: • Home screen wallpaper. Select an image and touch 2. -
Page 25: Video Setup
TuxedoW Home Automation and Security System User Guide Video Setup ICON ACTION NOTES 1. Insert a Micro SD card containing videos in a • Select to see only videos on the SD card supported file format. • Select to see videos recorded by connected cameras when triggered by system events such as 2. -
Page 26: Time/Date Setup
TuxedoW Home Automation and Security System User Guide Time/Date Setup • Touch for the touchscreen to set its time display from the security system. For Vista residential and newer commercial systems such as VISTA-128BPT: The system may update the touchscreen's time periodically •... -
Page 27: Cs Setup
TuxedoW Home Automation and Security System User Guide CS Setup These settings are part of the installer's initial setup. They are not accessible to users. User Setup Users of the security system are divided into categories (details below). Each type of user has a different degree of access to the system's functions and features (the user's Authority Level). -
Page 28: How To Add A User
TuxedoW Home Automation and Security System User Guide How to Add a User ICON ACTION NOTES Press the Setup → System Setup → User Setup icons. On the Data Entry screen, enter the user information. • Use the Shift key for capital letters Press and enter the Master User's user code. -
Page 29: Advanced Setup
TuxedoW Home Automation and Security System User Guide Advanced Setup On the Home screen touch Setup , then on the Setup screen, touch System Setup . Next, on the System Setup screen, touch Advanced Setup Power Mode Setup ICON ACTION NOTES 1. -
Page 30: End-User License
TuxedoW Home Automation and Security System User Guide End-User License To review the Privacy Statement and End-User License Agreement (EULA), do this: ICON ACTION On the Advanced Setup screen, touch The EULA is displayed. Factory Default To restore the keypad to factory defaults, do this:... - Page 31 TuxedoW Home Automation and Security System User Guide NOTE: Use caution when responding Yes or No. Pressing the screen outside the area of the Yes and No buttons may cause them to be obscured by another part of the display. If this occurs, the touchscreen continues its 30 second countdown and resets to Normal Mode (or Safe Mode if this is the third time that the warning message appeared).
-
Page 32: Tuxedo Sync
TuxedoW Home Automation and Security System User Guide Tuxedo Sync To access the Device Synchronize Management screen, press the Tuxedo Sync icon. Use the Discover option to detect other TuxedoW panels on the same network. Other panels discovered appear in a list. ICON Function... -
Page 33: Quick Programming
TuxedoW Home Automation and Security System User Guide Quick Programming Used by the dealer to program the security system. Requires Installer-level access. Controller Initial To access the Controller Initial Setup Wizard, touch ICON ACTION Step 1: Wi-Fi Setup Select a network from the list of available networks and enter the password OR:... -
Page 34: Automation
TuxedoW Home Automation and Security System User Guide Automation TuxedoW uses Z-Wave technology to automate devices in a home control network. To view videos about Tuxedo setup, press in the lower right corner of the Home screen. Follow the instructions beginning on page to Enroll (add) devices into your home control network. -
Page 35: Including (Adding) Z-Wave Devices In Your System
TuxedoW Home Automation and Security System User Guide Including (Adding) Z-Wave Devices in Your System Each device must be installed according to the manufacturer’s instructions. WARNING Automation is intended for lifestyle convenience. Do not use automation for life safety and property protection. -
Page 36: Including A Z-Wave Door Lock
The Inclusion process should be carried out within 5 ft of the keypad. NOTE: When setting a user code, program it into TuxedoW before programming it into the door lock. User codes must be 4 digits. Include the lock as follows:... -
Page 37: Wi-Fi Thermostat Programming
Removing a Thermostat and/or Account Association To disconnect a Wi-Fi thermostat from TuxedoW, you must delete the thermostat from your Total Connect Comfort account. The thermostat will no longer appear once Total Connect has performed a routine synchronization of its information with your system. -
Page 38: Excluding (Removing) Z-Wave Devices In Your System
TuxedoW Home Automation and Security System User Guide Excluding (Removing) Z-Wave Devices in Your System Note that individual Z-Wave devices are sometimes referred to as nodes in the Z-Wave network. Excluding a Light, Switch or Outlet Module ICON ACTION NOTES •... -
Page 39: Excluding A Door Lock
3. On the door lock, press the Function button to remove that lock will remain in the system. For more information, the device from the keypad. refer to the TuxedoW Installation and Setup Guide, Resideo document 800-25176. Abort a Z-Wave Action... -
Page 40: Device Setup
TuxedoW Home Automation and Security System User Guide Device Setup ICON ACTION NOTES 1. On the Home screen, press the Devices and then Setup Every Z-Wave enabled device has a maximum number of icons to display the Z-Wave Device Management screen secondary controllers to which it can send updates. -
Page 41: Default The Z-Wave Controller
TuxedoW Home Automation and Security System User Guide Default the Z-Wave Controller ICON ACTION NOTES 1. On the Home screen, press the Devices and then Setup This procedure performs a Z-Wave Set Default icons to display the Z-Wave Device Management screen command. -
Page 42: Scene Setup
TuxedoW Home Automation and Security System User Guide Scene Setup Scenes are used to control connected devices when the system receives a user-defined trigger. The trigger can be the system's clock and calendar, or the condition of connected devices (locked/unlocked, lights on or off, thermostats reaching a pre-defined temperature). -
Page 43: Sample Scene
TuxedoW Home Automation and Security System User Guide Sample Scene Let's say you want to have lights turn on when the system is disarmed, but only at night. Make these settings: Condition Define "only at night" by entering Start and End times... - Page 44 TuxedoW Home Automation and Security System User Guide Triggers In the Trigger box, press the Add icon To set the time, press the TIME button: “Set the occurrence” to Repeated, or Once. If “Repeated” was selected, choose the desired •...
- Page 45 TuxedoW Home Automation and Security System User Guide NOTES: Motorized door lock bolts physically lock and unlock the door when activated, but if the door lock installed is a non-motorized type, activation allows the door to be manually unlocked without a key. See Compatible Devices on page for more information.
-
Page 46: Create A Room
Save Setting a Secondary (Keypad) Controller After all Z-Wave devices have been enrolled with the main TuxedoW touchscreen functioning as primary Z-Wave controller, the enrollment information can be copied to another keypad that serves as a secondary Z-Wave controller. Note that as many as 232 secondary controllers can be added. -
Page 47: Updating Controllers (Keypads) With New Or Removed Devices
PROBLEM SOLUTION Cannot add new Make sure the Z-Wave device is within range of the TuxedoW touchscreen; you may need to move the device. device closer to the keypad. Refer to the Z-Wave device's instructions for the recommended distance. 1. At the TuxedoW touchscreen: a. -
Page 48: Total Connect
Scenes created at the TuxedoW keypad cannot be viewed from Total Connect. o Scenes created in Total Connect can be viewed from either Total Connect or directly from TuxedoW's Scenes screen. o Scenes created in Total Connect can be edited only via Total Connect. -
Page 49: Controlling Automation (Z-Wave) Devices Remotely
NOTE: Scenes created in Total Connect can be edited only from Total Connect. 2. After scenes have been created, follow the prompts to synchronize the data with TuxedoW. Syncing is required before scenes created in Total Connect will display on the TuxedoW screen. -
Page 50: Total Connect Server Screen For Troubleshooting
3. Press the Connect icon to test the connection to the AlarmNet servers. Notes on Z-Wave Devices and TuxedoW 1. TuxedoW ignores Z-Wave Basic Command Class commands it receives, but it will send Basic Command Class commands to some devices, depending on their capabilities. -
Page 51: Compatible Devices
TuxedoW Home Automation and Security System User Guide Compatible Devices Z-Wave devices may vary; follow the instructions for your specific device when adding and deleting devices into the Z-Wave network. Refer to the table below for some of the compatible devices. -
Page 52: Wireless Range
TuxedoW Home Automation and Security System User Guide Wireless Range Things to consider regarding RF range: Each wall or obstacle (such as refrigerators, big screen TVs, etc.) between the remote and the destination device will reduce the maximum range of 100 feet (30 meters) by approximately 25-30%. -
Page 53: Two Year Limited Warranty
TuxedoW Home Automation and Security System User Guide Two Year Limited Warranty Limited Warranty. General Subject to the terms and conditions of this Limited Warranty and except as provided in Section 1(b), Seller warrants its products to be free from defects in materials and workmanship under normal use and service, normal wear and tear excepted, for 24 months from the manufacture date code;... - Page 54 TuxedoW Home Automation and Security System User Guide Continued from the previous page Be sure to have the model number, serial number, and the nature of the problem available for the customer service representative. Prior authorization MUST be obtained for all returns, exchanges, or credits.
- Page 55 TuxedoW Home Automation and Security System User Guide FEDERAL COMMUNICATIONS COMMISSION (FCC) & INDUSTRY CANADA (IC) STATEMENTS The user shall not make any changes or modifications to the equipment unless authorized by the Installation Instructions or User's Manual. Unauthorized changes or modifications could void the user's authority to operate the equipment.
- Page 56 2 Corporate Center Drive, Suite 100 www.resideo.com P.O. Box 9040, Melville, NY 11747 © 2021 Resideo Technologies, Inc. All rights reserved. The Honeywell Home Trademark is used under license from Honeywell International Inc. 800-25177B 4/19 Rev. B This product manufactured by Resideo and its affiliates.
Need help?
Do you have a question about the TuxedoW and is the answer not in the manual?
Questions and answers