Honeywell Home ADEMCO VISTA-V21SIALTE Installation And Setup Manual
Hide thumbs
Also See for ADEMCO VISTA-V21SIALTE:
- Programming manual (36 pages) ,
- Quick manual (2 pages)

Related Manuals for Honeywell Home ADEMCO VISTA-V21SIALTE


Summary of Contents for Honeywell Home ADEMCO VISTA-V21SIALTE
- Page 1 ADEMCO VISTA SERIES VISTA-21iPLTE/V21SIALTE Security Systems Installation and Setup Guide 800-25358V1A 8/19 Rev A...
- Page 2 RECOMMENDATIONS FOR PROPER PROTECTION The Following Recommendations for the Location of Fire and Burglary Detection Devices Help Provide Proper Coverage for the Protected Premises. Recommendations For Smoke And Heat Detectors With regard to the number and placement of smoke/heat detectors, we subscribe to the recommendations contained in the National Fire Protection Association's (NFPA) Standard #72 noted below.
-
Page 3: Table Of Contents
Table of Contents Features and Installation Highlights ........................1 Capabilities and Functions ........................... 1 Compatible Devices.............................. 2 Important Installation Highlights (Installer Please Read) ..................2 Mounting and Wiring the Control ........................... 3 Installing the Control Cabinet and PC Board ....................... 3 Cabinet and Lock ............................ - Page 4 Data Field Programming ............................25 About Data Field Programming .......................... 25 System Setup Fields ( ∗ 20 – ∗29) ........................25 Zone Sounds & Timing (∗31–∗39) ........................26 Dialer Programming ( ∗ 40 – ∗ 50) ........................26 System Status Report Codes ..........................28 Miscellaneous System Fields ..........................
-
Page 5: Features And Installation Highlights
False Alarm Reduction. The V21SIALTE is not certified as SIA-compliant, but can be programmed for False Alarm Reduction. To program for False Alarm Reduction, follow the SIA Guidelines noted in the applicable programming fields. NOTE: Throughout this manual, device model numbers are Honeywell Home model numbers unless otherwise noted. Capabilities and Functions... -
Page 6: Compatible Devices
Program output functions via *80 Menu mode. Audio Alarm Verification Using AAV Honeywell Home AVS system can be used to permit voice dialog module between an operator at the central station and a person at the premises via phone line... -
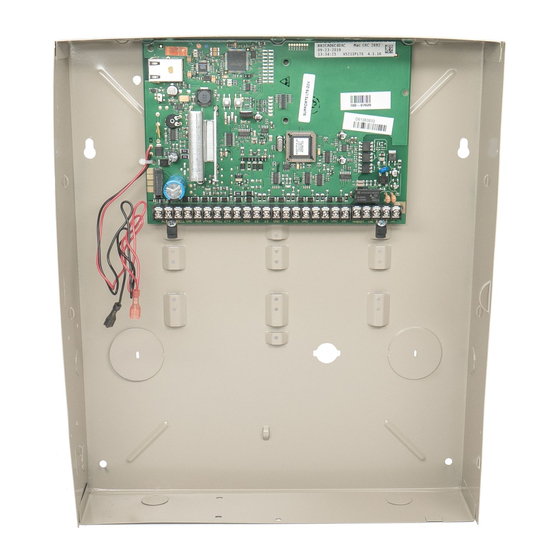
Page 7: Mounting And Wiring The Control
S E C T I O N Mounting and Wiring the Control Installing the Control Cabinet and PC Board Cabinet and Lock 1. Mount the control cabinet to a sturdy wall in a clean, dry area, which is not readily accessible to the general public, using fasteners or anchors (not supplied) with the four cabinet mounting holes. -
Page 8: Auxiliary Device Current Draw Worksheet
Installation and Setup Guide Figure 3. Mounting the PC Board and RF Receiver AUXILIARY DEVICE CURRENT DRAW WORKSHEET DEVICE CURRENT No. UNITS TOTAL CURRENT 6150 Fixed-Word Keypad 40mA/70mA** 6160 Alpha Keypad 40mA/150mA** 6160V Alpha Display Voice Keypad 60mA/190mA** 6280 Touch Screen Keypad 180mA/280mA** Tuxedo Touch™... -
Page 9: Ac Power, Battery, And Ground Connections
Mounting and Wiring AC Power, Battery, and Ground Connections Wire Run Chart 1361-GT Transformer Connect the 1361-GT Transformer (1361CN-GT in Canada) to terminals 1 and Distance from control Wire Size 2 on the control board. See Wire Run Chart for wire size to use. Up to 50 feet # 20 •... -
Page 10: Sounder (Bell) Connections
Installation and Setup Guide Sounder (Bell) Connections Basic Connections 1. Make sounder connections to alarm output terminals 3 (+) and 4 (–). 2. If not using bell supervision, connect the supplied 820 ohm resistor across terminals 3 and 4. If using bell supervision, see Supervised Output paragraph below. •... -
Page 11: Keypad Notes
Mounting and Wiring Keypad Notes Set device addresses. Refer to the instructions included with the devices and set each address according to the Table of Device Addresses. See Keypad Programming Fields (fields *190-*196) in Section 4. Data Field Programming for details on enabling keypad addresses, assigning keypad partitions and selecting keypad sounding options. -
Page 12: Hardwire Zones And Zone Expansion
Installation and Setup Guide Hardwire Zones and Zone Expansion Hardwire Zones Normally Open Zones/ N.O. EOLR Zones 1. Connect open circuit devices in parallel across the loop; for EOLR zones, connect the EOLR across the loop wires at the last device. 2. -
Page 13: Smoke Detectors
Mounting and Wiring Smoke Detectors 1. Connect up to 16 (10, if ESL “clean me” option used) 2-wire smoke detectors across zone 1 terminals 8 (+) and 9 (-) as shown in the Summary of Connections diagram at the back this manual. Observe proper polarity when connecting the detectors. 2. -
Page 14: Installing The Rf Receiver And Wireless Transmitter Zones
Installation and Setup Guide Installing the RF Receiver and Wireless Transmitter Zones Compatible Use any ADEMCO 5800 Series Wireless Receivers, such as: Receivers RF Receiver No. of Zones 5881ENL up to 8 5881ENM, 6150RF up to 16 5881ENH, 5883H, up to 40 plus 16 buttons 6160RF Receiver 1. -
Page 15: Installing The Transmitters
Mounting and Wiring Installing the • Refer to the table of compatible devices at the back of this manual. Transmitters • Supervised transmitters† send check-in signals to the receiver at 70-90 minute intervals. If at least one check-in message is not received from each transmitter within a 12-hour period, the “missing”... -
Page 16: Installing A Keyswitch
Installation and Setup Guide Installing a Keyswitch Keyswitch Connections 1. Connect the keyswitch's normally open momentary switch to a zone’s (2-8) terminals. Remove the 2000 ohm EOL resistor if connected across the selected zone. 2. Using a standard keypad cable as shown: Connect the yellow and white keyswitch wires to trigger connector pin 3 (+12V). -
Page 17: Connecting Relay Modules And Output Triggers
Mounting and Wiring Connecting Relay Modules and Output Triggers 4204/4229 Relay Modules 1. Mount either remotely or in the control panel cabinet. 2. Connect each module to the control’s keypad terminals and set the device addresses as previously described in the Connecting Keypads and Other Addressable Device section. -
Page 18: On-Board Triggers
Installation and Setup Guide On-Board Triggers Connect field wiring to the desired trigger pin on the 8-pin trigger connector centrally located above the terminal strip. • If only using the on-board triggers, you can use a 4-wire cable (N4632-4, supplied with the control) as shown below. -
Page 19: Audio Alarm Verification Connections
Mounting and Wiring Audio Alarm Verification Using the AVS System with AVS Module and AVST Remote Stations Connections The AVS system provides audio alarm verification via the phone line. (AVS System) Refer to the instructions included with the AVS system for installation procedures. The following is a summary. - Page 20 Installation and Setup Guide Figure 18. Connections for the AVS System...
-
Page 21: Internet (Ip) Connection
Mounting and Wiring Internet (IP) Connection Connection to the Internet can be made via hardwired high speed Internet connection and/or via an optional on-board LTE-21V module (using the wireless digital cellular network). Use ∗29 Menu mode to program various internet reporting and supervision options. Hardwire Internet Connection: Connect an active Ethernet cable (with RJ45 connector) to the IP connector on the upper left corner of the control board. - Page 22 Installation and Setup Guide 2. Install the Antenna Adapter Plates. a. Punch out the large wiring hole knockout and the adjacent smaller knockout from the cabinet’s upper-right and left topside. b. Position the antenna adapter plate over the large knockout, aligning the plate’s pin with the smaller knockout and push until the adapter snaps into place.
-
Page 23: Ip/Cell Status Leds
Mounting and Wiring IP/Cell Status There are three status LEDs used to indicate IP/Cell message and internal device status: LEDs • STATUS, green • MESSAGE, yellow • FAULT, red Each LED can have four different states - ON, OFF, FAST BLINK and SLOW BLINK. IP/Cell Status LED Meanings COLOR/LED DESCRIPTION... -
Page 24: Signal Strength And Status Led Locations - Status Led Functions Table
Installation and Setup Guide Signal Strength and Status LED Meanings Color Label Indication Signal on = signal quality display Quality off = status display Yellow Mode off = module operating in ECP mode Green Mode off = module operating in ECP mode Green web connection status ON = connected to web... -
Page 25: Programming Overview
S E C T I O N Programming Overview About Programming • You can program the system at any time, even at the installer's premises prior to the actual installation. • Programming can also be performed remotely from the installer’s office/home, using a personal computer, a modem, and Compass downloading software. -
Page 26: Interactive Mode Programming (∗56, *57, ∗58, ∗79, ∗80, ∗81, ∗82)
Installation and Setup Guide Interactive Mode Programming (∗56, *57, ∗58, ∗79, ∗80, ∗81, ∗82) Entering Interactive Mode Press [ ∗ ] + [Interactive Mode No.] (for example, ∗ 56) while in Program Mode. The Alpha display keypad will display the first of a series of prompts. After making the appropriate entry, press the [∗] key to accept the entry and continue to the next prompt. - Page 27 Programming Overview Type 05 • Assign to a zone that contains a foil-protected door or window (such as in a store), or to a zone Trouble by Day/ covering a sensitive area such as a stock room, drug supply room, etc. Alarm by Night •...
- Page 28 Installation and Setup Guide Type 23 * • Can be used on a zone when an output relay action is desired, but with no accompanying alarm No Alarm (e.g., lobby door access). Response Type 24 • Usually assigned to all sensors or contacts on exterior doors and windows where bells and/or Silent Burglary sirens are NOT desired.
-
Page 29: Data Field Programming
Data Field Programming S E C T I O N Data Field Programming About Data Field Programming The following pages list this control’s data fields in numerical order. Valid entries for each field are shown in italics. Explanations and special notes are presented below the entries. Use the separate Programming Guide to record the data for this installation. -
Page 30: Zone Sounds & Timing (∗31-∗39)
Installation and Setup Guide Zone Sounds & Timing (∗31–∗39) Audible Exit Warning 0 = no; 1 = yes Single Alarm Sounding Per Zone (per armed period) Warning sound consists of slow continuous beeps until the 0 = no limit on alarm sounding per zone last 10 seconds, and then it changes to fast beeps. - Page 31 Data Field Programming Primary/Secondary Account Numbers SESCOA/Radionics Select 0 = Radionics (0-9, B-F); 1 = SESCOA (0-9 only) Enter 4 or 10 digits, depending on selection in Select SESCOA or Radionics format. *48 Report Format field. Enter 0–9; # + 11 = B, Select 0 for all other formats.
-
Page 32: System Status Report Codes
Installation and Setup Guide Expert Zone Programming Menu Mode Trouble Report Code For quickly programming zone information, but is (0 = no report; 1-F = see description above *59 recommended only for those already familiar with *56 Sent if a zone has a trouble condition. See UL System menu mode. -
Page 33: Miscellaneous System Fields
Data Field Programming RF Xmtr Low Batt. Restore Code Recent Closing Report V21SIALTE only 0 = no report; 1-F = see description above *59 Always enabled. Field does not apply to other controls. Sent when a transmitter’s low battery condition is restored Similar to the Exit Error condition described in field *59, (i.e., new battery installed). - Page 34 Downloader AAV “Listen in” session cannot take place. UL installations using the AAV feature must use the Honeywell Home AVS system. Exit Delay Restart/Reset must be disabled. † pressing [∗] + [#] within 50 seconds of power up SIA Guidelines: Exit delay should be enabled.
-
Page 35: Pager Programming Fields
Data Field Programming Phone Line Monitor Enable (continued) Command to Initialize CSID and Subscriber Entry 1: Sets the length of time a phone line fault must Account Number remain after detected before the second digit option is Use this command, if necessary, to reset all subscriber activated. -
Page 36: Miscellaneous System Fields
Installation and Setup Guide *160 *167 Pager 1 Phone No. Pager 3 Characters Enter up to 20 digits. Enter up to 16 characters If entering fewer than 20 digits, exit by pressing [∗] + next See field ∗161 for explanation of entries. If fewer than 16 field number. -
Page 37: Configurable Zone Type Fields
Data Field Programming Configurable Zone Type Fields Configurable Zone Type Options Auto Restore (entry 2): Faults on zones set for this option are • The system allows you to define up to four custom zone cleared; restore messages sent upon restoral of faults. types based on the options described at right. - Page 38 Installation and Setup Guide Configurable Zone Type Charts ENTRY 1 ENTRY 2 Response when system disarmed and zone is: Auto Intact EOL Open Shorted Restore Vent Zone RF zone normal RF zone N/A RF zn off-normal 0 = normal 0 = normal 0 = normal 0 = no 0 = no...
-
Page 39: Touch Screen Keypad (Aui) Enable
Data Field Programming Touch Screen Keypad (AUI) Enable Keypad Programming Fields The system supports up to four touch screen style To enable keypads: keypads (e.g., 6280, and Tuxedo Touch Screen keypad). 1. Set desired address at keypad (refer to keypad’s instructions for setting the address). - Page 40 Installation and Setup Guide *191 *197 Keypad 3 Device Address 18 Exit Time Display Interval See field *190 for entries and explanation. 0 = no display; 1-5 = seconds between display updates If enabled, keypads display the exit time remaining after *192 arming the system, updated at the interval selected (i.e.
-
Page 41: Menu Mode Programming
Data Field Programming S E C T I O N Menu Mode Programming ∗29 Menu Mode for IP and Cell Module Programming This mode is for programming the Internet connection (IP) and optional LTE-21V Module configuration, collectively referred to as the Internal Device. NOTE: The Internal Device is automatically set to address 3 and cannot be changed. - Page 42 Installation and Setup Guide Internal Device (Ip and Cell) Default Values The programming default values for ∗29 Menu Mode are listed in the Table below. OPTION STANDARD DEFAULT VALUE ACTUAL ENTRY Internal Device Multi-Mode disabled Multi-Mode Address ?? (if Multi-Mode enabled) Primary City ID Primary CS ID Primary Sub ID...
- Page 43 Menu Mode Programming Internal Device Programming Prompts The keys used to select and enter options now follow 7720P keypad emulation. Refer to the table on the previous page for detailed key functions. The following is a summary: [B] = scroll to next prompt or shift-[B] scroll to previous prompt [∗] = scroll the options of a particular prompt [C] = answer No or shift-[C] answer Yes to prompt [#] = accept the entry and move to the next prompt...
- Page 44 Installation and Setup Guide Primary Subscriber ID P r i m a r y S u b I D 0001-9999 (decimal) ( ? ? ? ? ) Enter the 4-digit customer account number. Remote Access R e m o t e A c c e s s Y / N This feature is available only after authorization for it is set via the web-based programming tool ( N ) on the AlarmNet 360 website.
- Page 45 Menu Mode Programming IP Fault Time I P F a u l t T i m e Appears only if IP or IP & Cell is selected as Internal Device option. ( 0 0 m i n s ) 00-99 = time delay (in minutes) before the control notifies the central station that there is a loss of contact with the network over the Ethernet (IP) connection.
- Page 46 Installation and Setup Guide Review (and Exit ∗29 Menu mode or Reset Defaults) R e v i e w? Y / N You can review the ∗29 Menu mode options to ensure that the correct responses have been made. When satisfied with entries, select [N] to exit ∗29 Menu mode. To review prompts or exit ∗29 Menu mode: [Y] = review prompts and entries, starting with Internal Device.
-
Page 47: Ip/Cell Diagnostic Commands (∗29 Menu Mode)
Menu Mode Programming Programming IP/Cell Options via AlarmNet 360 Website To program the IP/Cell options via the AlarmNet 360 website (if you are already signed up for this service), go to: www.alarmnet360.com Log in and follow the on-screen prompts. Please have the following information available: 1. - Page 48 Installation and Setup Guide IP/Cell Diagnostic Commands (continued) LTE Status Displays Cellular Status Display Screen 1 SigQual REG LTE/3G ***** RAT – Radio Access Technology. – LTE or 3G SigQual – Signal Quality (1-5 “*”) REG – Registration status where “x” can be: RSRP: RSRQ: Greater than -85dBm = 5 stars...
- Page 49 Menu Mode Programming Operating with 3G Service Signal Display for 3G RAT RSCP EC/No RAT – Radio Access Technology. -xxx -xxxxxx RSCP –Received Signal Code Power Ec/N0 – Carrier Noise Ratio (CNR) Press the [space] key to get to the next screen. Press the [backspace] key to go to the previous field.
-
Page 50: Registering The Control With Alarmnet
Registering the Control with AlarmNet The control must be registered with AlarmNet before internet communication (via IP or Cell) can occur. To register, the control must be connected to the Internet. Register the control by using one of these methods: Register by phone 1. -
Page 51: Zones And Partitions
Menu Mode Programming Zones and Partitions Each protection zone needs to be programmed with various attributes using *56 Zone Programming mode or Expert Programming Mode. The system can control two independent areas of protection (known as partitions) for use by independent users, if desired, by simply assigning zones to one or the other partition during zone programming. - Page 52 Installation and Setup Guide Zone Number Enter Zn Num. wired 01-08 (and 09-48†); wireless 09-48; RF button zones 49-64 (00 = Quit) 91 = addr. device report enable; 92 = duress report enable; 95, 96, 99 =emerg. zones ∗ ] to continue; 00 to quit †...
- Page 53 Menu Mode Programming Input Device Type (In) 10 INPUT TYPE 2 = AW (Aux wired zone) RF TRANS 3 = RF (supervised RF transmitter) 4 = UR (unsupervised RF transmitter) 5 = Button type RF transmitter (unsupervised). ∗ ] to continue This prompt is skipped for zones 2-8, or 2-16 if zone-doubling was enabled at “Hardwire Type”...
-
Page 54: Completing Zone Programming
Installation and Setup Guide If Serial or Loop Numbers do not match after activating the transmitter E n t d A 0 2 2 - 4 0 6 3 1 ∗ ] to continue R c v d A 0 2 2 - 4 0 6 4 1 If the serial number transmitted does not match the serial number entered, a display similar to the one shown appears. - Page 55 Menu Mode Programming Summary Screen Zn ZT P RC HW: RT ∗ 01-64 = zone number; [ ] to continue; 00 = quit 01 09 1 10 OR [D] to go to prompts for wireless key programming templates A summary screen appears, showing zone 1’s currently programmed values. Enter the zone number being programmed, then press [∗], which displays a summary screen Zn ZT P RC IN: L for that zone.
-
Page 56: Wireless Key (Key Fob) Programming & Templates
Installation and Setup Guide If Serial or Loop Numbers do not match after activating the transmitter Entd A022-4063 ∗ ] to continue Rcvd A022-4064 If the serial/loop number combination transmitted does not match the serial and loop number entered, a display similar to the one below will appear. If the loop number does not match, it will also be displayed. - Page 57 Menu Mode Programming Serial Number INPUT S/N • Manually enter the serial number printed on the label for the wireless key or press and AXXX-XXXX – release the button to transmit its serial number. • Press [∗] to accept the serial number. The system will check for a duplicate. •...
-
Page 58: About Output Device Programming (*79/*80 Menu Mode)
Installation and Setup Guide About Output Device Programming (*79/*80 Menu Mode) Output Devices: The system supports up to 16 relays and/or Powerline Carrier devices (X-10 devices) plus 2 built-in trigger outputs in any combination. These 18 “outputs” are assigned to system- wide output numbers (01-18). - Page 59 Menu Mode Programming Start Output Device Mapping by pressing *79 while in Data Programming Mode. ∗79 Output Device Menu Mode Device Output Number ENTER OUTPUT NO. 01-18 = relays 00 = QUIT ∗ ] to continue; 00 to quit This is the logical (or reference) relay number as used in the system. Relays are numbered 01- 16;...
-
Page 60: *80 Menu Mode: Defining Output Functions
Installation and Setup Guide Relay Position XX REL POSITION 1-4 = relay position ∗ ] to continue This is the actual (or physical) relay number with respect to the Relay Module upon which it is located. For 4204 modules, relay numbers are 1-4. For 4229 modules, relay numbers are 1-2. The system returns to the Output Number prompt for programming the next device. - Page 61 Menu Mode Programming Activated By 01 Activated By: 0 = delete Zone List 1 = zone list (go to “A” prompt) 2 = zone type (go to “B” prompt) 3 = zone number (go to “C” prompt;) ∗ ] to continue Select where the initiating event for this output definition is to occur as follows: If you enter “0,”...
-
Page 62: About Zone Lists (*81 Menu Mode)
Installation and Setup Guide “C” Zone Number (prompt appears if zone number was selected) 01 Enter Zn No. Enter the desired zone number associated with this output number. Press [ * ] to continue. Enter the zone event that will activate this output. 01 Enter Event 0 = restore;... -
Page 63: Zone List Programming
Menu Mode Programming Zone List Programming 1. Select an appropriate zone list number. 2. Add the desired zone numbers to be included in that list. Start Zone List Program Mode by pressing * 81 while in Data Programming mode. *81 Menu Mode Zone List Number Zone List No. -
Page 64: About Function Keys (*57 Menu Mode)
Installation and Setup Guide About Function Keys (*57 Menu Mode) The system provides the ability to program each of the four keypad function keys to perform one of 12 system operations. The end user can then activate the function by simply pressing and holding the programmed key for 2 seconds. -
Page 65: About Descriptor Programming (*82 Menu Mode)
Menu Mode Programming About Descriptor Programming (*82 Menu Mode) The system lets you assign zone descriptors for protection zones, keypad panics, and RF receiver supervision faults. Each description can be composed of a combination of words (up to 3) selected from a vocabulary of 196 words stored in memory (see a following page). -
Page 66: Adding Custom Words (Will Not Be Annunciated By A Voice Keypad)
Installation and Setup Guide Accept First Word Z N 0 1 B A C K 6 = save word and go to next word in this descriptor; 8 = save word and go to next zone Press [6] to accept the selected word and continue to the next word, or press [8] if this is the only word you are using for the descriptor. - Page 67 Menu Mode Programming ALPHA VOCABULARY LIST (For Entering Zone Descriptors) • 060 DOWNSTAIRS • 107 LEFT • 161 RIGHT • 219 WING (Word Space) DRAWER LEVEL WIRELESS ∗ • 162 ROOM – A – • 062 DRIVEWAY ∗ ROOF • 109 LIBRARY –...
-
Page 68: Programming Installer And User Schedules
Programming Installer and User Schedules The system provides up to 32 schedules, which can be used to automatically control 11 types of system events at pre-defined times. Some events are reserved for the installer only. There are 16 schedules for use by the end-user, 16 for use by the installer. NOTES: •... -
Page 69: Avs System Enable And Quick Programming Commands
Menu Mode Programming Stop Time (For events 01-relay on/off; 02-user access; 03-latch key report) S T O P S M T W T F S 01-12 = hour; 00-59 = minute; 0 = AM; 1 = PM; Days = place “1” under days 0 0 1 0 0 0 0 H H M M A M Press [... -
Page 70: System Communication And Operation
S E C T I O N System Communication and Operation Panel Communication with Central Station This system accommodates several formats for reporting alarms and other system conditions to the Central Station. The process of a successful transmission consists of both the method of communication between the control panel and the Central Station receiver;... - Page 71 System Communication The following table lists codes for reports sent in different formats: Code for Code for Type of 3+1/4+1 3+1/4+1 Code for Report Standard Expanded Alarm SSS(S) A SSS(S) A SSSS AZ AAA(A) Z Trouble SSS(S) T SSS(S) T SSSS Tt TTT(T) t Bypass...
-
Page 72: Ademco Contact Id
Installation and Setup Guide ® Ademco Contact ID ® The Ademco Contact ID Reporting Format comprises the following: 4-digit or 10-digit subscriber number (depending on format selected). 1-digit event qualifier (“new” or “restore”). 3-digit event code. 2-digit Partition No. 3-digit zone number, user number, or system status number (see the following page). ®... -
Page 73: System Security Codes
System Operation System Security Codes The systems provides one Installer code, one System Master code, plus a set of other user codes intended for other users of the system. These codes can each be assigned one of 5 authority levels, which determine the functions each code can perform as listed in the table below. - Page 74 Installation and Setup Guide Keypad Functions The following is a brief list of system commands. For detailed information concerning system functions, refer to the User's Manual. For Touch Screen style keypad users, refer to the separate Touch Screen keypad (AUI) User’s Guide.
-
Page 75: Panic Keys
System Operation SUMMARY OF ARMING MODES Arming Mode Features for Each Arming Mode Exit Delay Entry Delay Perimeter Armed Interior Armed AWAY STAY NIGHT-STAY only those zones listed in Night-Stay zone list INSTANT MAXIMUM Panic Keys There are three Panic keys (A, B, and C) that, if programmed, can be used to manually initiate alarms and send a report to the central station. -
Page 76: Various System Trouble Displays
Installation and Setup Guide Various System Trouble Displays Alpha Display Fixed Disp. Meaning ALARM CANCELED will appear if an exit or interior zone contained a fault during closing at the time the Exit Delay ended (e.g., exit door left open), but the system was disarmed during the Entry Delay time. -
Page 77: Testing The System
S E C T I O N Testing the System About Test Procedures After the installation is complete, you should perform the following tests: System Test: Checks that all zones have been installed properly and the system responds to faults. Dialer Test: Checks that the phone connection to the central station is working properly. -
Page 78: Go/No Go Test Mode
Installation and Setup Guide Go/No Go Test Mode The Go/No Go Test verifies adequate RF signal strength from the proposed transmitter location, and allow you to reorient or relocate transmitters if necessary, before mounting the transmitters permanently. This mode is similar to the Transmitter Test mode, except that the wireless receiver gain is reduced. -
Page 79: Automatic Standby Battery Tests
Testing the System Automatic Standby Battery Tests 1. An automatic test is conducted every 3 minutes to ensure that a standby battery is present and properly connected. If a battery is not present or is not properly connected, a “LOW BATTERY” message is displayed and, if so programmed, will be reported to the central station. - Page 80 Installation and Setup Guide...
-
Page 81: Specifications & Accessories
S E C T I O N Specifications & Accessories Security Control 1. Physical: 12-1/2” W x 14-1/2” H x 3” D (318mm x 368mm x 76mm) 2. Electrical: VOLTAGE INPUT: 16.5VAC from plug-in 40VA transformer, ADEMCO 1361-GT (in U.S.A.) RECHARGEABLE BACKUP BATTERY: 12VDC, 4AH (sealed lead acid type). - Page 82 Installation and Setup Guide 2-Wire Smoke Detector: Detector Type Model No. Photoelectric w/heat sensor 2WT-B (System Sensor) Photoelectric 2W-B (System Sensor) Photoelectric 2151 w/B110LP base (System Sensor) Photoelectric FW-2S (Napco) Transformers: 1361-GT: 16.5VAC, 40VA Plug-In Transformer (No. 1361CN-GT in Canada) Sounders: AB12M 10”...
-
Page 83: 5800 Series Transmitter Input Loop Identification
Specification and Accessories 5800 Series Transmitter Input Loop Identification All of the transmitters illustrated below have one or more unique factory assigned input (loop) ID codes. Each of the input loops requires its own programming zone (e.g., a 5834-4's four inputs require four programming zones). NOTE: For information on any transmitter not shown, refer to the instructions accompanying that transmitter for details regarding loop numbers, etc. - Page 84 Installation and Setup Guide...
-
Page 85: Regulatory Agency Statements
Specification and Accessories S E C T I O N Regulatory Agency Statements FEDERAL COMMUNICATIONS COMMISSION (FCC) & INDUSTRY CANADA (IC) STATEMENTS The user shall not make any changes or modifications to the equipment unless authorized by the Installation Instructions or User's Manual. - Page 86 Installation and Setup Guide RF EXPOSURE WARNING The LTE-21V module must be installed to provide a separation distance of at least 7.8 in. (20 cm) from all persons and must not be co-located or operating in conjunction with any other antenna or transmitter except in accordance with FCC multi-transmitter product procedures.
-
Page 87: Limitations And Warranty
S E C T I O N Limitations and Warranty WARNING THE LIMITATIONS OF THIS ALARM SYSTEM While this System is an advanced design security system, it does not offer guaranteed protection against burglary, fire or other emergency. Any alarm system, whether commercial or residential, is subject to compromise or failure to warn for a variety of reasons. -
Page 88: Contacting Technical Support
• Note the proper model number of this product, and the version level (if known) along with any documentation that came with the product. • Note your Honeywell Home customer number and/or company name. Having this information handy will make it easier for us to serve you quickly and effectively. - Page 89 – INDEX – Exit Error Alarm ........69 sounder connections ......6 1361-GT ....... 2, 5, 79, 80 24-Hour Audible Alarm ....... 24 Exit Error Alarm ........73 Supervised Fire ........24 24-Hour Auxiliary Alarm ..... 24 Exit Error Report Code ......29 Supplementary Power ......
- Page 90 Installation and Setup Guide NOTES...
- Page 91 NOTES...
- Page 92 Installation and Setup Guide NOTES...
- Page 93 NOTES...
- Page 94 Installation and Setup Guide NOTES...
- Page 95 Figure 17. Summary of Connections...
- Page 96 The correct disposal of end-of-life equipment will help prevent potential negative consequences for the environment and human health. This product is manufactured by Resideo Technologies and its affiliates. The Honeywell Home Trademark is used under license from Honeywell International Inc.
Need help?
Do you have a question about the ADEMCO VISTA-V21SIALTE and is the answer not in the manual?
Questions and answers