Honeywell Home TUXEDOW Installation And Setup Manual
Home automation system
Hide thumbs
Also See for TUXEDOW:
- Quick installation manual (2 pages) ,
- Quick installation manual (2 pages) ,
- User manual (56 pages)

Related Manuals for Honeywell Home TUXEDOW


Summary of Contents for Honeywell Home TUXEDOW
- Page 1 Home Automation System Installation and Setup Guide 800-25176A 4/19 Rev A...
- Page 2 Z-Wave devices are identified by the Z-Wave logo and can be purchased from your local retailer. Z-Wave ® is a registered trademark Sigma Designs, Inc. and/or its subsidiaries.
-
Page 3: Table Of Contents
First Time Power Up (Keypad Initialization) ......................6 1: Operational Mode Setup ..........................6 2: Set ECP Address/RIS Automation Address.....................7 3: Honeywell Home End User License Agreement (EULA) .................8 4: Network (LAN/Wi-Fi) Setup ..........................9 5: Important Operation Information ........................9 6: Remote Login ..............................9 THE HOME PAGE .............................. - Page 4 Manual Network Setup ............................19 Static Network ..............................19 Local Access ..............................19 Web Server IP Address Access ........................19 Connecting the TUXEDOW to a mobile device ....................19 Remote Access Using Port Forwarding ......................20 Account................................20 Disp & Audio Setup ............................. 21 Operating Modes ..............................
- Page 5 Remote Services Setup ............................39 Controlling Automation (Z-Wave) Devices Remotely ..................39 Creating Scenes in Total Connect ........................39 Viewing and Controlling Total Connect Scenes from TUXEDOW ..............39 Enabling Devices for Total Connect ........................40 Total Connect Server Screen for Troubleshooting ....................40 Z-Wave Notes: ..............................
-
Page 7: About The System
TUXEDOW INSTALLATION AND SETUP GUIDE ABOUT THE SYSTEM This guide provides information to install and set-up Resideo’s TUXEDOW Home Automation and Security System. The TUXEDOW is an Advanced User Interface (AUI) device, which combines wireless home automation and security. The TUXEDOW connects to a VISTA ®... -
Page 8: Control Panel Compatibility
TUXEDOW INSTALLATION AND SETUP GUIDE Control Panel Compatibility The table below lists compatible control panels and their software revision levels. NOTE: For SIA installations used with a VISTA-128BPTSIA Control, see the SIA CP-01 Quick Reference Chart by visiting: www.resideo.com. NOTE: Keypad may only be used in the following UL/cUL installations: UL 365, UL 609, UL 985, UL 1023, UL 1610, CAN/ULC-S303, CAN/ULC-S304, ULC-S545, ULC/ORD-C1023, and ANSO/SIA CP-01-2010. -
Page 9: Mounting
MOUNTING TUXEDOW is for indoor use within the protected area only and should be mounted at a comfortable viewing level. Avoid mounting in areas of high condensation such as bathrooms or in locations where bright light or sunlight shines directly on the screen. -
Page 10: Wiring
550 feet NOTE: If more than one TUXEDOW is wired to one run, then the maximum lengths must be divided by the number of keypads on the run. (e.g., the maximum length is 75 feet if two TUXEDOWs are wired on a #22-gauge run). -
Page 11: Programming The Control Panel
TUXEDOW’s that may be used and the required control panel’s software revision level. We recommend that you use either a standard alpha keypad or the TUXEDOW in Console Emulation Mode when programming the control panel. When in the Console Mode, the TUXEDOW emulates an alpha keypad and the programming of the control panel is performed following the procedures provided in your control panel’s Installation and... -
Page 12: First Time Setup
If this situation occurs, TUXEDOW presents you with a message of “Problems detected. Start Keypad in Safe Mode?” and requests a YES or NO response. If you answer with Yes, TUXEDOW enters into the Safe Mode. If you answer with NO, TUXEDOW tries to communicate with the panel again. -
Page 13: 2: Set Ecp Address/Ris Automation Address
(keypad or AlarmNet device). If using an AlarmNet Communicator with the RIS option enabled, uncheck the Primary RIS Device feature in the TUXEDOW. Failure to do so can result in unpredictable results. Refer to the Control Panel Installation Instructions for additional information. -
Page 14: 3: Honeywell Home End User License Agreement (Eula)
NOTES: 1. The TUXEDOW ECP address (1-30) is defaulted to one; the RIS Automation address (1-30) is defaulted to 25. The ECP & RIS addresses can also be set later using the ECP Address menu from the CS Setup menu. -
Page 15: 4: Network (Lan/Wi-Fi) Setup
Enabling the Local Area Network (LAN) Option The keypad is configured for a LAN connection using a wireless connection. By default, the TUXEDOW is configured for DHCP. If Static is required, then manually adding a network is required. 1. Scroll through the list to locate a network from the list of Wi-Fi Networks to connect to and highlight it. -
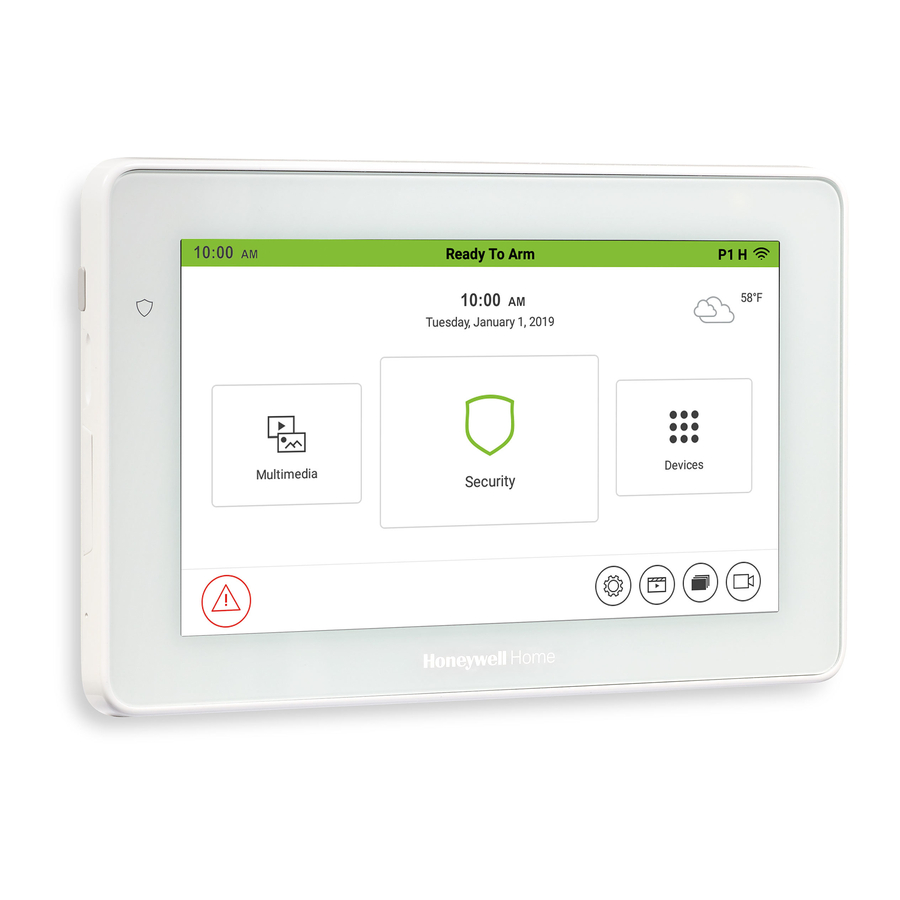
Page 16: The Home Page
TUXEDOW INSTALLATION AND SETUP GUIDE THE HOME PAGE Name Description Time/Date Displays current panels Time and Date. Status Banner Displays status of the control panel. Partition Displays the current partition the keypad is viewing. Wi-Fi Status Displays the signal strength of your Wi-Fi connection Weather Displays the current temperature. -
Page 17: Security Menu
TUXEDOW INSTALLATION AND SETUP GUIDE SECURITY MENU Introduction to Security System Operation You can arm the system in one of three arming modes: Away, Stay, and Night. The following table lists the three different arming modes and the results of each. -
Page 18: Panel Default Displays
TUXEDOW INSTALLATION AND SETUP GUIDE Commercial System Notes • If the Aux Relay function is set for alarm silenced by User Code + # + 67, this command may only be entered in the console emulation mode. • Do not use the common lobby logic function. -
Page 19: How To Arm The System
TUXEDOW INSTALLATION AND SETUP GUIDE How to Arm the System Arming the system in any mode is performed in the same way, as described below. Note: Close all perimeter windows and doors before arming. Arm the system as follows: ICON... -
Page 20: How To Clear Bypassed Zones
TUXEDOW INSTALLATION AND SETUP GUIDE How to Clear Bypassed Zones A bypassed zone is automatically unbypassed when you disarm the system (unless this feature is disabled in the control). If a zone is bypassed, you can remove the bypass as follows:... -
Page 21: How To Check The Status Of Other Partitions
TUXEDOW INSTALLATION AND SETUP GUIDE How to Check the Status of Other Partitions This system supports between one and eight Partitions (depending on the system.) Partitioning enables a single physical alarm system to control up to eight areas of protection (partitions) depending on the system used. Each Touchscreen is assigned a default partition for display purposes and shows only that partition's information. -
Page 22: More Choices
TUXEDOW INSTALLATION AND SETUP GUIDE MORE CHOICES How to Clear/Hide a Control Panel Message The Control Panel Message icon alerts the user to a control panel message. When a Control Panel Message is displayed, the user has two options. User can clear the Control Panel Message immediately or minimize the window and clear it at a later time. -
Page 23: How To Send Emergency Messages
TUXEDOW INSTALLATION AND SETUP GUIDE How to Send Emergency Messages An emergency message for fire, police, or medical can be sent to the central monitoring station from the Emergency screen. The Emergency screen can be accessed by activating the "PANIC" Icon located on the lower left corner of the screen. -
Page 24: Setup
Over the Air Updates (OTA) OTA requires a network connection and is initiated by AlarmNet 360. When the OTA screen appears on the TUXEDOW, the user can accept, reject or postpone the download process. If accepted, the download process starts, and a message is shown in the upper left corner of the screen. -
Page 25: Manual Network Setup
1. Verify the TUXEDOW is connected to the Network via Wi-Fi. 2. Verify the Smart Phone, or Tablet, is connected to the same network as the TUXEDOW (disable mobile data if needed.) 3. Open the browser and enter the IP Address on the keypad. -
Page 26: Remote Access Using Port Forwarding
Remote Access Using Port Forwarding TUXEDOW offers built-in web hosting capability to access your system via any web enabled device. The local IP Address is used on a standard web browser to control user functions. The home router must first be configured for port forwarding for both HTTP and HTTPS ports, which port the local IP address. -
Page 27: Disp & Audio Setup
• Chime Mode – All keypads chime whenever a door or window is open. • Voice Mode – TUXEDOW voice annunciates whenever a change in system status occurs. • Voice Chime – The chime mode and voice mode are in effect with the chime beeps followed by voice annunciation. -
Page 28: Clean Screen
TUXEDOW INSTALLATION AND SETUP GUIDE Clean Screen With the exception of normal cleaning, the keypad is maintenance free. Clean the touch-screen as follows: ICON ACTION NOTES 1. Touch the Setup icon. At the "Touch Screen Disabled for =30 Seconds" 2. Touch the Disp & Audio Setup icon. -
Page 29: System Setup
TUXEDOW INSTALLATION AND SETUP GUIDE SYSTEM SETUP Time/Date Setup You can set the time and date from the Time / Date Setup screen. • When the time is set, it is stored in the touchscreen and sent to the control panel when you touch the Apply icon and answer Yes to the “Set time on the security system as well?”... -
Page 30: Cs Setup
TUXEDOW INSTALLATION AND SETUP GUIDE CS Setup You may access Options, ECP Address, Screen Security, Device Events, Code Authority, Panel Configuration, TC Server Info. Options ICON ACTION NOTES Normal Mode: Runs keypad in normal 1. From the Home screen, touch the Setup, System Setup and operation, connected to a supported CS Setup icons. -
Page 31: Device Events
Configuration? OK Cancel. 4. Touch the X to delete the panel configuration (the If you touch OK, the TUXEDOW deletes Touchscreen resets and the panel configuration is the configuration of the control, the downloaded from the panel into the Touchscreen.) or touch TUXEDOW reboots, and re-searches for the installed control. -
Page 32: Tc Server Info
• TUXEDOW supports 232 devices 4. Touch Diagnostics to test each server path. (including the TUXEDOW keypads) in the 5. Touch the TC icon to view the list of enrolled Z-Wave devices. Z-Wave network. This is where you can enable or disable devices from showing up on Total Connect 2.0 (see notes for total number... -
Page 33: How To Add A User
TUXEDOW INSTALLATION AND SETUP GUIDE How to Add a User ICON ACTION NOTES 1. Touch the Setup, System Setup, User Setup On the Data Entry screen, enter the user icons. information. 2. Touch and enter the Authorized Master Code. • Use the Shift key for capital letters •... -
Page 34: Advanced Setup
Turn-Off Network - No firmware updates will be completed until power and the box to enable Power Save Mode. network are restored 2. Select the option to Turn off Network Override Display settings can be overwritten and the TUXEDOW operates or Override Display Settings. in low power mode: 3. Touch to save settings. -
Page 35: End User License
Select from the following actions: DISCOVER TUXEDO: Automatically searches for any TUXEDOW on the same network. ADD: You can manually add a TUXEDOW by entering the Name, IP Address, MAC and Model number. EDIT: Change the name of the TUXEDOW. -
Page 36: Quick Programming
TUXEDOW INSTALLATION AND SETUP GUIDE Quick Programming Used to access basic programming of the control panel, touch the Setup and System Setup icons. ICON ACTION NOTES Touch Setup, System Setup, and Quick • Not every security panel supports quick Programming. -
Page 37: Devices (Automation)
DEVICES (AUTOMATION) The TUXEDOW Home Automation System with web hosting capability is equipped with Security S0/S2 enabled Z-Wave technology and is designed to automate devices in a home control network. Security S0/S2 encrypts messages to other Z- Wave Security S0/S2 enabled devices thereby ensuring the authenticity and security of all communication. The keypad allows you to easily add and control multiple devices with the touch of a button. -
Page 38: Z-Wave Device Management Screen Device List
Install a Z-Wave Light, Switch or Outlet module as described below. ICON ACTION NOTES 1. At the TUXEDOW Home screen: Note: Z-Wave light modules may vary; follow the instructions in the User’s Guide for your specific device to include (enroll) a) Touch the Devices icon and then touch the properly into the Z-Wave network. -
Page 39: Include (Enroll) A Resideo Thermostat
Press Devices > Thermostats (displays Wi-Fi thermostat management page) > Account > enter the Total Connect Comfort username and password > Save. NOTE: Enrolling the Wi-Fi thermostat in the TUXEDOW keypad synchronizes it to their Resideo Total Connect 2.0 account. Enrolling the same Wi-Fi thermostat in Honeywell Home’s Total Comfort app produces a duplicate Wi-Fi thermostat shown in Resideo Total Connect 2.0 app. -
Page 40: Removing A Thermostat And/Or Account Association
TUXEDOW INSTALLATION AND SETUP GUIDE Removing a Thermostat and/or Account Association To remove a Wi-Fi thermostat from the TUXEDOW keypad, you must remove it from the total connect comfort account. Once it synchronizes the thermostat will no longer appear. To remove account association, touch Devices > Thermostats (displays Wi-Fi thermostat management page) > Account >... -
Page 41: Remove Failed Devices
Remove Failed Devices ICON ACTION NOTES 1. At the TUXEDOW Home screen: This option removes any Z-Wave device that has a) Touch the Devices and Setup icons to display the “Z- failed from the list Wave Device Management” screen. b) Touch the Remove Failed icon... -
Page 42: Scene Rules
TUXEDOW INSTALLATION AND SETUP GUIDE Scene Rules • Triggers and Conditions include: Time setting, Security mode, Thermostat setting, Door and Garage Door status and Water Valve status. • Actions include: Security mode, Lights on/off, Thermostat setting, Door and Garage Door Lock status, Water Valve status and recording. -
Page 43: Action Options - After Each Selection Touch Save
To set the door lock status, touch the Door icon to select a Door device from the drop-down menu (see notes below). Select LOCKED, UNLOCKED or CODE UNLOCKED. To set the garage door lock status, touch the Garage Door icon to select a Garage Door device from the drop-down menu (see notes below). -
Page 44: Updating Controllers (Keypads) With New Or Removed Devices
• Automation scenes can be created in both Total Connect and TUXEDOW (Scenes created in Total Connect can be edited only via Total Connect) • Scenes created in Total Connect can be viewed from either Total Connect or directly from TUXEDOW using the Remote selection on the TUXEDOW scenes page •... -
Page 45: Remote Services Setup
Remote Services Setup NOTE: If used for Remote Services, TUXEDOW should not be configured as a secondary controller. To use Remote Service, do the following: ICON ACTION NOTES 1. Verify the TUXEDOW is connected to the Internet via its Only the Primary TUXEDOW (if there is Ethernet connector. -
Page 46: Enabling Devices For Total Connect
The “TC Server Info” screen displays the current server information and Z-Wave device status. This information is typically used for IP connection troubleshooting purposes. To access Total Connect Server Information and Z-Wave Status from the TUXEDOW keypad, do the following: ICON... -
Page 47: Z-Wave Notes
Z-Wave Notes: The TUXEDOW ignores Z-Wave Basic Command Class commands that are sent to it but it will send Basic Command Class commands to some devices depending on their capabilities. This product can be operated in any Z-Wave network with other Z-Wave certified devices from other manufacturers. -
Page 48: Compatible Devices
TUXEDOW INSTALLATION AND SETUP GUIDE Compatible Devices Z-Wave devices may vary; follow the instructions in the User Guide for your specific device when adding and deleting devices into the Z-Wave network. Refer to the table below for some of the compatible devices. -
Page 49: Multimedia
.mov, .mkv, .flv. Camera To access the camera setup page press Multimedia > Camera. By default, the TUXEDOW takes you to the Camera Setup Page. If camera’s have already been added/discovered, then it takes you to the Camera View Page. -
Page 50: Discovering Cameras
User Name/Password Administrative password to access the camera’s setup or viewing page. NOTE: Every camera manufacturer makes their cameras slightly different, so Resideo does not guarantee that TUXEDOW will work with every camera that supports the above network and codec features. -
Page 51: Deleting Camera(S)
Deleting Camera(s) ICON ACTION NOTES 1. Touch Multimedia, then Camera. 2. Touch and highlight the camera to be deleted. 3. Touch Delete. Touch Delete All to erase all cameras. Camera Settings ICON ACTION NOTES 1. Touch Multimedia, then Camera. 2. Touch and highlight the camera to be configured. 3. -
Page 52: Picture
TUXEDOW INSTALLATION AND SETUP GUIDE Picture TUXEDOW can display personal photo(s) on the Home screen as wallpaper or in a slide show format. ICON ACTION NOTES 1. Insert a media card (Micro SD/SDHC) with stored (jpg, The Picture feature allows you to set up and view up to 1000 stored photos or select a photo to set it as wallpaper .bmp, .png or .jpeg) photos. -
Page 53: Specifications
TUXEDOW INSTALLATION AND SETUP GUIDE SPECIFICATIONS Mechanical: Width: ................................ 7.91 inches (200.9mm) Height: ..............................5.04 inches (128.016mm) Depth: ................................0.827 inches (21mm) Electrical Specifications: Backlight ON, Sound ON ............................12VDC, 270mA Operating Environment: Humidity ..............................93% RH, non-condensing Temperature: Operating ................14˚ F to 131˚ F / -10˚ C to 55˚ C (UL tested: 32˚-120˚F / 0 to 49˚C) Shipping / Storage .........................-40˚... -
Page 54: Agency Information
TUXEDOW INSTALLATION AND SETUP GUIDE AGENCY INFORMATION FEDERAL COMMUNICATIONS COMMISSION & ISED CANADA STATEMENTS The user shall not make any changes or modifications to the equipment unless authorized by the Installation Instructions or User's Manual. Unauthorized changes or modifications could void the user's authority to operate the equipment. - Page 55 TUXEDOW INSTALLATION AND SETUP GUIDE NOTES...
- Page 56 Any attempt to reverse-engineer this device by decoding proprietary protocols, de-compiling firmware, or any similar actions is strictly prohibited. This product manufactured by Resideo and its affiliates. The Honeywell Home Trademark is used under license from Honeywell International Inc. 2 Corporate Center Drive, Suite 100 P.O. Box 9040, Melville, NY 11747 ©...
Need help?
Do you have a question about the TUXEDOW and is the answer not in the manual?
Questions and answers