Table of Contents
Advertisement
Quick Links
Advertisement
Table of Contents

Subscribe to Our Youtube Channel
Related Manuals for Inalto IOSO605M-L


Summary of Contents for Inalto IOSO605M-L
- Page 1 U S E R M A N U A L I N A L T O . H O U S E 60cm 5 Function Side-Opening Oven M O D E L C O D E / S I O S O 6 0 5 M - L , I O S O 6 0 5 M - R , I O S O 6 0 5 T - L , I O S O 6 0 5 T - R F O R A L L A U S T R A L I A N H O M E S V 4 .
- Page 2 Again, thank you for choosing an InAlto appliance and we look forward to being of service to you.
-
Page 3: Table Of Contents
23 Purchase Details 24 Warranty Information Customer Care InAlto recommends the use of original spare parts. When contacting our customer service team, please ensure that you have the following information at hand (which can be found on your appliances’ rating plate). -
Page 4: Safety Instructions
Safety Instructions CONDITIONS OF USE CHILDREN & VULNERABLE PEOPLE SAFETY • This appliance is intended to be used in WARNING: Risk of suffocation, injury or household and similar applications such as permanent disability. farm houses or by customers in serviced apartments, holiday apartments and other •... - Page 5 Safety Instructions (Continued) BEFORE INSTALLATION (CONTINUED) ELECTRICAL CONNECTION • During the first time use, it is completely CAUTION: Risk of fire and electrical shock! normal that the oven will show slight signs of smoke and unpleasant odors. Please wait • The appliance must be earthed. for the smell to clear before putting food into •...
- Page 6 Safety Instructions (Continued) APPLIANCE USE APPLIANCE USE (CONTINUED) • Avoid touching the following: WARNING: Risk of fire, explosion, electric • Touching the appliance with wet parts shock or damage to the appliance. of the body • Using the appliance when barefoot •...
- Page 7 Safety Instructions (Continued) APPLIANCE USE (CONTINUED)) PRODUCT DISPOSAL SAFETY HINTS • Disconnect the appliance from the electrical Do not use the oven unless you are wearing something on your feet. Do not touch the oven • Disconnect the appliance from the ...
-
Page 8: Installation
Installation The appliance must be installed by an authorised technician and put into use. The manufacturer is not responsible for any damage that might be caused by defective placement, and installation by unauthorised personnel. Please contact 1300 11 HELP (4357) to arrange for an authorised technician. The manufacturer declines all responsibility for improper installation, which may harm persons and animals and damage property. - Page 9 Installation (Continued) INSTALLATION OF BUILT-IN OVENS (CONTINUED) • The figure below gives the dimensions of the cut-out for installation in a wall cabinet unit (Fig. B). Fig. B NOTE: Installation in compliance with the consumption declaration • In order to ensure adequate ventilation, the back panel of the cabinet unit must be removed.
- Page 10 net unit must be removed .Installing the oven on a continuous ,flat surface ,there must be an Installation (Continued) ELECTRICAL CONNECTION: • Those ovens equipped with a three-pole power supply cable are designed to operate with an alternating current. The wire for earthling the appliance is yellow-green in colour.
- Page 11 Installation (Continued) CONNECTING THE SUPPLY CABLE TO THE MAINS (CONTINUED) Before making the connection, check that: • The electrical safety of this appliance can only be guaranteed if the cooker is correctly and efficiently earthed, in compliance with regulations on electrical safety.
-
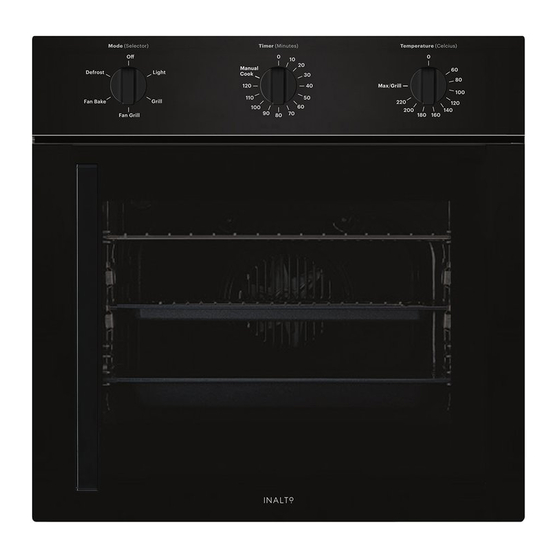
Page 12: Your Oven
IOSO605M-R, IOSO605M-L, IOSO605T-R & IOSO605T-L Control Panel Oven rack guides Oven rack Drip pan or oven sheet CONTROL PANEL: IOSO605M-R / IOSO605M-L Function Mode Knob Cooking Timer Knob Temperature Knob CONTROL PANEL: IOSO605T-R / IOSO605T-L Function Mode Knob Electronic Programmer... -
Page 13: Using Your Oven
Using Your Oven This multi-function oven combines the When the fan is on, a normal flow of air can be advantages of traditional convection ovens with heard exiting between the oven door and the those of the more modern fan assisted models control panel. - Page 14 The top central heating elements and the fan in the oven are active. will come on. This combination of features Cooking Timer (IOSO605M-R/IOSO605M-L) increases the effectiveness of the unidirectional thermal radiation of the heating elements This model is equipped with a timer to control through forced circulation of the air throughout when the oven shuts off during cooking.
- Page 15 Using Your Oven (Continued) Digital Clock (IOSO605T-R / IOSO605T-L) 4. When the clock turns to be 13:15 (or between The digital will show the time (0:00-24:00) 13:14-13:15), the oven will start automatically. and minutes. In the roast time, (B) and “AUTO” will be The screen shows 3 flashing numbers and always flashing.
-
Page 16: Care And Maintenance
elements in the oven come on. Cooling ventilation In order to cool down the exterior of the appliance, this model i elements in the oven come on. automatically when the oven is hot. Cooling ventilation When the fan is on, a normal flow of air can be heard exiting betw Care and Maintenance In order to cool down the exterior of the appliance, this model i Note: When cooking is done, the fan stays on until the oven... - Page 17 nge the door to right or left side he Oven door (refer to “How to Remove The Oven door”). door 180°. he bottom side of the door, then, Slide the movable rod( b and c position) downward by hand into the of the oven.
-
Page 18: Practical Cooking Advice
Practical Cooking Advice The oven offers a wide range of alternatives For example, when cooking meat roasts which allow you to cook any type of food in together with other food, place the roast on the the best possible way. With time you will learn 2nd rack from the bottom and the more delicate to make the best use of this versatile cooking food on the 4th rack from the bottom. - Page 19 Practical Cooking Advice (Continued) USING THE GRILL (CONTINUED) Baking tips: Pastry is too dry Furthermore, it can also be used for browning Increase the temperature by 10°C and reduce foods at the end of the cooking process, such the cooking time. as adding that gratin finish (for example pasta bakes).
- Page 20 THIS PAGE IS INTENTIONALLY LEF T BL ANK...
-
Page 21: Technical Specifications
Technical Specifications Models: IOSO605M-R, IOSO605M-L, IOSO605T-R, IOSO605T-L Supply Voltage: 220-240V~ 50/60Hz or 50Hz Inner Volume of Oven: Product Dimensions (W, D, H): 435mm, 400mm, 320mm Weight and Dimensions are approximate because we continually strive to improve our products we may change specifications and designs without prior notice. -
Page 22: Your Receipt
Attach your receipt to this page... -
Page 23: Purchase Details
Purchase Details For future reference, please record the following information which can be found on the rating plate and the date of purchase which can be found on your sales invoice. STORE DETAIL S STORE NAME ADDRESS TELEPHONE PURCHASE DATE PRODUCT DETAIL S MODEL NO. -
Page 24: Warranty Information
Warranty Information AUSTRALIAN WARRANTY TERMS & CONDITIONS (h) ‘you’ means the purchaser of the Appliance not COOKING APPLIANCES having purchased the Appliance for re-sale, and ‘your’ has a corresponding meaning. This document sets out the terms and conditions This warranty only applies to Appliances of the product warranties for Residentia Group purchased and used in Australia and is in Appliances. - Page 25 (a) the Appliance is damaged by: quality and the failure does not amount to a major accident failure. The benefits to you given by this warranty (ii) misuse or abuse, including failure to properly are in addition to your other rights and remedies under a law in relation to the Appliances or services maintain or service (iii)
- Page 26 THIS PAGE IS INTENTIONALLY LEF T BL ANK...
- Page 27 Simply visit the below website, or ask your retailer 24 months on the microwave magnetron; Waste for help: www.inalto.house/nz/registration disposers have a 12 month warranty. The provision of service under this warranty is...
- Page 28 D E S I G N E D I N M E L B O U R N E F O R A L L A U S T R A L I A N H O M E S —...
Need help?
Do you have a question about the IOSO605M-L and is the answer not in the manual?
Questions and answers