
Related Manuals for Inalto IO605MB


Summary of Contents for Inalto IO605MB
- Page 1 U S E R M A N U A L I N A L T O . H O U S E 60cm Built-in 5 Function Oven M O D E L C O D E / S I O 6 0 5 M B I O 5 0 6 T B F O R A L L A U S T R A L I A N H O M E S V 1 .
- Page 2 Again, thank you for choosing an InAlto appliance and we look forward to being of service to you. Scan to Register your InAlto Appliance or go to: →...
-
Page 3: Table Of Contents
Warranty Information Customer Care InAlto recommends the use of original spare parts. When contacting our customer service team on 1300 11 4357, please ensure that you have the following information at hand (which can be found on your appliances’ rating plate). -
Page 4: Safety Instructions
READ CAREFULLY AND KEEP This manual explains the proper use of your new FOR FUTURE REFERENCE InAlto oven. Please read this manual carefully before using the product. This manual should be Read this manual thoroughly before first use, kept in a safe place for handy reference. - Page 5 Safety Instructions (Continued) CHILDREN & VULNERABLE PEOPLE SAFETY • Ensure that the appliance is switched off before replacing the oven lamp to avoid the WARNING: Risk of suffocation, injury or possibility of electric shock. permanent disability. • The means for disconnection must be incorporated in the fixed wiring in accordance •...
- Page 6 Safety Instructions (Continued) APPLIANCE USE DISPOSAL OF THE APPLIANCE • Disconnect the appliance WARNING: Risk of fire, explosion, electric shock from the mains supply. or damage to the appliance. • Cut off the mains cable and discard it. • Use this appliance in a household only. •...
-
Page 7: Installation Instructions
SHELF PLACEMENT WARNING: Installation Instructions To ensure the oven shelves operate safely, correct placement of the shelves between the side rail is imperative. Shelves and the pan only can be used between the first and fifth layers. The shelves should use with the right direction, it will ensure that during careful removal of the FITTING THE OVEN INTO THE KITCHEN UNIT shelf or tray, hot food items should not slide out. -
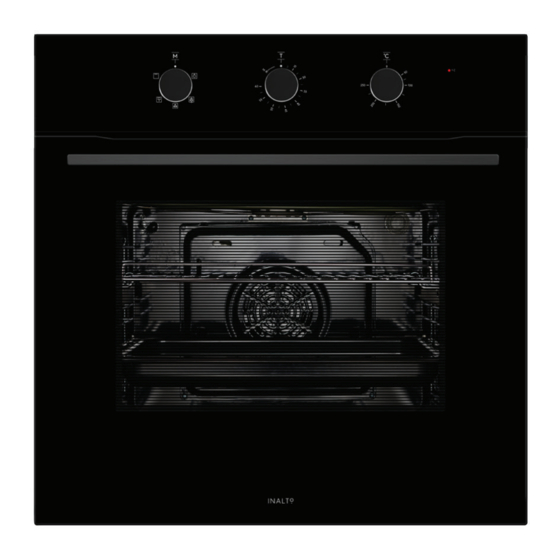
Page 8: Your Built-In Oven
4. Increase Timer Control 5. Temperature Knob (°C) 6. Preheat Indicator ACCESSORIES Your InAlto Built-in Oven is supplied with: • 2 × Wire Shelves For grill, dishes, cake pan with items for roasting and grilling • 2 × Slider brackets These shelf support rails on the right and left sides of the oven can be removed. - Page 9 Operating Instructions OVEN FUNCTIONS SYMBOL FUNCTION DESCRIPTION Grill: This cooking method is for everyday grilling, utilising only the inner grill element only, which directs heat downwards onto the food. Grill & Fan: Utilising the inner grill element along with the fan, is suitable for grilling a large amount of cooking.
- Page 10 Operating Instructions (Continued) MANUAL COOKING MODE (IO605MB) In manual cooking mode, the cooking duration is controlled by the user without a timer. 1. Rotate the Timer Knob counter clockwise to the “ M ” position to engage Manual Cooking mode.
-
Page 11: Operation Instructions
When the oven is first connected to the electrical supply, wait for the display automatically a beep sound once and the " 12 " " . " flash. Ensure the correct time of the day is set befor oven. please note: that is 24 hour clock, for example 2PM shown as 14.00. To set the correct time of day 1>... - Page 12 OPERATION INSTRUCTIONS When the oven is first connected to the electrica a beep sound once and the " 12 " " . " flash. Ens oven. please note: that is 24 hour clock, for exam To set the correct time of day Operating Instructions (Continued) 1>...
-
Page 13: Maintenance & Cleaning
Maintenance & Cleaning esatto.house esatto.house tenance & Cleaning esatto.house esatto.house PRIOR TO CLEANING YOUR OVEN REMOVING THE OVEN DOOR & INNER GLASS esatto.house The removable door allows for full access to the tenance & Cleaning OVEN (OPTIONAL) WARNING: entire interior of the oven for easier and quicker tenance &... -
Page 14: Troubleshooting
Troubleshooting OPERATION IN CASE OF EMERGENCY In the event of an emergency you should: • Set all controls in the OFF position and disconnect the power. • Call After Sales Support on 1300 11 4357 or email support@residentiagroup.com.au Some minor faults can be fixed by referring to the instructions given in the table below. IMPORTANT: If your appliance appears to be operating incorrectly, then you should disconnect it from your electrical supply and then contact After Sales Support. - Page 15 Troubleshooting (Continued) ISSUE POSSIBLE CAUSE COMMON RESOLUTIONS The oven is not Break in power Check the household fuse box for any blown fuses turning on. supply. and replace as necessary. Also ensure that a safety switch hasn’t tripped. The oven light The light globe is When the oven has cooled and is switched off, is not working.
- Page 16 This page is intentionally left blank...
-
Page 17: Technical Specifications
Technical Specifications Model IO605MB IO605TB Gross Volume: Product Dimensions (W × D × H): 595 × 575 × 595mm 595 × 575 × 595mm Weight (Net/Gross): 32kg / 36kg 31kg / 34kg Rated Voltage 220-240V~ 220-240V~ Rated Frequency 50Hz-60Hz 50Hz-60Hz Rated Power 2.1kW... - Page 18 Attach your receipt to this page...
-
Page 19: Purchase Details
Purchase Details For your records, please record details of your purchase below and staple your receipt on the opposite page. Your serial number can be found on the rating plate of your Built-in Oven. STORE DETAIL S STORE NAME ADDRESS TELEPHONE PURCHASE DATE PRODUCT DETAIL S... -
Page 20: Warranty Information
Appliance; (which are not exhaustive): Scan to Register your InAlto Appliance or go to: www.inalto.house/registration By registering your product, you will receive advanced support, stay updated with the latest from InAlto and find out about new products and promotions. - Page 21 major failure. The benefits to you given by this (a) the Appliance is damaged by: accident warranty are in addition to your other rights and (ii) misuse or abuse, including failure to remedies under a law in relation to the Appliances properly maintain or service or services to which the warranty relates.
- Page 22 Such travelling outside of these limits will incur commercial cost to be paid by you, regulated by the for help: number of kilometres travelled beyond the 25km limit www.inalto.co.nz/register (50km return trip). Microwaves are to be delivered to the nearest authorised service agent by the WARRANTY: customer.
- Page 23 This page is intentionally left blank...
- Page 24 D E S I G N E D I N M E L B O U R N E F O R A L L A U S T R A L I A N H O M E S —...
Need help?
Do you have a question about the IO605MB and is the answer not in the manual?
Questions and answers