Advertisement
Advertisement
Table of Contents

Related Manuals for Inalto IO99


Summary of Contents for Inalto IO99
- Page 1 MODEL CODE / S PRODUCT D OCUMENT IO99 MULTI— USER FUNCTION MANUAL OVEN...
- Page 2 Again, thank you for choosing an Inalto appliance and we look forward to being of service to you. Kind Regards,...
-
Page 3: Troubleshooting
PAGE 03 PAGE CONTENT SAFETY INSTRUCTIONS YOUR INALTO OVEN INSTALLATION INSTRUCTIONS OPERATING YOUR OVEN CLEANING & MAINTENANCE TROUBLESHOOTING & TECHNICAL DATA WARRANTY INFORMATION PURCHASE DETAILS... -
Page 4: Safety Instructions
USER MANUAL PAGE 04 SAFETY INSTRUCTIONS This oven must only be installed by a suitably qualified IMPORTANT! and licenced person and in accordance with the Your built-in oven is an electrical appliance and as with instructions provided. Incorrect installation may any electrical appliance (particularly with electric heating cause harm to persons, damage property and void elements), basic precautions must be followed in order to... - Page 5 PAGE 05 ► To reduce the risk of fire, do not place or install this UNPACKING oven in areas where the ventilation or circulation ducts During transportation, protective packaging was used to may become blocked. protect the appliance against any damage. After unpacking, ►...
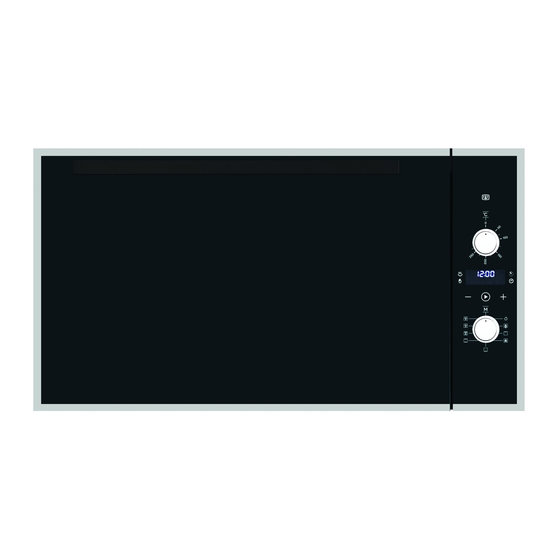
- Page 6 USER MANUAL PAGE 06 YOUR INALTO OVEN CONTROLS — Oven indicator light— this light indicates that the oven is heating. When the oven reaches the desired temperature, the indicator light will switch off. 2. Temperature knob— this knob allows you to set your ovens cooking temperature.
- Page 7 PAGE 07 OVEN COMPONENTS Roasting Tray Grilling Rack/shelf...
-
Page 8: Installation Instructions
USER MANUAL PAGE 08 INSTALLATION INSTRUCTIONS INSTALLATION INSTRUCTIONS It’s important to carefully read the following installation instructions before beginning the installation of your oven. IMPORTANT! The connection of this oven must be carried out by a suitably qualified and licensed person, in accordance with the current versions of the following: ►... - Page 9 PAGE 09 VENTILATION To provide adequate ventilation, there must be appropriate ventilation openings in the front bottom and the top part of 200 cm2, and an exhaust opening on the bottom of an least 200 cm2, and an exhaust opening of at least 60 cm2 . FASTENING THE OVEN WARNING! Once the oven has been mounted, there must be no possible contact with electrical parts.
- Page 10 USER MANUAL PAGE 10 INSTALLATION INSTRUCTIONS Fitting the Power Supply cable Opening the terminal board: ► Using a screwdriver, prise open the side tabs of the terminal board cover; ► Pull open the cover of the terminal board To install the cable, proceed as follows: ►...
-
Page 11: Operating Your Oven
OVEN FUNCTIONS & OPERATION Your InAlto 900mm oven combines the advantages of traditional convection ovens with those of modern fan forced air ventilation ovens. It is an extremely versatile appliance that allows you to easily and safely choose between 9 different cooking functions. - Page 12 USER MANUAL PAGE 12 OPERATING YOUR OVEN Touch Controls ► The programmable timer features 3 touch control buttons; Decrease, Confirm/Set and Increase. ► Holding the decrease or increase buttons will change the time faster. ► The centre Confirm/Set button allows you to cycle through a function sequence (with each press), as outlined below: ►...
- Page 13 PAGE 13 Using the End of Cooking Time function To set the End of Cooking Time function: ► Press the Confirm/Set button until the End of Cooking Time icon (page 11) is displayed and flashing. ► Now set the time that you would like the cooking to be completed by, using the Increase and Decrease buttons. Note: The latest time that can be set is the current TIME OF DAY plus 23:59 hr:min.
- Page 14 OPERATING YOUR OVEN Child Lock To avoid an unwanted selection or tampering, your InAlto oven features a Child Lock. To activate the Child Lock whilst cooking in Manual cooking mode: ► Whilst the current TIME of DAY is displayed on screen, press and hold the Confirm/Set button for a minimum of 5 seconds until the Child Lock symbol (page 11) is displayed.
- Page 15 PAGE 15 CLEANING & MAINTENANCE By ensuring proper cleaning and maintenance of your Inalto oven, you can ensure that it will have a long and fault free operation. WARNING! Do not start cleaning the oven until it has completely cooled. Never use steam cleaning equipment to clean your oven.
- Page 16 USER MANUAL PAGE 16 CLEANING & MAINTENANCE Removal of the internal glass panel Unscrew and unfasten the plastic latch that is in the corner at the top of the door. Next take out the glass from the second blocking mechanism and remove. After cleaning, insert and block the glass panel, and screw in the blocking mechanism. Replacement of the oven light globe Warning! In order to avoid the possibility of an electric shock, ensure that the appliance is switched off at the isola-...
-
Page 17: Technical Data
PAGE 17 TROUBLESHOOTING & TECHNICAL DATA OPERATION IN CASE OF EMERGENCY In the event of an emergency you should: ► Switch off all oven controls (i.e. Cooking Function and Temperature) ► Switch the oven off at the isolation switch or at the fuse box. ►... -
Page 18: Warranty Information
USER MANUAL PAGE 18 WARRANTY INFORMATION WARRANTY TERMS & CONDITIONS You will bear the cost of transportation, travel and COOKING APPLIANCES delivery of the Appliance to and from Residentia (BUILT-IN OVENS, COOKTOPS) Group or its ASR. If you reside outside of the service area, you will bear the cost of: This document sets out the terms and conditions of the travel of an authorised representative;... - Page 19 PAGE 19 RECEIPT 10. For Appliances and services provided by Residentia To enquire about claiming under this warranty, please Group in Australia, the Appliances come with a follow these steps: guarantee by Residentia Group that cannot be carefully check the operating instructions, user excluded under the Australian Consumer Law.
- Page 20 MODEL CODE / S IO99...
Need help?
Do you have a question about the IO99 and is the answer not in the manual?
Questions and answers