Advertisement
Quick Links
Advertisement

Related Manuals for Inalto IF9EG


Summary of Contents for Inalto IF9EG
- Page 1 MODEL CODE / S PRODUCT D OCUMENT IF9EG DUAL USER FUEL MANUAL COOKER...
- Page 2 Again, thank you for choosing an Inalto appliance and we look forward to being of service to you. Kind Regards,...
-
Page 3: Troubleshooting
PAGE 03 PAGE CONTENT SAFETY INSTRUCTIONS YOUR INALTO COOKER CONNECTIONS INSTALLATION OF COOKER OPERATING YOUR COOKER MAINTENANCE & CLEANING TROUBLESHOOTING & TECHNICAL DATA WARRANTY INFORMATION PURCHASE DETAILS... -
Page 4: Safety Instructions
USER MANUAL PAGE 04 SAFETY INSTRUCTIONS This electrical oven is manufactured for using ► Oven can be installed between two furniture elements preparation of normal home meals. Please do not use such as kitchen cabinetry. (Class 2/1). It can be placed for other purposes. - Page 5 PAGE 05 ► Cleaning and user maintenance shall not be made by ► During boiling and frying, very hot solid or liquid oil children without supervision. drops leaped on oven can easily catch fire and cause fire danger. Please take frying process in your control. The appliance and its accessible parts become hot during use.
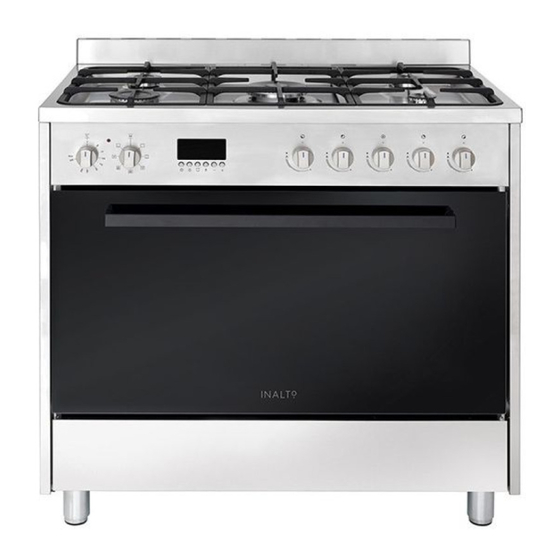
- Page 6 USER MANUAL PAGE 06 YOUR INALTO COOKER CONTROLS — 1 Small burner Medium burners 3 Large burner 4 Trible burner Minute minder 6 Control buttons 7 Tray Oven door 9 Flap drawer 10 Splash panel SAFETY INSTRUCTIONS ► Always turn off all controls after use.
- Page 7 PAGE 07 TECHNICAL SPECIFICATION Model Type IF9EG Voltage (V) 230V Frequency (Hz) 50-60Hz Wok Gas Burner Power (W) 14.4 MJ/h (4.0kW) Rapid Gas Burner Power (W) 10.8 MJ/h (3.0kW) S-Rapid Gas Burner Power (W) 2 x 6.3 = 12.6 MJ/h (3.75kW) Aux.
- Page 8 USER MANUAL PAGE 08 CONNECTIONS ELECTRICAL CONNECTION ► Have the electrical connection performed by authorised technical personnel. ► Use personal protective equipment. ► The appliance must be connected to earth in compliance with electrical system safety standards. ► Disconnect the main power supply. ►...
- Page 9 PAGE 09 GAS CONNECTION Power Voltage Danger of Electrocution ► After carrying out any operation, check that the tightening torque of gas connections is between 10 Nm and 15 Nm. ► If required, use a pressure regulator that complies with cur-rent regulations. ►...
- Page 10 USER MANUAL PAGE 10 CONNECTIONS Connection to liquid gas ► Use a pressure regulator and make the connection on the gas cylinder following the guidelines set out in the regulations in force. ► Make sure that the supply pressure complies with the values indicated in the paragraph “ Burner and nozzle characteristics table”.
- Page 11 PAGE 1 1 INSTALLATION OF COOKER ► The kitchen where the cooker is to be installed should be dry and have an efficient ventilation system. ► There should be an open space above the appliance to allow kitchen odours to disperse. A cooker hood may be installed to either absorb or extract the odours.
- Page 12 USER MANUAL PAGE 12 INSTALLATION OF OVEN SAFETY CHAIN ANCHORS In order to eliminate the risk of the oven falling forward, two chains have been supplied with the appliance. Before use, these will need to be fastened securely to the wall behind the appliance with the anchor brackets supplied. ►...
- Page 13 PAGE 13 OPERATING YOUR COOKER You can find control buttons in the diagram below. With these control buttons power of each heating element can be adjustable. Buttons can turn clockwise or opposite to clockwise directions. Please bring the control button to required cooking position.
- Page 14 USER MANUAL PAGE 14 OPERATING YOUR COOKER OPERATING BURNERS SUPPLIED FROM AN LPG CYLINDER Before lighting the first burner, open the valve on the LPG cylinder. Then light the burner using one of the methods described above. When closing the flow of gas before turning off the last burner: ►...
- Page 15 PAGE 15 Adjusting the minimum setting for LPG ► Tighten the screw located at the side of the tap rod clockwise all the way. ► Following adjustment to a gas other than the one originally set in the factory, replace the gas setting label fixed to the appliance with the one corresponding to the new gas.
- Page 16 USER MANUAL PAGE 16 OPERATING YOUR COOKER: USING YOUR OVEN FAN BAKE Heat comes from the elements surrounding the fans. The fans circulate the hot air around the oven cavity so that you can put your food in different places in the oven and still cook them at the same time.
- Page 17 PAGE 17 DEFROST The “Defrost” function uses low temperature air that is circulated by the fans. You can defrost (thaw) your food before you cook it. You can also use “Defrost” to raise your yeast dough and to d r y fruit, vegetables and herbs. PIZZA “Pizza”...
- Page 18 USER MANUAL PAGE 18 OPERATING YOUR COOKER: USING YOUR OVEN SETTING THE TIMER This adjustment can only made when no cooking program is in progress. 1. Press the button. 2. Within 5 seconds, using adjust the clock. Long presses of those buttons will result in fast changes.
- Page 19 PAGE 19 Setting cooking time for delayed start of cooking To set the cooking to start later, you have to decide your cooking period and the hour you want the cooking to be finished. Example: at 12:00, setting the oven finish a cooking of 2 hours and 15 minutes at 15:00 1.
- Page 20 USER MANUAL PAGE 20 OPERATING YOUR COOKER: USING YOUR OVEN COOKING TABLE Thermostat Cooking Extension Shelf Food Kinds Position (min.) Position Cream-Cake 150-175 25-35 Grape-Cake 150-175 20-30 Apple-Cake 150-175 25-35 Fruitful-Cake 150-175 20-30 Light Cake 150-175 20-30 Cookie 150-175 30-35 Bun 190-200 30-40 Pastry...
- Page 21 PAGE 21 MAINTENANCE & CLEANING Please Note: ► Do not use a steam cleaner to clean the cooker. ► Do not use cleaning products containing chlorine, ammonia or bleach on steel parts or parts with metallic finishes on the surface (e.g. anodizing, nickel-or chromium-plating). ►...
- Page 22 USER MANUAL PAGE 22 MAINTENANCE & CLEANING Cleaning the door glazing The glass in the door should always be kept thoroughly clean. Use absorbent kitchen roll. In case of stubborn dirt, wash with a damp sponge and an ordinary detergent. ►...
-
Page 23: Technical Data
PAGE 23 TROUBLESHOOTING & TECHNICAL DATA PROBLEM POSSIBLE CAUSE WHAT TO DO Oven or grill not working Power not turned on. Switch on electricity Household fuse blown Check fuses Controls incorrectly set Reset controls Circuit breaker tripped Check circuit breaker Clock not set Set time of day on timer Oven not heating enough... - Page 24 USER MANUAL PAGE 24 TROUBLESHOOTING & TECHNICAL DATA INFORMATION ABOUT TRANSPORTATION In case of transport hold your oven vertically and do not put anything on it. At transportation ► Please Keep your ovens original box. ► Carry your oven with original box. Obey carrying signs on box. ►...
- Page 25 PAGE 25 NOTES...
-
Page 26: Warranty Information
USER MANUAL PAGE 26 WARRANTY INFORMATION WARRANTY TERMS & CONDITIONS You will bear the cost of transportation, travel and COOKING APPLIANCES delivery of the Appliance to and from Residentia (FREESTANDING COOKERS) Group or its ASR. If you reside outside of the service area, you will bear the cost of: This document sets out the terms and conditions of the travel of an authorised representative;... - Page 27 PAGE 27 RECEIPT 10. For Appliances and services provided by Residentia To enquire about claiming under this warranty, please Group in Australia, the Appliances come with a follow these steps: guarantee by Residentia Group that cannot be carefully check the operating instructions, user excluded under the Australian Consumer Law.
- Page 28 MODEL CODE / S IF9EG...
Need help?
Do you have a question about the IF9EG and is the answer not in the manual?
Questions and answers