
Related Manuals for Inalto IO607M


Summary of Contents for Inalto IO607M
- Page 1 U S E R M A N U A L I N A L T O . H O U S E 60cm 7 Function Oven — M O D E L C O D E I O 6 0 7 M A H I G H E R L E V E L O F C O O K I N G V .
-
Page 2: Welcome
It is important that you read through the following use and care manual thoroughly to familiarise yourself with the installation and operation requirements of your appliance to ensure optimum performance. Again, thank you for choosing an InAlto appliance and we look forward to being of service to you. -
Page 3: Table Of Contents
Contents Welcome 4 Safety Instructions 8 Installation 11 Your Oven 12 Using Your Oven 16 Care and Maintenance 20 Practical Cooking Advice 22 Technical Specifications 23 Purchase Details 24 Warranty Information... -
Page 4: Safety Instructions
Safety Instructions CONDITIONS OF USE CHILDREN & VULNERABLE PEOPLE SAFETY • This appliance is intended to be used in WARNING: Risk of suffocation, injury or household and similar applications such as permanent disability. farm houses or by customers in serviced apartments, holiday apartments and other •... - Page 5 BEFORE INSTALLATION (CONTINUED) ELECTRICAL CONNECTION • During the first time use, it is completely CAUTION: Risk of fire and electrical shock! normal that the oven will show slight signs of smoke and unpleasant odors. Please wait • The appliance must be earthed. for the smell to clear before putting food into •...
- Page 6 Safety Instructions (Continued) APPLIANCE USE APPLIANCE USE (CONTINUED) • Avoid touching the following: WARNING: Risk of fire, explosion, electric • Touching the appliance with wet parts shock or damage to the appliance. of the body • Using the appliance when barefoot •...
- Page 7 APPLIANCE USE (CONTINUED)) PRODUCT DISPOSAL SAFETY HINTS • Disconnect the appliance from the electrical Do not use the oven unless you are wearing something on your feet. Do not touch the oven • Disconnect the appliance from the with wet or damp hands or feet. mains if it is not functioning properly.
-
Page 8: Installation
Installation The appliance must be installed by an authorised technician and put into use. The manufacturer is not responsible for any damage that might be caused by defective placement, and installation by unauthorised personnel. Please contact 1300 11 HELP (4357) to arrange for an authorised technician. The manufacturer declines all responsibility for improper installation, which may harm persons and animals and damage property. - Page 9 INSTALLATION OF BUILT-IN OVENS (CONTINUED) • The figure below gives the dimensions of the cut-out for installation in a wall cabinet unit (Fig. B). Fig. B NOTE: Installation in compliance with the consumption declaration In order to ensure adequate ventilation, the back panel of the cabinet unit must be removed. Installing the oven so that it rests on two strips of wood is preferable.
- Page 10 Installation (Continued) CONNECTING THE SUPPLY CABLE TO THE MAINS Install a standardised plug corresponding to the load indicated on the data plate. When connecting the cable directly to the mains, install an omni polar circuit breaker with a minimum contact opening of 3 mm between the appliance and the mains.
-
Page 11: Your Oven
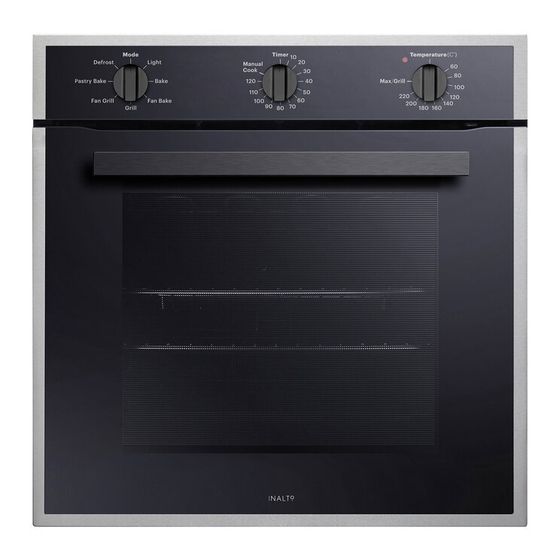
Close-up view Close-up view Your Oven Close-up view Close-up view Close-up view Close-up view Your Oven Your Oven Your Oven Your Oven IO607M IO607M IO607M IO607M Control Panel IO607M Control Panel Control Panel Control Panel Oven rack guides Control Panel... -
Page 12: Using Your Oven
Using Your Oven This multi-function oven combines the When the fan is on, a normal flow of air can be advantages of traditional convection ovens with heard exiting between the oven door and the those of the more modern fan assisted models control panel. - Page 13 Fan Bake Mode Fan Grill Mode Position the Function Mode Knob to Fan Bake Position the Function Mode Knob to Fan Grill and the Temperature Knob between 60°C and and the Temperature Knob between 60°C and Max. 200°C. The top and bottom heating elements, as well The top central heating elements and the fan as the fan, will come on, guaranteeing constant will come on.
- Page 14 Using Your Oven (Continued) Defrost Mode Position the Function Mode Knob to Defrost and the Temperature Knob to any temperature. The fan located on the bottom of the oven makes the air circulate at room temperature around the food. This is recommended for the defrosting of all types of food, but in particular for delicate types of food which do not require heat, such as ice cream cakes, cream or custard...
- Page 15 THIS PAGE IS INTENTIONALLY LEF T BL ANK...
-
Page 16: Care And Maintenance
Care and Maintenance How to change the door to right or left side Before cleaning your oven, or performing • Never line the bottom of the oven ·Remove The Oven door (refer to “How to Remove The Oven door”). maintenance, disconnect it from the power with aluminum foil, as the consequent ·Rotate the door 180°. - Page 17 nter .We recommend you avoid using the oven until it has been repaired. ter .We recommend you avoid using the oven until it has been repaired. ndensation may form .Dry it using a soft cloth. ensation may form .Dry it using a soft cloth. g powders, etc) and abrasive ng powders, etc) and abrasive For a more thorough clean, you can remove the oven door.
- Page 18 Care and Maintenance (Continued) Care and Maintenance (Continued) DISMANTLING THE OVEN DOOR To dismantle the oven door (two methods) To dismantle the oven door (two methods) DISMANTLING THE OVEN DOOR Method 1 remove and assemble procedure: Method 1 remove and assemble procedure: Double oven door: Remove the seal G by unscrew the no.2 bolts (fig.1) ·...
- Page 19 THIS PAGE IS INTENTIONALLY LEF T BL ANK...
-
Page 20: Practical Cooking Advice
Practical Cooking Advice The oven offers a wide range of alternatives For example, when cooking meat roasts which allow you to cook any type of food in together with other food, place the roast on the the best possible way. With time you will learn 2nd rack from the bottom and the more delicate to make the best use of this versatile cooking food on the 4th rack from the bottom. - Page 21 USING THE GRILL (CONTINUED) Baking tips: Pastry is too dry Furthermore, it can also be used for browning Increase the temperature by 10°C and reduce foods at the end of the cooking process, such the cooking time. as adding that gratin finish (for example pasta bakes).
-
Page 22: Technical Specifications
Technical Specifications Model: IO607M Supply Voltage: 220-240V~ 50/60Hz or 50Hz Inner Volume of Oven: Product Dimensions (W, D, H): 423mm, 407mm, 392mm Weight (Net/Gross): 32.5kg / 37kg Bake Mode: 2100-2450W Fan Bake Mode: 2100-2500W Grill Mode: 1200-1400W Fan Grill Mode:... -
Page 23: Purchase Details
Purchase Details For future reference, please record the following information which can be found on the rating plate and the date of purchase which can be found on your sales invoice. STORE DETAIL S STORE NAME ADDRESS TELEPHONE PURCHASE DATE PRODUCT DETAIL S MODEL NO. -
Page 24: Warranty Information
Warranty Information AUSTRALIAN WARRANTY TERMS & CONDITIONS This warranty only applies to Appliances APPLIANCES purchased and used in Australia and is in addition to (and does not exclude, restrict, or modify in This document sets out the terms and conditions any way) any of the product warranties for Residentia Group non-excludable statutory warranties in Australia. - Page 25 (a) the Appliance is damaged by: failure. The benefits to you given by this warranty accident are in addition to your other rights and remedies (ii) misuse or abuse, including failure to properly under a law in relation to the Appliances or services to which the warranty relates.
- Page 26 THIS PAGE IS INTENTIONALLY LEF T BL ANK...
- Page 27 Simply visit the below website, or ask your retailer 24 months on the microwave magnetron; Waste for help: www.inalto.co.nz/register disposers have a 12 month warranty. The provision of service under this warranty is...
- Page 28 A H I G H E R L E V E L O F C O O K I N G — W W W . I N A L T O . H O U S E —...
Need help?
Do you have a question about the IO607M and is the answer not in the manual?
Questions and answers