U-Line H-8041 Instructions Manual
Compact auto floor scrubber
Hide thumbs
Also See for H-8041:
- Manual (34 pages) ,
- Quick start manual (10 pages) ,
- Quick user manual (3 pages)
Table of Contents
Advertisement
Available languages
Available languages
Quick Links
π
H-8041
COMPACT AUTO
FLOOR SCRUBBER
• Disconnect the scrubber from the main power socket
before performing maintenance.
• Only use the scrubber as instructed in these
instructions. Only use the accessories recommended
by the manufacturer.
• Do not move or transport the scrubber by pulling on
its power cable. Do not use the power cable as a
handle, close doors on it or pull it over sharp objects
or corners. Do not run over the power cable with the
scrubber. Keep the power cable completely clear of
hot surfaces.
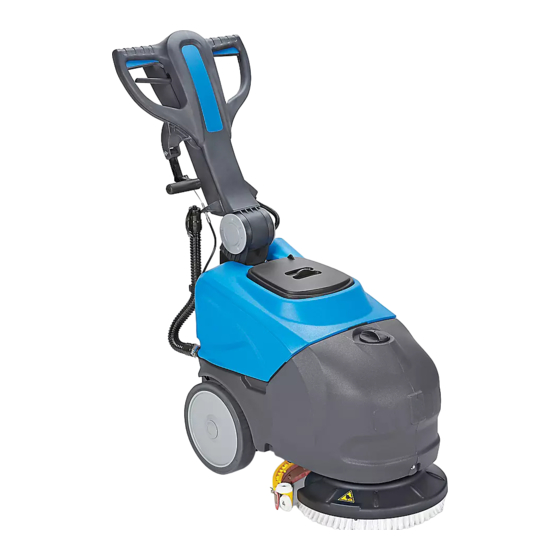
PARTS
1
2
3
4
PAGE 1 OF 21
1-800-295-5510
uline.com
SAFETY
GENERAL INFORMATION
6
7
8
5
• Do not disconnect the scrubber by pulling on
the power cable. Grip the plug, not the cable, to
disconnect the scrubber.
• Switch off all controls before unplugging the
scrubber.
• Do not use the scrubber to clean flammable or
combustible liquids like gasoline. Do not operate the
scrubber in areas where such liquids may be present.
12
11
10
9
Para Español, vea páginas 8-14.
Pour le français, consulter les pages 15-21.
#
DESCRIPTION
1
Recovery Tank
2
Detergent Tank
3
Nylon Brush
4
Detergent Tap
5
Squeegee
6
Control Panel
7
Drive Lever
8
Recovery Tank Hose
9
Power Inlet
10
Drain Hose
11
Squeegee Release
12
Handle Release
0621 IH-8041
Advertisement
Table of Contents

Related Manuals for U-Line H-8041


Summary of Contents for U-Line H-8041
- Page 1 Para Español, vea páginas 8-14. Pour le français, consulter les pages 15-21. π H-8041 1-800-295-5510 uline.com COMPACT AUTO FLOOR SCRUBBER SAFETY • Disconnect the scrubber from the main power socket • Do not disconnect the scrubber by pulling on before performing maintenance.
-
Page 2: Button Functions
GENERAL INFORMATION CONTINUED BUTTON FUNCTIONS: Battery Indicator Water Power Brush ASSEMBLY INSTALL FUSE NOTE: Battery must be fully charged before first use. Locate fuse in plastic parts bag. Lift recovery tank off unit to expose fuse connector. Connect fuse and ASSEMBLE SQUEEGEE close connector. -
Page 3: Operation
OPERATION FILL TANK 2. Turn on unit and press brush button. All lights will light up and unit is fully functional. 1. Add water and detergent into the tank. (See Figures 11 and 12) (See Figure 8) Figure 8 Figure 11 Figure 12 NOTE: Use a non-foaming detergent with a 3. -
Page 4: Daily Maintenance
MAINTENANCE DAILY MAINTENANCE 5. Check battery charge. (See Figure 19) Figure 19 Use the attached drain hose to empty the dirty water from the recovery tank. (See Figure 14) Figure 14 6. To recharge batteries, plug in battery charger using electrical cord provided with machine. -
Page 5: Troubleshooting
MAINTENANCE CONTINUED CHECK MOTOR FUSES 3. Pull off black caps from the brush motor fuse (B) and the vacuum motor fuse (C). (See Figures 25 and 26) NOTE: Fuses need to be replaced with the correct value. Value is listed on the fuse. •... - Page 6 TROUBLESHOOTING CONTINUED OPERATING ISSUE CAUSES RECOMMENDATIONS No detergent is delivered. The detergent button LED is off. Press the detergent button. The detergent tank is empty. Fill the detergent tank. The brush motor is off. Turn the motor on by pressing the brush button.
- Page 7 TROUBLESHOOTING CONTINUED ERROR CODE DISPLAY ERROR CODE ERROR Brush Button LED: Brush short circuit error. 2 quick flashes / pause / 2 quick flashes. Brush Button LED: 1 flash / pause/ 1 flash. Overcurrent error. Fan Button LED: Suction short circuit error. 2 quick flashes / pause / 2 quick flashes.
-
Page 8: Información General
π H-8041 800-295-5510 uline.mx FREGADORA DE PISOS COMPACTA AUTOMÁTICA SEGURIDAD • Desconecte la fregadora del enchufe principal antes • No desconecte la fregadora jalando el cable de darle mantenimiento. eléctrico. Para desconectar la fregadora agarre la clavija, no el cable. - Page 9 CONTINUACIÓN DE INFORMACIÓN GENERAL FUNCIÓN DEL BOTÓN Indicador de Batería Agua Encendido Ventilador Cepillo ENSAMBLE INSTALAR FUSIBLE NOTA: La batería debe estar completamente cargada antes del primer uso. Localice el fusible en la bolsa de las partes ENSAMBLAR EL JALADOR plásticas.
- Page 10 FUNCIONAMIENTO LLENAR EL TANQUE 2. Encienda la unidad y presione el botón del cepillo. Todas las luces se encenderán y la unidad estará 1. Añada agua y detergente al tanque. completamente funcional. (Vea Diagramas 11 y 12) (Vea Diagrama 8) Diagrama 8 Diagrama 11 Diagrama 12...
-
Page 11: Mantenimiento Diario
MANTENIMIENTO MANTENIMIENTO DIARIO 5. Verifique la carga de la batería. (Vea Diagrama 19) Diagrama 19 Utilice la manguera de desagüe anexa para vaciar el agua sucia del tanque de recuperación. (Vea Diagrama 14) Diagrama 14 6. Para volver a cargar las baterías, conecte el cargador de baterías con el cable eléctrico incluido con la máquina. -
Page 12: Solución De Problemas
CONTINUACIÓN DE MANTENIMIENTO VERIFIQUE LOS FUSIBLES DEL MOTOR 3. Retire las tapa negras del fusible del motor del cepillo (B) y el fusible del motor de la aspiradora (C). NOTA: Los fusibles se deben reemplazar con el (Vea Diagramas 25 y 26) valor correcto. - Page 13 CONTINUACIÓN DE SOLUCIÓN DE PROBLEMAS PROBLEMA DE FUNCIONAMIENTO CAUSAS RECOMENDACIONES No sale detergente. El LED del botón del detergente Presione el botón del detergente. está apagada. El tanque de detergente está Llene el tanque del detergente. vacío. El motor del cepillo está apagado. Encienda el motor activando el botón del cepillo.
- Page 14 CONTINUACIÓN DE SOLUCIÓN DE PROBLEMAS INDICADOR DE CÓDIGOS DE ERROR CÓDIGO DE ERROR ERROR LED del Botón del Cepillo: Error de corto circuito del cepillo. 2 parpadeos rápidos / pausa / 2 parpadeos rápidos. LED del Botón del Cepillo: 1 parpadeo / pausa / Error de sobrecorriente.
-
Page 15: Renseignements Généraux
π H-8041 1-800-295-5510 uline.ca AUTOLAVEUSE À PLANCHER COMPACTE SÉCURITÉ • Débranchez l'autolaveuse de l'alimentation • Ne débranchez pas l'autolaveuse en tirant sur le principale avant les opérations d'entretien. câble d'alimentation. Saisissez la fiche et non le câble pour débrancher l'autolaveuse. -
Page 16: Fonctions Des Boutons
RENSEIGNEMENTS GÉNÉRAUX (SUITE) FONCTIONS DES BOUTONS : Indicateur de batterie Marche/arrêt Ventilateur Brosse ASSEMBLAGE INSTALLATION DES FUSIBLES REMARQUE : La batterie doit être complètement chargée avant la première Repérez le fusible dans le sac en plastique prévu utilisation. pour les pièces. Soulevez le réservoir de récupération pour accéder au connecteur à... -
Page 17: Remplissage Du Réservoir
FONCTIONNEMENT REMPLISSAGE DU RÉSERVOIR 2. Allumez l'appareil et appuyez sur le bouton de la brosse. Tous les voyants s'allument et l'appareil est 1. Ajoutez de l'eau et du détergent dans le réservoir. pleinement opérationnel. (Voir Figures 11 et 12) (Voir Figure 8) Figure 8 Figure 11 Figure 12... -
Page 18: Entretien Quotidien
ENTRETIEN ENTRETIEN QUOTIDIEN 5. Vérifiez le niveau de chargement de la batterie. (Voir Figure 19) Utilisez le tuyau de vidange attaché pour vider l'eau Figure 19 sale du réservoir de récupération. (Voir Figure 14) Figure 14 6. Branchez le chargeur de la batterie au moyen du cordon électrique fourni avec la machine pour le rechargement de la batterie. -
Page 19: Dépannage
ENTRETIEN (SUITE) REMPLACEMENT DE LA BROSSE 3. Enlevez les capuchons noirs sur le fusible du moteur de la brosse (B) et sur le fusible du moteur de 1. Avec la face inférieure exposée, retirez la brosse en l'aspirateur (C). (Voir Figures 25 et 26) tournant dans le sens horaire hors du moyeu central. - Page 20 DÉPANNAGE (SUITE) PROBLÈME CAUSES RECOMMANDATIONS Aucune distribution de Le voyant du bouton de détergent Appuyez sur le bouton de détergent. détergent. est éteint. Le réservoir de détergent est vide. Remplissez le réservoir de détergent. Le moteur de la brosse est éteint. Allumez le moteur en appuyant sur le bouton de la brosse.
- Page 21 DÉPANNAGE (SUITE) AFFICHAGE DE CODES D'ERREUR CODES D'ERREUR ERREUR Voyant du bouton de la brosse : Erreur de court-circuit de la 2 clignotements rapides / pause / 2 clignotements rapides. brosse. Voyant du bouton de la brosse : 1 clignotement / pause / Erreur de surintensité.
Need help?
Do you have a question about the H-8041 and is the answer not in the manual?
Questions and answers
My scrubber not throwing water. A click sounds when I press the handle but no water come out. H-8041