Lexmark X925 Quick Reference
Hide thumbs
Also See for X925:
- Service manual (488 pages) ,
- User manual (334 pages) ,
- Maintenance manual (18 pages)
Table of Contents
Advertisement
Quick Links
Quick Reference
Learning about the printer
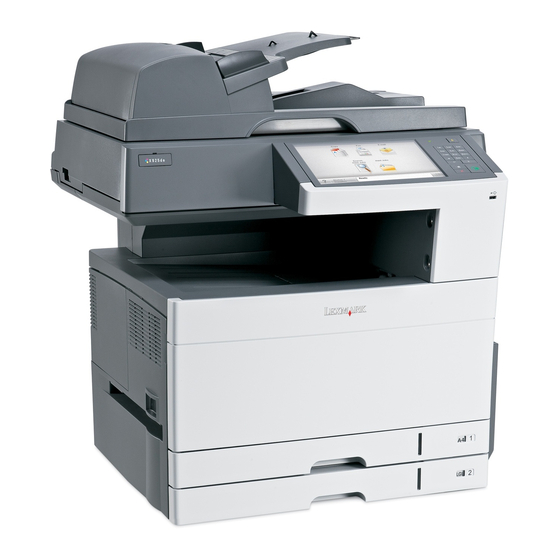
Understanding the printer control panel
1
2
7
Item
Description
1
Display
Shows the status of the printer, and allows
printer setup and operation
2
Indicator
•
Off—The printer is off.
light
•
Blinking green—The printer is warming up,
processing data, or printing.
•
Solid green—The printer is on, but idle.
•
Blinking red—The printer requires operator
intervention is needed.
Item
3
Sleep
3
4
1
@ ! .
2
A B C
3
D E F
4
G H I
5
J K L
6
M N O
7
P Q R S
8
T U V
9
W X Y Z
*
0
#
5
6
4
Keypad
5
Submit
6
Stop/Cancel
7
Home
Understanding the home screen
When the printer is turned on, the display shows a basic screen,
referred to as the home screen. Touch the home screen buttons and
icons to initiate an action such as copying, faxing, or scanning; to open
the menu screen; or to respond to messages.
Note: Your home screen, icons, and buttons may vary depending on
your home screen customization settings, administrative setup, and
active embedded solutions.
Description
Enables Sleep Mode or Hibernate Mode
The following are the statuses of the indicator
light and the Sleep button:
•
Entering or waking from Sleep Mode—The
indicator light is illuminated solid green,
Sleep button is unilluminated.
•
Operating in Sleep Mode—The indicator
light is illuminated solid green, Sleep button
is illuminated solid amber.
•
Entering or waking from Hibernate Mode—
The indicator light is illuminated solid green,
Sleep button is illuminated blinking amber.
•
Operating in Hibernate Mode—The
indicator light is unilluminated, Sleep button
is blinking amber for 1/10 of a second, then
go completely unilluminated for 1.9 seconds
in pulsing pattern.
The following actions wake the printer from
Sleep Mode:
•
Touching the screen or any hard button
presses.
•
Opening an input tray, cover, or door.
•
Sending a print job from the computer.
•
Performing a Power On Reset (POR) with the
main power switch.
Lets you enter numbers, letter, or symbols
Lets you submit changes made in the printer
settings
Stops all printer activity
Note: A list of option is displayed once
Stopped appears on the display.
Lets you navigate back to the home screen
1
Touch
To
Copy
Access the Copy menus and make copies.
E-mail
Access the E-mail menus and send e‑mails.
Fax
Access the Fax menus and send fax.
Access the printer menus.
Note: These menus are available only when the
printer is in the Ready state.
FTP
Access the File Transfer Protocol (FTP) menus and
scan documents directly to an FTP server.
Status message bar
•
Show the current printer status such as Ready
or Busy.
•
Show printer conditions such as Toner Low
or Cartridge Low.
•
Show intervention messages so the printer can
continue processing.
Status/Supplies
•
Display a warning or error message whenever
the printer requires intervention to continue
processing.
•
Access the messages screen for more
information on the message, and how to clear
it.
USB or USB
View, select, print, scan, or e‑mail photos and
Thumbdrive
documents from a flash drive.
Note: This button appears only when you return
to the home screen while a memory card or flash
drive is connected to the printer.
Advertisement
Table of Contents

Related Manuals for Lexmark X925


Summary of Contents for Lexmark X925
- Page 1 Item Description Quick Reference Sleep Enables Sleep Mode or Hibernate Mode The following are the statuses of the indicator light and the Sleep button: Learning about the printer • Entering or waking from Sleep Mode—The indicator light is illuminated solid green, Sleep button is unilluminated.
-
Page 2: Using The Touch-Screen Buttons
Touch Touch Touch Bookmarks Create, organize, and save a set of bookmarks Cancel Jobs Open the Cancel Jobs screen. The Cancel (URL) into a tree view of folders and file links. Jobs screen shows three headings: Print, Submit Submit changes made in the printer settings. Fax, and Network. -
Page 3: Activating The Home Screen Applications
Other touch-screen buttons Activating the home screen applications Feature Description Warning If an error condition occurs, then this icon Touch appears. Setting up Forms and Favorites Accept Save a setting. Icon Description The application helps you simplify and streamline work processes by letting you quickly find and print frequently used online Setting up and using the home Cancel... -
Page 4: Setting Up Remote Operator Panel
Setting up Scan to Network Setting up My MFP Open a Web browser, and then type the printer IP address in the address field. Note: View the printer IP address on the printer control panel Icon Description Icon Description home screen. The IP address appears as four sets of numbers The application lets you capture a digital The application lets you customize your separated by periods, such as 123.123.123.123. -
Page 5: Loading The Standard Or Optional 550-Sheet Tray
Note: If a timeout occurs and a blank screen appears, then Notice the size indicators at the bottom of the tray. Use these Loading the standard or optional refresh the browser, and then click Apply. indicators to help position the guides. 550‑sheet tray The printer has a standard 150‑sheet (Tray 1) and 250‑sheet tray (Tray Loading paper and specialty... - Page 6 Make sure to release the width guide lock at the rear of the tray. Squeeze and then slide the length guide to the correct position for Squeeze and then slide the width guide to the correct position for the paper size you are loading. Long‑edge orientation Short‑edge orientation the paper size you are loading.
-
Page 7: Loading The Multipurpose Feeder
Lock the width guide. From the printer control panel, verify the Paper Size and Paper Type Gently pull the extension until it is fully extended. for the tray based on the paper you loaded. Loading the multipurpose feeder The multipurpose feeder can hold several sizes and types of print media, such as transparencies, labels, card stock, and envelopes. -
Page 8: Creating A Custom Name For A Paper Type
different Paper Type name to the tray, such as Custom Type [x], or Adjust the width guide to lightly touch the edge of the stack. Make Transparencies sure the paper or specialty media fits loosely in the multipurpose define your own custom name. Note: Avoid scratching or touching the print side. -
Page 9: Adjusting Toner Darkness
Using the printer control panel Note: Mobile printing applications may also be available from your Click OK > Print. mobile device manufacturer. From the home screen, navigate to: For Macintosh users Customize the settings in the Page Setup dialog: Printing from a flash drive >... -
Page 10: Canceling A Print Job
Note: Do not load postcards, photos, small items, Touch the print job you want to cancel, and then touch Delete Selected Jobs. transparencies, photo paper, or thin media (such as magazine clippings) into the ADF. Place these items on the scanner glass. Note: If you press on the keypad, then touch Resume to Adjust the paper guides when loading a document into the ADF. -
Page 11: Getting Ready To E-Mail
Canceling a copy job while copying pages using Configuring e‑mail settings E-mail > Recipient > type an e‑mail address To create a group of recipients, touch Next address, and then type the scanner glass Type the printer IP address into the address field of your Web the next recipient’s e-mail address. -
Page 12: Canceling An E-Mail
Note: Do not load postcards, photos, small items, • To use the fax option with the PostScript driver, configure and Faxing transparencies, photo paper, or thin media (such as magazine enable it in the Configuration tab. clippings) into the ADF. Place these items on the scanner glass. For Macintosh users If you are loading a document into the ADF, then adjust the paper Sending a fax... -
Page 13: Creating A Fax Destination Shortcut Using The Touch Screen
Creating a fax destination shortcut using the Note: Do not load postcards, photos, small items, Note: The scan name is the name that appears in the Scan transparencies, photo paper, or thin media (such as magazine Profile list on the display. touch screen clippings) into the ADF. -
Page 14: Clearing Jams
CAUTION—HOT SURFACE: The inside of the printer might Touch Scan It. Remove the jammed paper. be hot. To reduce the risk of injury from a hot component, allow the surface to cool before touching. Clearing jams Determine where the jam is located, and then remove it: If the paper is visible under the fuser, then grasp it on each side and pull it out. -
Page 15: 203 Paper Jam
203 paper jam Grasp any jammed paper visible in the standard exit bin, and then gently pull it out. Close the cover on the duplexing unit. Close the cover of the duplexing unit. Notes: • Make sure all paper fragments are removed. •... -
Page 16: 24X Paper Jam
Paper jam in one of the optional trays 24x paper jam Open Tray 1, and then pull the jammed pages straight up and out. Check the side access door to trays and then pull the jammed pages Paper jam in Tray 1 out. -
Page 17: 250 Paper Jam
Open the specified tray, and then pull the jammed pages out. 250 paper jam Open the ADF cover. Remove any jammed pages from the multipurpose feeder. Grasp the jammed paper on each side, and then gently pull it out. Note: Make sure all paper fragments are removed. Close the ADF cover. - Page 18 292 paper jam Try one of more of the following: • Close the ADF cover. • Close the scanner cover. • Contact your system support system person. 451 paper jam Open the scanner cover, and then remove any jammed paper. Close the scanner cover.
Need help?
Do you have a question about the X925 and is the answer not in the manual?
Questions and answers