
Related Manuals for Campbell DataView II


Summary of Contents for Campbell DataView II
- Page 1 DataView II (CD295) Dual Line Display Revision: 12/2021 Copyright © 2005 – 2021 Campbell Scientific, Inc.
-
Page 2: Table Of Contents
Table of Contents PDF viewers: These page numbers refer to the printed version of this document. Use the PDF reader bookmarks tab for links to specific sections. 1. Introduction..............1 Changes from Version 1 to Version 2 ..........1 Normal Operation Overview ..............2 2. -
Page 3: Introduction
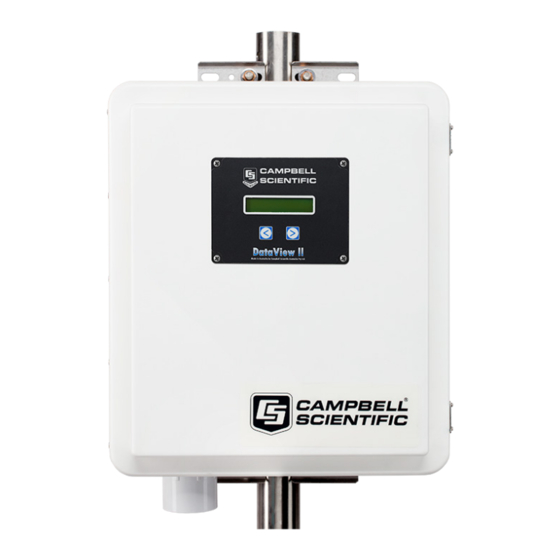
DataView II (CD295) Dual Line Display Introduction The DataView II is a two-line, 32-character LCD that displays real time values from a CR2xx series data logger along with a predefined description string and units string. Two buttons allow the user to scroll through the programmed locations that are updated as often as they are measured. -
Page 4: Normal Operation Overview
30 “screens”. There are no limitations on the order of screens, or which Public Variables are displayed. Pressing the buttons on the front panel of the DataView II will cause the next (or previous) screen to be displayed. -
Page 5: Installation Procedure
DataView II (CD295) Dual Line Display While in sleep mode the DataView II will continue to respond to PakBus communications, however the LCD is turned off and no requests are sent to the data logger. Installation Procedure Below is a general guide to the steps involved in configuring and programming a DataView II (CD295). - Page 6 DataView II (CD295) Dual Line Display After starting Setup.exe you will be presented with a welcome screen giving a brief introduction to the software. Click OK. 3. The next screen asks where you would like PC295W installed on your hard disk.
-
Page 7: Programming
By default, the first part of the filename is the same as the data logger program from which it was generated. So, for example, if you opened station1.cr2 to create the DataView II program, PC295W would save the program as station1.dv2. This naming convention is strongly recommended, but not... -
Page 8: Operation
Software. 2. Once the PC295W program starts you will see the main screen. The first step in creating a DataView II program is to select Create new DataView2 Program from the File menu. This will open a file browser window which will allow you to locate the data logger program (with CR1, CR2, CR3, or CR8 extension). - Page 9 5. PC295W will now return to the main screen, however the CRX FileName and DataView 2 Refresh Rate will no longer be blank. PC295W has read your data logger program and is now ready for you to create a DataView II program.
- Page 10 DataView II (CD295) Dual Line Display The Description and Units fields are free-form text strings that are displayed on the CD295 along with the value collected from the data logger. These fields can be used to provide a user-friendly description and engineering units of the value displayed.
- Page 11 DataView II (CD295) Dual Line Display NOTE The date stamp will only show meaningful values if the long integers are created correctly. For more information, refer to Appendix C, Using Time Stamps (p. C-1) 7. If at any time you would like to return to an earlier screen, you can do so by using the Screen Number dropdown list.
- Page 12 DataView II (CD295) Dual Line Display 8. After entering all of the screens in your DataView II program, you will probably want to save your work. Click File > Save As and this will open a dialog in which you can specify a filename and save your DataView II program.
-
Page 13: Online Help
DataView II (CD295) Dual Line Display 9. Once you have completed and saved the DataView II program, you are ready to download the program into the DataView II itself. NOTE To do this, you must have the Device Configuration Utility installed on your computer. -
Page 14: Operation
Before using Device Configuration Utility, it is important to provide power to your DataView II (CD295) and connect the serial port of your computer to the CD295, using the programming cable provided (see figure below). -
Page 15: Downloading A Program
These are Program Control, Send OS and Settings Editor. The Program Control tab is used to send a program to the DataView II, and is the most commonly used of the three tabs. - Page 16 NOTE When a DataView II program is created, PC295W creates two files — the DV2 file for download to your DataView II, and a .295 file which contains internal configuration information for the PC295W program. You should only send the DV2 file to your CD295.
-
Page 17: Modifying Settings
Device Configuration Utility will show the current values of the settings in order for you to verify that the changes were discarded. It is possible to return the DataView II to its factory default settings. To do this, click Factory Defaults. - Page 18 A file browser window will appear. Locate the operating system file (A43 extension), provided by your supplier, and click Open. After selecting the operating system file, it will be necessary to power cycle the DataView II. Disconnect the power from the CD295 and reconnect it.
-
Page 19: Mounting In Enclosure Door
Mounting in Enclosure Door If the DataView II will be exposed to the elements, it is important to fit the CD295 door kit, as explained below. Use the template provided to mark out the four mounting holes and cut-out for the CD295. - Page 20 DataView II (CD295) Dual Line Display Apply a thin coating of neutral-cure silicon sealant between the flange of the CD295 and enclosure door. Use the screws and nuts provided to attach the CD295. Insert the head of the screw followed by a flat washer through the front of the CD295. On the inside of the enclosure, fit the rubber O-ring washer then the second flat washer followed by the dome nut.
-
Page 21: Shipping Kit
DataView II (CD295) Dual Line Display Shipping Kit The CD295 DataView II Shipping Kit includes: CD295 DataView II display • CD295 programming cable • PC295W software on CD • • CD295 Mounting Template • 4 x stainless steel mounting screws, dome nuts, stainless steel and... -
Page 22: Problems
CD295? Using Device Configuration Utility, check that the “Logger Address” setting in the DataView II and the PakBus address of the data logger match (refer to your data logger manual). Is the baud rate of the data logger RS-232 port set to 9600 or auto? By default, the data logger serial port speed should be suitable for the CD295. - Page 23 It is important that the program that is running in the data logger is the same as the one used when the DataView II program was written. If not, then the DataView II program may need to be re-written.
-
Page 24: Temperature Extremes And Lcd Adjustment
DataView II (CD295) Dual Line Display Temperature Extremes and LCD Adjustment The CD295 has been tested to –20 ºC. It will perform at this temperature although the display may be sluggish and dim. Under temperature extremes, the CD295 liquid crystal display (LCD) may become difficult to read. -
Page 25: Cd295 Door Kit Assembly Diagram
Appendix A. CD295 Door Kit Assembly Diagram... - Page 26 DataView II (CD295) Dual Line Display...
-
Page 27: Cd295 Mounting Template
Appendix B. CD295 Mounting Template (NOT TO SCALE – REFER TO MOUNTING TEMPLATE SUPPLIED WITH CD295) -
Page 28: Using Time Stamps
Value as per the screenshot below: In this case, the DataView II would display the time as below: Timestamp 24/01/2007 9:34 Please note: If this value is displayed using Numeric Value, the DataView II would show something like this: Timestamp 538479240... - Page 29 See Product Details on the Ordering Information pages at www.campbellsci.com. Other manufacturer's products, that are resold by Campbell Scientific, are warranted only to the limits extended by the original manufacturer. Refer to www.campbellsci.com/terms#warranty...
- Page 30 Decontamination” form and comply with the requirements specified in it. The form is available from your CAMPBELL SCIENTIFIC regional office. Campbell Scientific is unable to process any returns until we receive this statement. If the statement is not received within three days of product receipt or is incomplete, the product will be returned to the customer at the customer’s...
- Page 31 Dispose of spent batteries properly. WHILE EVERY ATTEMPT IS MADE TO EMBODY THE HIGHEST DEGREE OF SAFETY IN ALL CAMPBELL SCIENTIFIC PRODUCTS, THE CUSTOMER ASSUMES ALL RISK FROM ANY INJURY RESULTING FROM IMPROPER INSTALLATION, USE, OR MAINTENANCE OF TRIPODS, TOWERS, OR ATTACHMENTS TO TRIPODS AND TOWERS SUCH AS SENSORS, CROSSARMS, ENCLOSURES, ANTENNAS, ETC.
- Page 32 Campbell Scientific Regional Offices Australia France Thailand Location: Garbutt, QLD Australia Location: Vincennes, France Location: Bangkok, Thailand Phone: 61.7.4401.7700 Phone: 0033.0.1.56.45.15.20 Phone: 66.2.719.3399 Email: info@campbellsci.com.au Email: info@campbellsci.fr Email: info@campbellsci.asia Website: www.campbellsci.com.au Website: www.campbellsci.fr Website: www.campbellsci.asia Brazil Germany Location: São Paulo, SP Brazil...
Need help?
Do you have a question about the DataView II and is the answer not in the manual?
Questions and answers