Table of Contents
Advertisement
Quick Links
BY
Table of Contents
. . . . . . . . . . . . . . . . . . . . . . . . . . . . . . . . . . . . . . . . . . . .
. . . . . . . . . . . . . . . . . . . . . . . . . . . . . . . . . . . . . . . . . . . .
. . . . . . . . . . . . . . . . . . . . . . . . . . . . . . . . . . . . . . . . . . . . . . . . . . .
. . . . . . . . . . . . . . . . . . . . . . . . . . . . . . . . . . . . . . . . . . . . .
. . . . . . . . . . . . . . . . . . . . . . . . . . . . . . . . . . . . . . . . . . . . . .
. . . . . . . . . . . . . . . . . . . . . . . . . . . . . . . . . . . .
. . . . . . . . . . . . . . . . . . . . . . . . . . . . . . . . . . . . . . . . . . . . . . .
lci1.com
. . . . . . . . . . . . . . . . . . . . . . . . . . . . . . . . . . .
. . . . . . . . . . . . . . . .
. . . . . . . . . . . . . . . . .
. . . . . . . . . . . . . . . . . . . . . . . . . . . . . . . .
. . . . . . . . . . . . . . .
. . . . . . . . . . . . . . . . . . . . . . . . . . . . . . . . . .
. . . . . . . . . . . . . . . . . . . . . . . . . . . . . . . . .
. . . . . . . . . . . . . . . . . . . . . . . . . . . . . . . . .
. . . . . . . . . . . . . . . . . . . . . . . . .
. . . . . . . . . . . . . . . . . . . . . . . . . . . . . . .
574-537-8900
Solera
®
Awning
Installation and Owner's Manual
(For Aftermarket Applications)
Solera
Awning
Installation and
Owner's Manual
(For Aftermarket Applications)
2
2
. . . . . . . . . . . . . . . . . . . . . . . . . . . . . . . . . . . . . . . . . .
2
3
. . . . . . . . . . . . . . . . . . . . . . . . . . . . . . . . . . . . . . . . . .
. . . . . . . . . . . . . . . . . . . . . . . . . . . . . . . . . . . . . . . . . . . . . . . . . .
3
3
3
3
4
5
5
8
8
9
9
11
11
1
Classic
(AU)
Classic
®
(AU)
. . . . . . . . . . . . . . . . . . . . . . . . . . . . . . . . . . . . . .
. . . . . . . . . . . . . . . . . . . . . . . . . . . . . . . . .
CCD-0001254-AU
13
15
15
15
15
Rev: 07.27.21
Advertisement
Table of Contents

Related Manuals for Lippert Solera Classic Awning


Summary of Contents for Lippert Solera Classic Awning
-
Page 1: Table Of Contents
Solera Classic ® Awning (AU) Installation and Owner’s Manual (For Aftermarket Applications) Solera Classic ® Awning (AU) Installation and Owner’s Manual (For Aftermarket Applications) Table of Contents Introduction Troubleshooting .......... -
Page 2: Introduction
Solera Classic ® Awning (AU) Installation and Owner’s Manual (For Aftermarket Applications) Introduction Safety The rugged spring-loaded Solera Classic extends and Read and fully understand all instructions before installing ® retracts in just a few easy steps. Simply release the travel or operating this product. -
Page 3: Preparation
Solera Classic ® Awning (AU) Installation and Owner’s Manual (For Aftermarket Applications) Resources Required • 1 to 3 people • Non-permanent method of marking • Cordless or electric drill or MOVING PARTS CAN PINCH, CRUSH OR CUT. KEEP screw gun •... -
Page 4: Assembling The Awning
Solera Classic ® Awning (AU) Installation and Owner’s Manual (For Aftermarket Applications) roof/wall line awning width = bolthead-to-bolthead in 12" increments fabric width side view awning 90° 90° rail front facing view dotted line dotted line = vertical = vertical centerline centerline floor line... -
Page 5: Installing The Bottom Mounting Brackets
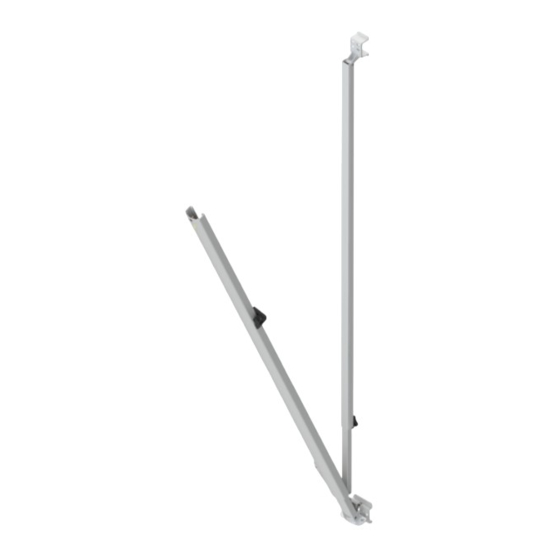
Solera Classic ® Awning (AU) Installation and Owner’s Manual (For Aftermarket Applications) 4. Measure and confirm the width of the awning. The NOTE: All screws supporting the awning assembly MUST distance is measured from centerline of support arm have a backer within the structure of the wall of the unit. assembly to the opposite centerline of the other support Refer to unit’s manufacturer for proper backer location. - Page 6 Solera Classic ® Awning (AU) Installation and Owner’s Manual (For Aftermarket Applications) 8. Lift the support arm assembly up and secure the feet channel #3 into the previously installed bottom mounting brackets by pressing the lever and opening the latch (Fig.8). locking knob 9.
- Page 7 Solera Classic ® Awning (AU) Installation and Owner’s Manual (For Aftermarket Applications) Pop Top Installation Sidewall Installation Upper Mounting Bracket Lag Screws Awning Rail Fig.10 Fig.9 10. Secure the upper mounting bracket. 12. Repeat steps 8-11 for the other support arm assembly. A.
-
Page 8: Securing The Fabric
Solera Classic ® Awning (AU) Installation and Owner’s Manual (For Aftermarket Applications) Securing the Fabric B. Close the handle and slide the outer arm upper channel #1 (Fig.6) upward on the outer arm lower channel 1. Roll the awning in and out several times to ensure that #2 (Fig.6) until the locking pin clicks into the nearest the fabric is square on the roll tube. -
Page 9: Operation
Solera Classic ® Awning (AU) Installation and Owner’s Manual (For Aftermarket Applications) Operation Extending the Awning B. Original Travel Lock - Release the travel locks (Fig.16B) on the support arm brackets by reaching behind 1. Release the travel locks accordingly as they appear on the support bracket (Fig.16A) and squeezing the travel lock the unit. - Page 10 Solera Classic ® Awning (AU) Installation and Owner’s Manual (For Aftermarket Applications) 2. Loosen the black locking knobs (Fig.17A) on the support 7. Raise the outer arms to the desired height by releasing the support arm assembly handle (Fig.19A) and allow the arms.
-
Page 11: Extending Optional Car Port
Solera Classic ® Awning (AU) Installation and Owner’s Manual (For Aftermarket Applications) 4. Loosen the black locking knob (Fig.17A) and unlock the Extending Optional Car Port support arm by releasing the spring clip (Fig.21A) at the top 1. After steps 1-8 in the Extending the Awning section of the outer arm head assembly. - Page 12 Solera Classic ® Awning (AU) Installation and Owner’s Manual (For Aftermarket Applications) 7. Secure travel locks accordingly as they appear on the unit. B. Original Travel Lock Lock the arms for travel mode by compressing the outer arm and support arm together A.
-
Page 13: Troubleshooting
Solera Classic ® Awning (AU) Installation and Owner’s Manual (For Aftermarket Applications) Troubleshooting What is happening? What is happening? Why? Why? What should be done? What should be done? Cam lock engaged. Check position of the cam lock (roll out). Make sure that the travel locks have been Travel locks engaged. - Page 14 Solera Classic ® Awning (AU) Installation and Owner’s Manual (For Aftermarket Applications) Troubleshooting (continued) What is happening? What is happening? Why? Why? What should be done? What should be done? Check to make sure fabric is centered on Fabric out of alignment. roll tube and also centered between the arms attached to the unit.
-
Page 15: Maintenance
Solera Classic ® Awning (AU) Installation and Owner’s Manual (For Aftermarket Applications) Maintenance Notes Resources Required • 5 gallon bucket • cup of dish soap • Clean water • Bristle brush with sufficient reach Fabric Care OVER-SPRAY OF CLEANING SOLUTION CAN CAUSE EYE AND SENSITIVE SKIN IRRITATION. - Page 16 (For Aftermarket Applications) Notes Manual information may be distributed as a complete document only, unless Lippert Components provides explicit consent to distribute individual parts. All manual information is subject to change without notice. Revised editions will be available for free download at lci1.com.
Need help?
Do you have a question about the Solera Classic Awning and is the answer not in the manual?
Questions and answers