FAR KJ 45/S Translation Of Original Instructions
Hydropneumatic tool
Hide thumbs
Also See for KJ 45/S:
- Original instructions manual (80 pages) ,
- Instructions for use manual (80 pages) ,
- Translation of original instructions (11 pages)

Subscribe to Our Youtube Channel
Related Manuals for FAR KJ 45/S


Summary of Contents for FAR KJ 45/S
- Page 1 TRANSLATION OF ORIGINAL INSTRUCTIONS HYDROPNEUMATIC TOOL FOR INSERTS M4 - M12 INSTRUCTIONS FOR USE www.air-allied.com.au sales@air-allied.com.au Air & Allied Sales (Pacific) Pty Ltd www.air-allied.com.au...
- Page 2 The undersigned Far S.r.l., having its office in Quarto lnferiore (BO), Via Giovanni XXIII No. 2, herewith DECLARES on its sole responsibility that the riveting machine Type: KJ45/S - Hydropneumatic tool Application: for threaded inserts M4 - M12 which is the object of this declaration complies with the basic safety requirements established in the law decree Leg.
- Page 3 TOPPING UP OIL-DYNAMIC CIRCUIT • Do not carry the connected tool by pulling the hose. The hole must be far from any heating sources or from cutting MAINTENANCE & CHANGE OF SIZE parts.
-
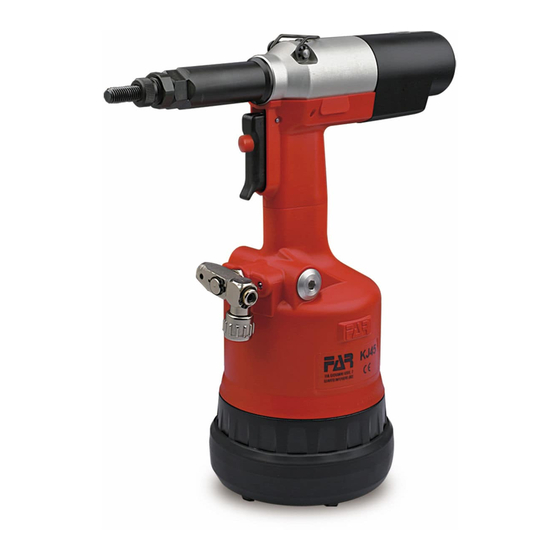
Page 4: Tool Identification
TOOL IDENTIFICATION GENERAL NOTES AND USE The riveting tool KJ 45/S is identified from a marking that shows company name and address of manufacturer, desig- The tool can be employed only for threaded inserts M4 - nation of the tool, CE mark and year of manufacturing. If M12. - Page 5 TOPPING UP THE OIL-DYNAMIC CIRCUIT (fig. f2-f3) AIR FEED The compressed air system must be provided with air cleaners Check that the threaded tie rod (A) and head (B) couple as- and condensation drains and must guarantee that the air sup- sembled on the riveting tool is suitable to the size of the insert plied to the feeder has a constant pressure of min.
- Page 6 PLACING OF THE INSERT (fig. f4-f5-f6) Check that the threaded tie rod (A) and head (B) couple as- sembled on the riveting tool is suitable to the size of the insert to be used. Adjust the stroke as indicated (fig. f2-f3). Introduce the insert on the tie rod (A) and push slightly on it as indicated in f4, so as to make it clamp automatically on the threaded tie rod.
- Page 7 WORKING PROBLEMS (fig. f7) Any time it is necessary to unscrew forcedly the threaded tie rod from the insert, push the button (P). ATTENTION! Carry out this operating keeping the riveting tool firmly in order to avoid sharp move- ments which could damage people or things. sales@air-allied.com.au Air &...
- Page 8 CHANGE OF SIZE (fig. f8-f9-f10-f11) The riveting tool is supplied with 6 pairs of threaded tie-rods (A), heads (B), screws (R) and spacers (S) only for tie-rods from M4 to M6 (f8). To change the size make as follows: • Unscrew the cone-carrying head (O) by a 22 mm standard spanner (f9).
- Page 9 TIE-ROD/HEAD UNIT ADJUSTMENT (fig. f14-f15-f16) Changing the length of the insert to clamp, the position of the head (B) compared to the threaded tie rod (A) should be ad- justed. Disconnect the compressed air feeding from the tool. Screw an insert of the desired length on the threaded tie rod manual- ly until the insert head touches the riveting tool head (B).
-
Page 10: Maintenance
It is advisable to carry out a complete overhaul of the riveting tool after 600,000 cycles or every year. In this case apply only to centres authorised by FAR S.r.l. DISPOSAL OF THE RIVETING TOOL Follow the prescriptions of the national laws for disposing of the riveting tool. - Page 11 KJ45/S sales@air-allied.com.au Air & Allied Sales (Pacific) Pty Ltd www.air-allied.com.au...
- Page 12 Pos. Code Descrip on Qty 001 713291 Head M 10 1 Screw TCCE M10 x 70 UNI 002 71C00281 1 5931 ‐ 12,9 Hexagonal unit for e‐rod M 003 72A00105 1 10 004 713292 Head M 12 1 005 713177 Tie rod M 12 1 Hexagonal unit for e‐rod M 8 006 72A00104 2 ÷ M 12 007 713290 Head M 8 1 008 71345529 Spacer for screw M 8 ...
- Page 13 KITA 74000042 Pneuma c kit Code Descrip on Qty 71C00295 Ring Parbak 8‐028 1 71C00296 Gasket OR 5‐670 1 710925 Gasket OR 027 1 711062 Gasket OR 2‐126 1 710244 Gasket OR 2‐130 1 713275 Gasket OR 2‐122 1 713390 Gasket OR 2‐007 2 710258 Gasket OR 5‐612 1 710921 Gasket OR 2‐115 1 71C00529 Gasket XR 008 PP180 B 1 710528 Gasket OR 2‐120 1 ...
- Page 14 KJ45/S sales@air-allied.com.au Air & Allied Sales (Pacific) Pty Ltd www.air-allied.com.au...
- Page 15 Pos. Code Descrip on Qty 026Q 711722 Gasket B‐094063‐B / NEI 1 027 713402 Seeger ring JV 25 1 028 71345258 Jacket 1 029 71345261 Flange 1 030A 71C00295 Ring Parbak 8‐028 1 031A 71C00296 Gasket OR 5‐670 1 032A 710925 Gasket OR 027 1 033 71345264 Oil‐dynamic piston 1 034Q 713389 Gasket 157118‐B / NEO 1 ...
- Page 16 KJ45/S sales@air-allied.com.au Air & Allied Sales (Pacific) Pty Ltd www.air-allied.com.au...
- Page 17 Pos. Code Descrip on Qty 061A 710528 Gasket OR 008 1 062A 710572 Gasket OR 2‐120 1 063A 710385 Gasket OR 2‐006 2 064A 713394 Gasket OR 2‐106 1 065 713401 Pin NRB ø 3 x 19.8 1 066A 710376 Gasket OR 2‐009 2 067 72A00019 Push‐bu on unit 1 068AHI 711338 Gasket OR 2‐003 2 069AHI 710918 Gasket OR 2‐005 ...
- Page 18 KJ45/S sales@air-allied.com.au Air & Allied Sales (Pacific) Pty Ltd www.air-allied.com.au...
- Page 19 Pos. Code Descrip on Qty 070AHI 716060 Gasket OR 2‐010 1 071 72C00003 Body 1 071 72C00017 Body 1 072 713403 Ball ø 5,5 1 073 71345272 Valve cap 1 074 71345273 Coil 1 075A 713400 Gasket OR 5‐616 7 076 72A00028 Air connector unit 1/4" 1 077A 71C00355 Gasket OR 1,78 x 8,73 1 ...
- Page 20 KITN 74000030 Pneuma c piston kit KITO 74000031 Pneuma c jacket kit KITP 74000023 Coil kit sales@air-allied.com.au Air & Allied Sales (Pacific) Pty Ltd www.air-allied.com.au...
- Page 21 KJ45/S sales@air-allied.com.au Air & Allied Sales (Pacific) Pty Ltd www.air-allied.com.au...
- Page 22 Pos. Code Descrip on Qty 001 71C00764 Bearing 61801 1 002 71345645 Gear cage 1 003 71345644 Planetary gear 3 004 71345643 Crown gear 1 005 71345642 Washer 1 006 71C00763 Bearing AY7‐ZZ 1 007 71345640 Connector 1 008 71C00761 Spring pin ø 1,5 x 10 UNI 6875 2 009 71345639 Tongue 5 ...
Need help?
Do you have a question about the KJ 45/S and is the answer not in the manual?
Questions and answers