Advertisement
Quick Links
Items listed below Hardware Complete line are included with Hardware Complete Number
Warning: During Installation, Hardware And Small Parts Are Choking Hazards For Young Children. Store
Unused Parts Appropriately Until Assembly Is Completed. Once Assembly Is Completed, Remove Any
Unused Parts From The Play Environment And Dispose/Save Them In A Secure Location. Any bolt end
protruding more than two full threads beyond the face of the nut causes risk of clothing entanglement.
Note: Peen Tee-Nuts and Flatwashers to match radius of pipe after assembly is complete.
Note: Loctite (supplied by others) should be used on any non-patch hardware.
INSTALLATION INSTRUCTIONS:
1. Dig footing holes as shown in Ground Plan. See specific installation sheets for Elevation Views.
2. Refer to specific installation sheets for component attachments, hardware, details, and concrete requirements.
3. Attach 5" Post Top Cover to Uprights using 3/8" x 1/2" P.B.H.C.S. w/Patch. See Detail 612.
4. Plumb and level the entire assembly and tighten all fasteners.
5. After entire discrete unit is assembled pour concrete footings within 4" to the top and taper away from post for water drainage. Allow
to cure at least 48 hours before use. NOTE: Temporary bracing may be required until concrete cures.
6. When the structure is finished and satisfactory, eliminate sharp points and sharp edges (burring) on installed hardware like bolt,
nuts, etc. Install resilient surfacing material within the use zone of play structure in accordance with ASTM specifications F1292
appropriate for the fall height of each structure. Refer to the safety guidelines.
MAINTENANCE PROCEDURE:
Periodically check hardware for tightness, and tighten as necessary. Always check all parts for breakage or wear, and immediately
put equipment out of service until any faulty parts found are repaired or replaced. Also Check all metal parts for rust, paint loss and
touch-up if necessary with paint. Check for welded areas and verify integrity. Check periodically resilient surfacing for appropriate
depth and remove extraneous materials that could cause injury, infection, or disease. Maintain detailed installation, inspection,
maintenance, and repair records for each public-use playground equipment.
Issued/Revised:
07/05/12
1-866-814-8697
Play Systems
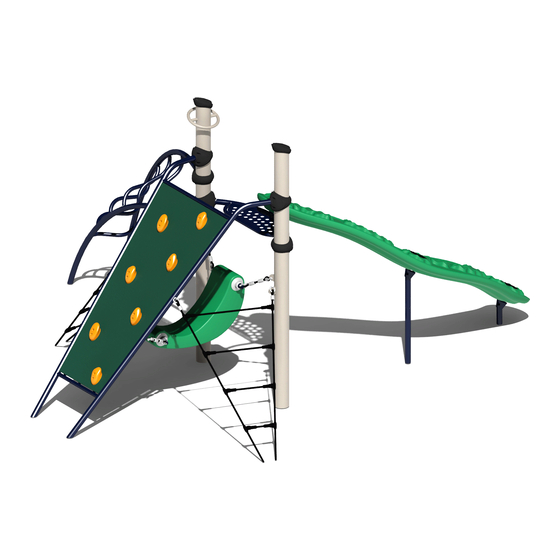
BT402 NORTH STAR
DESCRIPTION
INCLINED WALL
NAVICLIMB INVERTED
TWISTED TRIDENT
UPRIGHT 1
UPRIGHT 2
HARDWARE COMPLETE
5" POST TOP COVER
3/8" x 1/2" P.B.H.C.S. w/PATCH
Unless Otherwise Specified, All Units of Measure are Each
Promptly cut-off flush, file smooth, and treat to prevent corrosion.
Parts List
QTY
PART NUMBER
1
BT464
1
BT476
1
BT468
1
402487
1
402489
1
311634
2
311349*
4
812049*
SHEET 1 OF 5
bigtoys.com
Advertisement

Subscribe to Our Youtube Channel
Related Manuals for Playcore NAVIGATOR Series


Summary of Contents for Playcore NAVIGATOR Series
- Page 1 Play Systems BT402 NORTH STAR Parts List DESCRIPTION PART NUMBER INCLINED WALL BT464 NAVICLIMB INVERTED BT476 TWISTED TRIDENT BT468 UPRIGHT 1 402487 UPRIGHT 2 402489 HARDWARE COMPLETE 311634 5" POST TOP COVER 311349* 3/8" x 1/2" P.B.H.C.S. w/PATCH 812049* Unless Otherwise Specified, All Units of Measure are Each Items listed below Hardware Complete line are included with Hardware Complete Number Warning: During Installation, Hardware And Small Parts Are Choking Hazards For Young Children.
- Page 2 Play Systems BT402 NORTH STAR 5" POST TOP COVER (311349) TWISTED TRIDENT UPRIGHT 2 (BT468) (402489) NAVICLIMB INVERTED (BT476) UPRIGHT 1 (402487) INCLINED WALL (BT464) FINISHED ASSEMBLY = INSTALLATION DETAIL Issued/Revised: 07/05/12 SHEET 2 OF 5 bigtoys.com 1-866-814-8697...
-
Page 3: Plan View
Play Systems BT402 NORTH STAR NAVICLIMB INVERTED UPRIGHT 1 (BT476) (402487) INCLINED WALL (BT464) UPRIGHT 2 (402489) TWISTED TRIDENT (BT468) PLAN VIEW Issued/Revised: 07/05/12 SHEET 3 OF 5 bigtoys.com 1-866-814-8697... - Page 4 Play Systems BT402 NORTH STAR FOOTING TABLE Diagonal Hole No. Hor. Dim Ver. Dim. 18 3/16" 18 7/8" 5" 33 7/8" 28 11/16" 44 3/8" 84 11/16" 84 11/16" 99 1/16" 108 11/16" 147 1/16" 55 5/16" 122 1/8" 134 1/16" 75 3/16"...
- Page 5 INCH BT402 NORTH STAR 5" POST TOP COVER (311349) UPRIGHT 3/8" x 1/2" P.B.H.C.S. w/PATCH (812049) Issued/Revised: 07/05/12 SHEET 5 OF 5 bigtoys.com 1-866-814-8697...
- Page 6 Play Systems BT464 INCLINED CLIMBER Parts List DESCRIPTION PART NUMBER 14 15/16" CABLE 309082 CABLE 308254 ANGLE WALL HDPE 311539 ANGLE WALL 311543 PLAYSHELL 401549 PLAYSHELL PIPE 402415 HARDWARE COMPLETE 311571 SHROUD 311350* HANDHOLD PACKAGE 311570* PLAYSHELL STOP CASTING ASS'Y 402250* 1/4"...
-
Page 7: Maintenance Procedure
Play Systems BT464 INCLINED CLIMBER INSTALLATION INSTRUCTIONS: 1. Dig footing holes as shown in Elevation and Plan Views. Refer to Top View for correct Upright and orientation. 2. Attach Angle Wall to Uprights using 3/8" x 5 3/4" Hex Head Bolt, 3/8" Flat Washer, and 3/8" Lock Nut. See Detail 601. 3. -
Page 8: Finished Assembly
Play Systems BT464 INCLINED CLIMBER SHROUD (311350) UNDERNEATH ANGLE WALL HDPE (311539) PLAYSHELL STOP CASTING ASS'Y (402250) CABLE (308254) HANDHOLD PLAYSHELL (401549) CABLE ANGLE WALL (308254) WELD ASS'Y (311543) COMPONENTS SHOWN IN HIDDEN LINES ARE SOLD SEPARATELY FINISHED ASSEMBLY = INSTALLATION DETAIL Issued/Revised: 03/04/13 SHEET 3 OF 7... - Page 9 Play Systems BT464 INCLINED CLIMBER 18 in [45.72 cm] TYP. 48 in 160 in [121.92 cm] [406.40 cm] 104 in [264.16 cm] 90 3/4 in [230.48 cm] 69 1/4 in 56 in [175.92 cm] [142.24 cm] 33 7/8 in 41 5/16 in [86.03 cm] [104.96 cm] PLAN VIEW...
- Page 10 INCH BT464 INCLINED CLIMBER *LOCTITE (SUPPLIED BY PLAYSHELL OTHERS) SHOULD BE USED ON ANY NON-PATCH HARDWARE. 3/4" ID BRONZE BEARING (817451) 1/2" x 1/2" SET SCREW PLAYSHELL PIPE ASS'Y (402415) 3/4" ID BRONZE BEARING (817451) PLAYSHELL STOP CASTING (402250) CABLE UPRIGHT 3/8"...
- Page 11 INCH BT464 INCLINED CLIMBER 3/8" BARREL NUT (804804) SHROUD (311350) CLIMBER 3/8" FLAT WASHER (817410) 1/4" x 1 1/4" PANEL P.B.H.C.S. (812083) 3/8" x 3/4" P.B.H.C.S. 1/4" FLAT WASHER w/PATCH (812052) (5/8" O.D.) (817408) PANEL RAIL CABLE HANDHOLD 3/8" BARREL NUT (804804) 3/8"...
- Page 12 INCH BT464 INCLINED CLIMBER CABLE UPRIGHT 3/8" x 1 1/4" P.B.H.C.S. w/PATCH (812051) 3/8" FLAT WASHER (1 1/4" O.D.) (817424) Issued/Revised: 03/04/13 SHEET 7 OF 7 bigtoys.com 1-866-814-8697...
- Page 13 Play Systems BT476 NAVICLIMB INVERTED Parts List DESCRIPTION PART NUMBER MOUNTING PLATE 309279 309292 STRATASCEND CLIMBER SUPPORT 311414 MIDDLE PIPE 311420 BOTTOM PIPE 311423 EXTENSION PIPE 404351 404361 HARDWARE COMPLETE 304073* PLASTIC WASHER PLASTIC CAP 304074* RUBBER PAD 309010* SHROUD 311350* 1/4"...
-
Page 14: Underside View
Play Systems BT476 NAVICLIMB INVERTED 9. When the structure is finished and satisfactory, eliminate sharp points and sharp edges (burring) on installed hardware like bolts, nuts etc. Install resilient surfacing material within the use zone of play structure in accordance with ASTM specifications F1292 appropriate for the fall height of each structure. - Page 15 Play Systems BT476 NAVICLIMB INVERTED 55 5/16 in 43 3/4 in [140.56 cm] [111.10 cm] 18 in [45.72 cm] TYP. 24 in [60.96 cm] 37 3/8 in [94.99 cm] 48 in [121.92 cm] 46 9/16 in 52 15/16 in [118.28 cm] [134.53 cm] PLAN VIEW CONCRETE REQUIRED...
- Page 16 INCH BT476 NAVICLIMB INVERTED PLASTIC CAP (304074) STRATASCEND CLIMBER 3/8" x 1 3/4" (309292) P.B.H.C.S. w/PATCH RUBBER (812054) 3/8" FLAT WASHER (817410) 3/8" x 1" P.B.H.C.S. w/PATCH (812050) PLASTIC WASHER (304073) 3/8" FLAT WASHER MOUNTING (817410) PLATE 3/8" BARREL NUT (804804) 3/8"...
- Page 17 BT468 TWISTED TRIDENT Parts List DESCRIPTION PART NUMBER WAVE ARCH CLIMBER 311463 HARDWARE COMPLETE 311513 SHROUD 311350 3/8" x 5 3/4" HEX HEAD BOLT 801051 3/8" FLAT WASHER 817410 3/8" LOCK NUT 804353 1/4" x 1 1/4" P.B.H.C.S. 812083 1/4" FLAT WASHER (5/8" O.D.) 817408 Unless Otherwise Specified, All Units of Measure are Each *Items listed below Hardware Complete line are included with Hardware Complete Number...
- Page 18 BT468 TWISTED TRIDENT SHROUD (311350) UNDERNEATH WAVE ARCH CLIMBER (311463) COMPONENTS SHOWN IN HIDDEN LINES ARE SOLD SEPARATELY FINISHED ASSEMBLY = INSTALLATION DETAIL Issued/Revised: 02/21/12 SHEET 2 OF 4 bigtoys.com 1-866-814-8697...
- Page 19 BT468 TWISTED TRIDENT 84 5/8 in [215.00 cm] 79 5/8 in [202.30 cm] 81 3/4 in [207.66 cm] 18 in [45.72 cm] TYP. PLAN VIEW CONCRETE REQUIRED 0.218 CUBIC YARDS [0.166 CUBIC METERS] 65 in [165.06 cm] 10 in [25.40 cm] RESILIENT SURFACE 30 in [76.20 cm]...
- Page 20 INCH BT468 TWISTED TRIDENT UPRIGHT 3/8" FLAT WASHER SHROUD (311350) (817410) 3/8" LOCK NUT (804353) 3/8" FLAT WASHER (817410) 1/4" x 1 1/4" P.B.H.C.S. (812083) 3/8" x 5 3/4" HEX HEAD BOLT (801051) CLIMBER 1/4" FLAT WASHER (5/8" O.D.) (817408) Issued/Revised: 02/21/12 SHEET 4 OF 4...
Need help?
Do you have a question about the NAVIGATOR Series and is the answer not in the manual?
Questions and answers