Advertisement
Quick Links
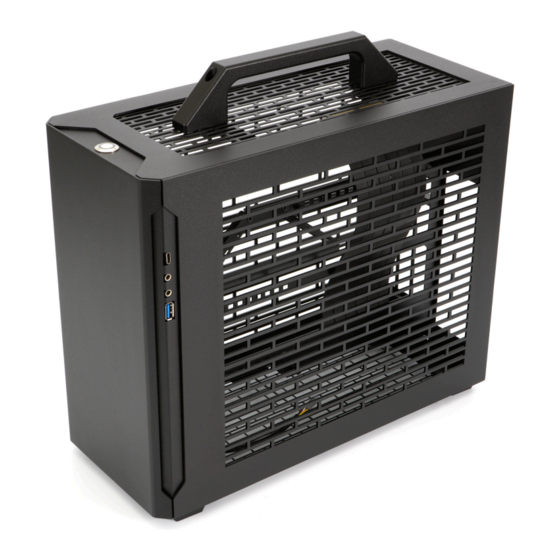
Advertisement

Related Manuals for Sliger SM580


Summary of Contents for Sliger SM580
- Page 1 S M 5 8 0 Build Guide...
- Page 2 SCREWS The SM580 comes with a total of 4 different screws. For the purposes of this guide we will assign a unique color to each screw to signify their locations in this guide. GREEN M3 x 6mm PAN HEAD Securing PCIe Cards...
- Page 3 EASY-OFF PANELS The front and side panels all have tool-less removal via their ball-stud mounting points. Careful, panels may be very tight on the first few times on/off. CAUTION: The Top Panel is attached with screws, see next page. RE-ASSEMBLY NOTES Side panels are reversible to either side.
-
Page 4: The Top Panel
THE TOP PANEL The top panel on the SM580 is held on via 6x M3 x 5mm FLAT HEAD screws. Two are located by the power switch in the front. Two are located on the rear top edge of the case. - Page 5 BOTTOM FANS IT IS RECOMMENDED TO INSTALL BOTTOM FANS FIRST. You may run into troubles getting them into the case if you install the PSU, motherboard, or GPU before the fans. STEP 1 Slide first fan into the case at the bottom front.
- Page 6 MOTHERBOARD Be sure to install your IO shield first! Some CPU coolers and AIOs may require a back plate to be installed before installing the motherboard into the case. It is advised to check that any M.2 drives on the back of the motherboard are installed before mounting the motherboard. Once the IO shield is properly installed the motherboard can now be mounted...
-
Page 7: Power Supply
POWER SUPPLY The SFX PSU mounting bracket is secured to the case spine via M3 x 5mm FLAT HEAD screws. These screws are located at the top middle of the spine, next to the motherboard corner standoff. There are also 2x M3 x 5mm FLAT HEAD screw locations behind the front panel of the case. - Page 8 POWER SUPPLY CONT. The SFX PSU can be attached to the PSU Mounting Bracket with the included 6x M3x5mm HEX HEAD screws. Note: Not all SFX Power Supplies have all 6x holes. It is recommended to attach your power supply's modular cables first, and loosely route them.
- Page 9 PCIe CARDS All GPU and other PCIe cards (if using bifurcated / trifurcated riser) should now be installed into the case. The PCIe cards are mounted M3 x 6mm PAN HEAD screws.
-
Page 10: Standard Mount
Power Cords STANDARD MOUNT The power cord should be installed by pulling it in from the rear through the power cord mount hole, passing through the cable mounting bracket. The inlet and metal plate are then mounted via 2x M3x5mm FLAT HEAD screws as shown. - Page 11 SUBTOP REMOVAL / AIO INSTALL The AIO / handle bracket is attached to the subtop with 4x M3 x 5mm FLAT HEAD screws. Remove screws and pull the AIO bracket out.
- Page 12 ATTACHING RADIATOR The SM580 AIO Bracket can fit either a 240mm or 280mm radiator. Attach 6-32 the radiator with the hose ports near the front of the case with up to 8x x 1/4" HEX HEAD screws. Then mouth either you 120mm or 140mm...
- Page 14 SUBTOP REMOVAL / AIO INSTALL The AIO bracket is attached to the subtop with 4x M3 x 5mm FLAT HEAD screws. Remove screws and pull the AIO bracket out.
-
Page 15: Cable Management
CABLE MANAGEMENT Tidy up all cables with zip ties or velco cable wraps to improve airflow and keep cables off fan blades, away from components. Route AIO water lines (Blue) behind the PSU (Yellow) Mount Bracket. - Page 17 SSD MOUNTING The SM580 has a SDD mounting bracket located behind the front panel. Each SSD attaches to the bracket with 4x M3 x 6mm PAN HEAD screws. Be sure to install drives with the SATA power and data connections face down.
Need help?
Do you have a question about the SM580 and is the answer not in the manual?
Questions and answers