Advertisement
Quick Links
Advertisement

Subscribe to Our Youtube Channel
Related Manuals for Vello BG-N21


Summary of Contents for Vello BG-N21
- Page 1 BG-N21 BATTERY GRIP Designed for the Nikon Z 6 and Z 7 Mirrorless Cameras...
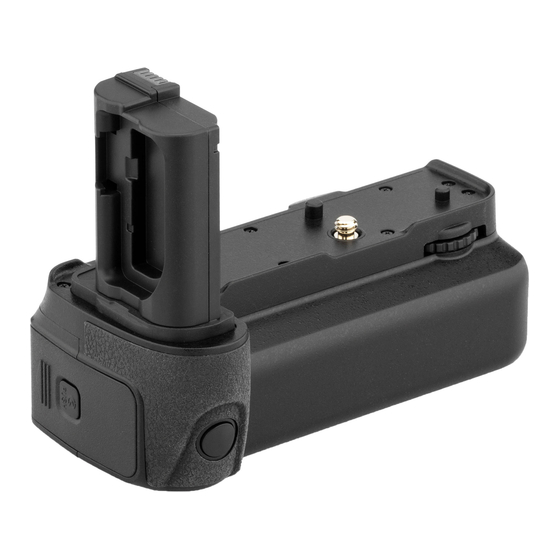
- Page 2 Thank you for choosing Vello The Vello BG-N21 battery grip offers extended shooting time and comfort when shooting in a vertical (portrait) orientation. The grip is compatible with the Nikon Z 7 and Z 6 mirrorless cameras, and it accepts up to two Nikon EN-EL15a/EN-EL15b rechargeable batteries.
-
Page 3: Specifications
Precautions The BG-N21 should be used only with the compatible The battery level may not display properly if batteries devices specified in this manual. are installed before mounting the grip. Use only with the batteries and battery holders Remove batteries from the grip when not in use. - Page 4 Overview...
- Page 5 Battery compartment B Compartment A battery latch Control lock switch Compartment B battery latch Battery compartment A USB-C port Camera battery door holder 2.5 mm remote cable socket Battery status LEDs Shutter release button Mounting screw Battery compartment A door Front thumbwheel Rear thumbwheel Battery compartment A door latch...
- Page 6 Re m ove t h e c a m e r a’s Insert the chamber door power is turned off, and the battery chamber door. Pull into the BG-N21’s camera grip’s control lock switch is gently at a 45° angle until the battery door holder for in the Off position.
- Page 7 Inser t the battery grip’s Rotate the rear thumbwheel Connect the shutter release power contacts into the counterclock wise until cable from the 2.5 mm camera’s battery chamber. the grip is secured to the remote cable socket on the camera. grip to the remote port on the camera.
-
Page 8: Inserting The Batteries
Inserting the Batteries Turn off the c amer a’s Press the door latch of Insert the battery until it power, and make sure the battery compartment A or locks into place. grip’s control lock switch is B, and slide the door to the in the Off position. - Page 9 Close the compar tment Turn on the camera power, Note: When removing the grip, door, and slide it to the front and make sure the grip’s turn off the camera’s power and of the grip until it clicks. control lock switch is in the the grip’s control lock switch, and On position.
-
Page 10: Removing The Batteries
Removing the Batteries Turn off the c amer a’s Press the door latch of Press compar tment A’s power, and make sure the battery compartment A or battery latch to the left until grip’s control lock switch is B, and slide the door to the the battery slightly pops in the Off position. - Page 11 Checking the Batteries’ Power Press the CHECK button to check the battery’s Full power. The LEDs will display the status for 3 seconds. Medium Battery needs to recharge. In-Grip Battery Charging You can charge the batteries inside the grip, without removing them, using the included 5 V / 2.4 A power adapter. Make sure you turn off the camera to begin charging.
-
Page 12: One-Year Limited Warranty
To obtain warranty coverage, contact the Vello Customer Service Department to obtain a return merchandise authorization (“RMA”) number, and return the defective product to Vello along with the RMA number and proof of purchase. Shipment of the defective product is at the purchaser’s own risk and expense.
Need help?
Do you have a question about the BG-N21 and is the answer not in the manual?
Questions and answers