Table of Contents
Advertisement
Advertisement
Table of Contents

Related Manuals for ClonerAlliance Box Pro


Summary of Contents for ClonerAlliance Box Pro
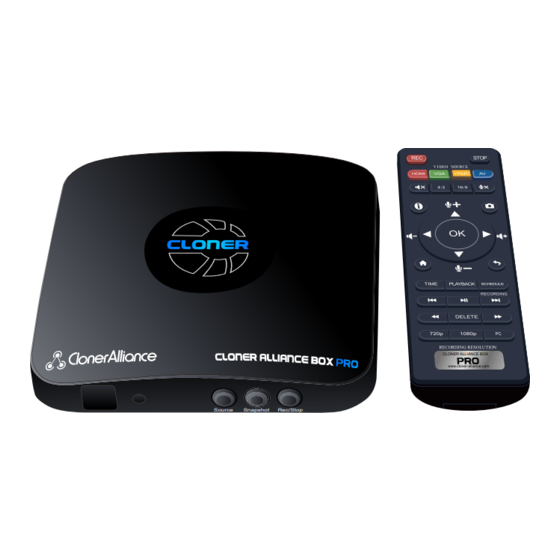
- Page 1 ClonerAlliance Box Pro User Manual CLONER ALLIANCE BOX Source Snapshot Rec/Stop...
- Page 2 ClonerAlliance Box Pro User Manual This documentation describes how to use ClonerAlliance Box Pro (Model: CA-998P) device. Copyright Notice Copyright © ClonerAlliance Inc. All rights reserved. Documentation Version 2.7.0 No part of this publication may be reproduced, transmitted, transcribed, stored in a retrieval system, or translated into any language or computer language, in any form or by any means, electronic, mechanical, magnetic, optical, chemical, manual, or otherwise, without the prior written permission of ClonerAlliance Inc.
- Page 4 Before using ClonerAlliance Box Pro, please ensure that you read and understand the safety precautions below: 1. Do not attempt to open the case of ClonerAlliance Box Pro or modify it in any way, as this will void the warranty.
-
Page 5: Table Of Contents
................. . .9 How to playback the recorded files on ClonerAlliance Box Pro directly?. - Page 6 How to live stream with OBS?(Settings in OBS)........... .38 Frequently Asked Questions Supported Resolutions Product Specifications...
-
Page 7: Getting Started
• e. Remote Control • b. MMI Cable (VGA/AV/YPbPr to HDMI Cable) • f. User Manual • c. Micro-USB to USB Cable • g. HDMI Cable • d. ClonerAlliance Box Pro If any parts is missing/broken, don’t worry, contact support@cloner-alliance.com for a replacement.... -
Page 8: Product Diagram
5. Rec/Stop: ClonerAlliance Box Pro will be turned on automatically once it’s connected with power supply. Press and hold “Rec/Stop”button on Box Pro for 5 secs to turn off the unit. Press “Rec/Stop”button again can turn it on again. 1.2. Product Diagram... - Page 9 ClonerAlliance Box Pro User Manual 6. Line Out: Insert the headphone plug into this jack to output the video sound. 7. Mic: Insert the microphone plug into this jack to input voice. 8. Line In: Stereo audio inputs. 9. Storage: Insert the USB flash drive or mobile hard disk and record videos to this storage medium.
- Page 10 13. MMI: Connect the included VGA/AV/YPbPr to HDMI cable between the video player and ClonerAlliance Box Pro. 14. To PC: Connect the Micro-USB to USB cable between PC and ClonerAlliance Box Pro for recording videos to PC. This function must be realized together with ClonerAlliance Helper.
- Page 11 ClonerAlliance Box Pro User Manual Start recording. Stop recording. Select HDMI as the input signal. Select VGA as the input signal. Select YPbPr as the input signal. Select AV as the input signal. Mute. Switch to the aspect ratio of 4:3.
-
Page 12: How To Record Videos To The Usb Storage Device
2. Connect the video source/player. For HDMI Video Sources: Using the included HDMI cable, connect your video source (gaming system, set-top box, etc.) to the ClonerAlliance Box Pro. Plug it into the IN port. For AV/VGA/YPbPr Video Sources: Using the included MMI cable, plug one end into the “MMI IN”port. Plug/Connect the other end to your video source device. - Page 13 ClonerAlliance Box Pro User Manual 2.1. Connect Diagram...
-
Page 14: Record/Capture
“MMI In”port and DO NOT connect MMI cable to HDMI “In”port. 2. Once a signal is coming from your video source to ClonerAlliance Box Pro then to your TV, you should see a live preview of your video source on your TV screen. (If not, please check section of “FAQ”. Also, check your signal and make sure your TV is set to the correct HDMI input.) -
Page 15: Playback
2.4 How to playback the recorded files on ClonerAlliance Box Pro directly? Once you’ve recorded at least one video, you may play back videos from ClonerAlliance Box Pro to your TV using the playback feature. Please follow the steps below: 1. - Page 16 ClonerAlliance Box Pro User Manual 2. Choose “USB”by the remote. You will then see a list of videos that have been recorded. 2.4. How to playback the recorded files on ClonerAlliance Box Pro directly?
- Page 17 3. Select your desired file by using the up and down arrow buttons on the remote control. And then press OK to playback the selected video in full screen. 2.4. How to playback the recorded files on ClonerAlliance Box Pro directly?
- Page 18 4. During playback, you can use up/down/left/right arrow buttons on the remote to choose previous/next/rewind/forward. To go back to “Capture”mode when you are done playing back videos, simply press the “Back”button on the remote several times until you are back in “Capture”mode. 2.4. How to playback the recorded files on ClonerAlliance Box Pro directly?
-
Page 19: Schedule Recording
ClonerAlliance Box Pro User Manual 2.5 Schedule Recording 1. Press the TIME button on the remote control. Set the system time by using the four buttons of volume control on the remote control. 2.5. Schedule Recording... - Page 20 Then exit schedule settings by clicking “Back”button on the remote control. 3. Then ClonerAlliance Box Pro will start to record videos automatically at the scheduled time. Note: If you want to record certain channel’s video, do select the channel first.
-
Page 21: Menu Navigation
ClonerAlliance Box Pro User Manual 2.6 Menu Navigation Press on the remote control to browse the menu settings of ClonerAlliance Box Pro, which are System Setting, Image Setting, Audio Setting and Schedule Setting. 2.7 System Setting Show time: Time display switch. - Page 22 NTFS and exFAT support up to 16GB for one single file. Loop Recording: Switch on/off the loop recording function. Show REC: REC display switch. Time Watermark: Time Watermark display switch. System Time: Set the time of ClonerAlliance Box Pro by year, month, day, hour and minute. 2.7. System Setting...
-
Page 23: Image Setting
ClonerAlliance Box Pro User Manual 2.8 Image Setting Brightness: Set the value of brightness. 2.8. Image Setting... - Page 24 ClonerAlliance Box Pro User Manual Contrast: Set the value of contrast. Saturation: Set the value of saturation. VGA Auto: When VGA is the signal source, press ok to adapt automatically. Decoder Update: Press ok to update decoder. Encoder Update: Press ok to update encoder.
-
Page 25: Audio Setting
ClonerAlliance Box Pro User Manual 2.9 Audio Setting HDMI Volume: Set the volume of HDMI. 2.9. Audio Setting... - Page 26 ClonerAlliance Box Pro User Manual Mic Volume: Set the volume of Mic. Line in Volume: Set the volume of Line in. Line out Volume: Set the volume of Line out. Line out mixed: Switch on/off Line out mix function. When it’s set to “on”, line out will mix HDMI, Mic and Line in audio;...
-
Page 27: Schedule Setting
ClonerAlliance Box Pro User Manual 2.10 Schedule Setting Schedule recording: Switch on/off the schedule recording function. 2.10. Schedule Setting... - Page 28 ClonerAlliance Box Pro User Manual Schedule mode: Set the mode of schedule task, there are two options “Once”and “Every day”. Tip: The parameter options may change as the firmware upgrades. Please refer to the text description. If you have any question about this, please contact us by support@cloner-alliance.com.
-
Page 29: How To Connect To Pc And Record Videos Directly
Please register ClonerAlliance Helper first before using, otherwise it will show watermark because it is a demo version. Launch ClonerAlliance Helper. Fill in your proper Email address, real name and code in the auto pop-up Register window. Then click ”Register” to finish the registration. -
Page 30: How To Get The Registration Code
ClonerAlliance Box Pro User Manual 3.3 How to get the registration code? Scan the QR code on the back of ClonerAlliance Box Pro or visit the registration link: https://www.cloner-alliance.com/ register/ first, enter your SN number, you can get your registration code directly. -
Page 31: Connect
1. Connect your ClonerAlliance Box Pro to the power adapter and connect your HDMI source to the “IN”port. 2. Plug the power adapter into the power socket and plug the other end into the 12V/1A port of ClonerAlliance Box Pro. - Page 32 ClonerAlliance Box Pro User Manual After all devices have been connected properly, please power on all connected devices. Tip: When ClonerAlliance Box Pro is recognized by PC successfully, the LED light will turn off, and you can see video in ClonerAlliance Helper.
- Page 33 ClonerAlliance Box Pro User Manual If ClonerAlliance Box Pro isn’t recognized by your PC, please make sure “Video Streaming /Audio Streaming”device is installed successfully and appears in the Device Manager (Right click My Computer – Manage – System Tools – Device Manager).
- Page 34 ClonerAlliance Box Pro User Manual 3.4. Connect...
-
Page 35: Record/Capture
For more details about recording videos to PC, please click the link below to visit the Frequently Asked Questions. https://www.cloner-alliance.com/help/knowledgebase/cat_cloneralliance_box_pro 3.5 Record/Capture 1. After all devices are connected properly, insert the video disc into the drive of the video player and run ClonerAlliance Helper. 3.5. Record/Capture... - Page 36 ClonerAlliance Box Pro User Manual 2. Click to start recording. 3.5. Record/Capture...
- Page 37 ClonerAlliance Box Pro User Manual 3.5. Record/Capture...
- Page 38 ClonerAlliance Box Pro User Manual 3. Click to stop recording. Tip: During recording, you can also click to pause anytime. When want resume, please click continue recording. sides, Click take screenshots, click capture animation. 3.5. Record/Capture...
- Page 39 ClonerAlliance Box Pro User Manual Software interfaces may vary depending on the version. 3.5. Record/Capture...
- Page 40 ClonerAlliance Box Pro User Manual 4. After recording, click to view the recorded video. Then you can double click the file to play back the video directly. ClonerAlliance Helper also supports recording videos at the scheduled time. Click to enter the ”Sched- 3.5. Record/Capture...
- Page 41 ClonerAlliance Box Pro User Manual ule recording” window. Then click the ”+” button to set up the schedule recording task. 3.5. Record/Capture...
- Page 42 ClonerAlliance Box Pro User Manual Please enable schedule recording first, and set the Recording duration, Starting time, Repeat mode and Date for schedule recording. Then click “OK”. Then videos will be recorded automatically at the scheduled time. 3.5. Record/Capture...
-
Page 43: How To Live Stream With Obs
2. Connect the Micro-USB to USB cable between the “TO PC”port and the USB port of PC. 3. Plug the power adapter into the power socket and plug the other end into the 12V/1A port of ClonerAlliance Box Pro. 4.2 Install ClonerAlliance Helper and OBS Studio Note:If you want to livestream with OBS using ClonerAlliance Box Pro, you need to install ClonerAlliance Helper on the PC first. - Page 44 ClonerAlliance Box Pro User Manual 4.3 How to live stream with OBS?(Settings in OBS) 1. Run Open Broadcaster Software (OBS Studio). Tip: Please do NOT run ClonerAlliance Helper and OBS Studio at the same time. You need to run each of them separately.
- Page 45 ClonerAlliance Box Pro User Manual 2. Please click “+”below “Sources”and select “Video Capture Device”from the pop-up menu, then click “OK”. 4.3. How to live stream with OBS?(Settings in OBS)
- Page 46 ClonerAlliance Box Pro User Manual 3. In the “Properties for Video Capture Device”window, select “Video Streaming”in the dropdown list of “Device” , and then scroll down to the “Audio Output Mode”option. Please select “Output desktop audio (DirectSound)”in the drop-down list. Click “OK”to save the settings.
- Page 47 ClonerAlliance Box Pro User Manual 4.3. How to live stream with OBS?(Settings in OBS)
- Page 48 4. Now you can click the “Start Streaming/Start Recording”button to start streaming/recording. Note: Please do NOT run ClonerAlliance Helper or any Third-Party Live Streaming Software like OBS Studio at the same time. You need to run each of them separately.
- Page 49 The default signal selection is HDMI. If you are trying to record from AV/VGA/YPbPr sources, please switch to the proper input signal with the remote control or by pressing the “SOURCE”button on ClonerAlliance Box Pro. If it still doesn’t work, please troubleshoot as below: 1.
- Page 50 If the flash drive works, contact our support to help you configure external hard drive. What kinds of USB flash drives or USB external hard drives does ClonerAlliance Box Pro support? We recommend starting with a new, 16GB or more, unused USB drive that is a recognized name brand (for example, SanDisk Toshiba or Samsung).
- Page 51 ClonerAlliance Box Pro User Manual FYI. Here is the requirement of storage device. At least 16GB capacity, FAT32, NTFS or exFAT file system on Windows 7 operating system or above. Why Is There A Prompt “Can’t Detect USB Device”/”Scanning Storage Device”? We recommend starting with a new, 16GB or more, unused USB drive that is a recognized name brand (for example, SanDisk Toshiba or Samsung).
- Page 52 Do ClonerAlliance products record 5.1 audio from the HDMI (AC3, DTS etc) or just 2 channel? ClonerAlliance Hardware records PCM or Stereo audio format. I am sorry that it doesn’t record Dolby Digital 5.1. Please adjust the audio output of your source device to PCM or Stereo before recording.
- Page 53 How to delete files with ClonerAlliance Box Pro directly? Please press the “playback”button on remote to check the recorded files, then use up or down arrows button to select the file that you want to delete. Then press “Delete”button on remote to delete it.
- Page 54 Username. From other platforms, let me know related information. Thanks very much. Due to time difference, internet connection or any other unexpected factors, ClonerAlliance technical support may miss your chat request. Don’t worry. If we missed your chat request, we will get back to you ASAP. All questions will be answered in 24 hours.
- Page 55 SUPPORTED RESOLUTIONS Max. Input 3840x2160 30fps Resolution Max. Out- put(Display) 1920x1080 60fps Resolution Max. Recording 1920x1080 60fps Resolution (USB) Max. Recording 1920x1080 60fps Resolution (UVC)
- Page 56 PRODUCT SPECIFICATIONS Output format MP4 (H.264) Video standards (Input) NTSC, PAL, PAL-60 Supported disk formats FAT32, NTFS, exFAT Input signals HDMI, VGA, YPbPr, AV, MIC Output signals HDMI (pass-through), USB, Micro USB Bitrate Max: 22Mbps Maximum storage capacity No limitation Power supply DC 12V/1A Weight...
- Page 57 ClonerAlliance provides 90-Day No Hassle Return(at our cost) and 2-Year Warranty Service. 90-Day No Hassle Return(at our cost) ClonerAlliance Inc. offers you super-long test period. Don’t worry about refund win- dow’s period. Feel free to test it. If you want to return it, contact us at support@cloner- alliance.com.
- Page 58 CONTACT US If you encounter any problem when using our products, please contact us by support@cloner-alliance.com or call 1-844-9-CLONER (toll free) and we will serve you with utmost satisfaction. We’ll offer a satisfying discount on batch purchase and affiliate program. If you are interested, please contact us by market@cloner-alliance.com.
- Page 59 DISCLAIMER HDMI is a registered trademark of HDMI Licensing, LLC. USB is a registered trade- mark of USB implementers Forum. HDMI and USB are registered trademarks of their respective companies. ClonerAlliance Inc. is not affiliated with those companies.
- Page 60 Toll free: 1-844-9-CLONER Support Email: support@cloner-alliance.com Market Email: market@cloner-alliance.com www.cloner-alliance.com Copyright ClonerAlliance Inc. All rights reserved.
Need help?
Do you have a question about the Box Pro and is the answer not in the manual?
Questions and answers
unable to ]get cloner alliance uhd pro out of a playback loop. replaying a short video over and over. Removed harddrive and still plays same short loop with or without harddrive attached. How do I reset box to stop problem
To stop the ClonerAlliance Box Pro from replaying a short video in a playback loop, press the “Back” button on the remote control several times until you return to “Capture” mode.
This answer is automatically generated