Table of Contents
Advertisement
Quick Links
Advertisement
Table of Contents

Related Manuals for Qomo HiteVision QRF 900


Summary of Contents for Qomo HiteVision QRF 900
- Page 1 Copyright © 2008 -2010 All Rights Reserved by QOMO HiteVision. www.qomo.com...
-
Page 2: Table Of Contents
Question Modes ....................33 2.2.10 Answer Sheet Setup ..................34 2.2.11 Template Design ....................34 2.2.11.1New: ......................... 35 2.2.11.2Open: ....................... 36 2.2.11.3Save: ........................ 36 2.2.11.4Close: ....................... 36 2.2.11.5Add: ........................36 Copyright © 2007 -2011 All Rights Reserved by QOMO HiteVision. www.qomo.com... - Page 3 3.2.2.5 Offsite Mode ....................140 Main Receiver and USB Cable ............... 151 3.3.1 Specifications ....................151 3.3.2 Illustration ....................... 151 Carrying Case ....................151 Part 4. FCC warning statement .................. 152 Copyright © 2007 -2011 All Rights Reserved by QOMO HiteVision. www.qomo.com...
-
Page 4: Part 1. Qrf900 Ars Overview
Part 1. QRF900 ARS Overview Thank you for purchasing the QOMO QRF900 Audience Response System (ARS). The QRF900 ARS incorporates 2.4G RF technology to receive instant feedback from all of the participants simultaneously (up to 1,000 persons). Working with Microsoft PowerPoint, the QClick software is easy to learn and easy to use. -
Page 5: Part 2. Software
Open the disk and double click on the ―QClick.exe‖ file in the root directory. Follow the instructions displayed during the installation. If the program has been previously installed, we suggest you remove the older version of the Copyright © 2007 -2011 All Rights Reserved by QOMO HiteVision. www.qomo.com... -
Page 6: Quiz Genius
Then logon to the QClick system by typing the user name and the password. The software sets the default login user name to ―qomo‖ and the password is also ―qomo‖. If you do not want to logon to the system, click the Cancel button. The software will allow you to do some limited operations, however the system database will not be updated. -
Page 7: Running A Test Using Quiz Genius
2.1.1.6 Run /Start a Quiz. Depending on your selection, not all of these steps are necessary. The following table shows the relationship: Copyright © 2007 -2011 All Rights Reserved by QOMO HiteVision. www.qomo.com... - Page 8 ID number can be changed Attendanc None Not needed Normal, Not needed Optional** Optional** Rush, needed Elimination , Vote *A system exam PPT file could be used as an answer sheet. Copyright © 2007 -2011 All Rights Reserved by QOMO HiteVision. www.qomo.com...
-
Page 9: Class
Select one of choices in the Student Settings to enter the student information. The student information can be modified by directly double clicking on the student row in the roster to display the Student Profile window. Copyright © 2007 -2011 All Rights Reserved by QOMO HiteVision. www.qomo.com... - Page 10 To add, remove or modify the students from the class, click the Manage button to display the Manage Students window. To import or export the student roster from a spreadsheet, click the Import Export button to display the file browser. Copyright © 2007 -2011 All Rights Reserved by QOMO HiteVision. www.qomo.com...
- Page 11 Group Edit window for the manual grouping. You can simply click and hold the left mouse button to drag and drop a student from one group to another group. Copyright © 2007 -2011 All Rights Reserved by QOMO HiteVision. www.qomo.com...
-
Page 12: Participation Mode
The grouping information is obtained from the class setting. Please refer to section 2.1.1.1 Class step 8 to set up groups. Only the activity modes Normal Quiz, Rush Quiz and Elimination apply to the group participation mode. Copyright © 2007 -2011 All Rights Reserved by QOMO HiteVision. www.qomo.com... -
Page 13: Activity Modes
1. You may click the Title button to display the Set Test ID window and change the test ID number you desire to set and/or to write a memo for the associated quiz. Copyright © 2007 -2011 All Rights Reserved by QOMO HiteVision. www.qomo.com... -
Page 14: Run / Start A Quiz
– start or pause the timer Stop – stop the time Previous – return to the previous question page Next – advance to the next question page Copyright © 2007 -2011 All Rights Reserved by QOMO HiteVision. www.qomo.com... - Page 15 0, the receiver will no longer receive audience/participant responses. The timer window will change to black. The instructor can always stop the timer by pressing the Start/Pause Copyright © 2007 -2011 All Rights Reserved by QOMO HiteVision. www.qomo.com...
-
Page 16: Result And Report
Both the correct responses and incorrect responses are displayed in percentage form in the histogram. Press the F1 key to show the detail percentage for each answer option. Copyright © 2007 -2011 All Rights Reserved by QOMO HiteVision. www.qomo.com... - Page 17 Press the F1 key to show the detail response answer for each participant. You can view the student ID by checking the ―Show Student ID‖ in the Quiz Genius box in System Settings. Refer to session 2.4 Settings on Student ID Display for details Copyright © 2007 -2011 All Rights Reserved by QOMO HiteVision. www.qomo.com...
-
Page 18: Exit
The quiz file may either be in the PowerPoint format with the embedded answers. If a different format other than PowerPoint is used, then the answer sheet file must be provided. The instructor controls the pace of the questions being answered. Copyright © 2007 -2011 All Rights Reserved by QOMO HiteVision. www.qomo.com... -
Page 19: Paper Quiz
Note: If you choose to send the question contents to the student clicker, simply press either the button “F1” Send Question on the status tool bar in the bottom screen window or the F1 on the teacher remote keypad. Copyright © 2007 -2011 All Rights Reserved by QOMO HiteVision. www.qomo.com... -
Page 20: Rush Quiz
When you select the Vote activity mode, the system allows you to only load the vote file in PowerPoint format. No answer sheet is needed. In this activity mode, Copyright © 2007 -2011 All Rights Reserved by QOMO HiteVision. www.qomo.com... -
Page 21: Attendance
4. The status tool bar will appear on the bottom of screen. If you do not wish to capture any images or use the system white board tool to draw your questions, simply click the Start button on the status tool bar to begin an oral quiz. Copyright © 2007 -2011 All Rights Reserved by QOMO HiteVision. www.qomo.com... - Page 22 7. The system white board tool contains these controls: Arrow button – Click the button to toggle between function keys button – Click the button to select the pen function. Copyright © 2007 -2011 All Rights Reserved by QOMO HiteVision. www.qomo.com...
- Page 23 ―.bmp‖ and ―.jpg‖ file format. The imported image will be displayed in the white board window. Capture button – Click this button to capture and display an image in the white board window. Copyright © 2007 -2011 All Rights Reserved by QOMO HiteVision. www.qomo.com...
- Page 24 Elimination Vote Free √ √ √* √** √ Normal Free Rush √ √ √* √ √ Free √ √ √* √ √ Elimination Free Vote √ √ √ √ Copyright © 2007 -2011 All Rights Reserved by QOMO HiteVision. www.qomo.com...
-
Page 25: Logon And Force Login
He or she simply logs on in the normal manner. The software will display a Force Login window, when the logging on is happening. Copyright © 2007 -2011 All Rights Reserved by QOMO HiteVision. www.qomo.com... - Page 26 4. Whether the student is permitted to Force Login or not, the ―Invalid ID‖ is displayed on the student keypad before permission. After the instructor approves the Force Login, the student should try one more time to logon to the system RF network. Copyright © 2007 -2011 All Rights Reserved by QOMO HiteVision. www.qomo.com...
-
Page 27: Exam Editor
8. To set up the PowerPoint quiz file, click the PowerPoint Setup button. This will open the PowerPoint Setup window which includes the answer sheet setting! Refer to the session 2.2.7 PowerPoint Setup for further details. Copyright © 2007 -2011 All Rights Reserved by QOMO HiteVision. www.qomo.com... -
Page 28: New
PowerPoint quiz file has been changed. 2.2.5 Add: The Add function is used to add the selected Template model to your PowerPoint editing quiz file. Copyright © 2007 -2011 All Rights Reserved by QOMO HiteVision. www.qomo.com... -
Page 29: Del
1. Open a PowerPoint quiz file from the Exam Editor, refer to session 2.2.2. Open You can also create a new PowerPoint quiz file from the Exam Editor, session 2.2.1, New. Copyright © 2007 -2011 All Rights Reserved by QOMO HiteVision. www.qomo.com... - Page 30 Rush Quiz mode. The default point is set to 10. Note: The new set timer value in a running session will overwrite the time limit value set here in the question set up. Copyright © 2007 -2011 All Rights Reserved by QOMO HiteVision. www.qomo.com...
- Page 31 Option. You may edit the contents if you want to modify the Question Title and Answer Option. 4. In the Correct Answer Selection column, clicking on the radio button before each answer Copyright © 2007 -2011 All Rights Reserved by QOMO HiteVision. www.qomo.com...
-
Page 32: Standard Setup
Browse button; the import file browser will display. Load in the file and then choose the standard you desire to import from the list in select standard(s) window. Currently, the import function only supports XML format files. Copyright © 2007 -2011 All Rights Reserved by QOMO HiteVision. www.qomo.com... -
Page 33: Question Modes
Teaching Plan: -- If a question is set up as a teaching plan, the question cannot be used as a quiz question. It is used for the presentation of teaching material. Copyright © 2007 -2011 All Rights Reserved by QOMO HiteVision. www.qomo.com... -
Page 34: Answer Sheet Setup
Editor. The QClick system provides some basic default template models and is loaded when you use the Template Design for the first time. To use the Template Design, follow these steps: 1. Click the button Templates to open the Template Design window. Copyright © 2007 -2011 All Rights Reserved by QOMO HiteVision. www.qomo.com... -
Page 35: 1New
The detailed description for the template design control is 2.2.11.1 New: The New function will create a new PowerPoint template file. Clicking the New button will display a blank template slide. Copyright © 2007 -2011 All Rights Reserved by QOMO HiteVision. www.qomo.com... -
Page 36: 2Open
The Open function will open the existing PowerPoint template file for editing. A file browser will be displayed after clicking the Open button allowing you to choose a PowerPoint quiz file. The template file extension is ―.pot‖ or ―x.pot‖. The default loading path is: ―Documents\ QOMO\ language \QRF900\Module‖. -
Page 37: 8Option Selection
2.3.1.1 Report Click the Reports tab on the QClick main window then click Report. This opens the reports tool. QClick Reports has two main categories; Data Manager and Create Report: Copyright © 2007 -2011 All Rights Reserved by QOMO HiteVision. www.qomo.com... - Page 38 Merge two or more sessions Delete selected sessions Delete selected course grade sessions Save a session to a file Save a course grade session to a file Copyright © 2007 -2011 All Rights Reserved by QOMO HiteVision. www.qomo.com...
- Page 39 QClick system. However, teachers may want the system grade book software to include these test results. In this application, the session data can be entered manually. Copyright © 2007 -2011 All Rights Reserved by QOMO HiteVision. www.qomo.com...
- Page 40 6. Select a teacher name for the session being created from the drop down list Teacher. 7. Select a date for the session being created from the calendar table Date. Copyright © 2007 -2011 All Rights Reserved by QOMO HiteVision. www.qomo.com...
- Page 41 20. Click the Save button and then click the Close button to close the ―creating a new session window‖. The saved session data will be recorded in the system database. Copyright © 2007 -2011 All Rights Reserved by QOMO HiteVision. www.qomo.com...
- Page 42 Click a student name and enter the student points in the Student Points text box. Repeat step 8 until all of the students points are entered for the new course grade session. Copyright © 2007 -2011 All Rights Reserved by QOMO HiteVision. www.qomo.com...
- Page 43 “The session already exists”; the importing is still successful. Copyright © 2007 -2011 All Rights Reserved by QOMO HiteVision. www.qomo.com...
- Page 44 QClick system database. The file takes the extension ―.gat‖ format. When a file to be imported is selected, the import session previews the course grade session data in two groups, the Import Information and the student session point list. Copyright © 2007 -2011 All Rights Reserved by QOMO HiteVision. www.qomo.com...
- Page 45 Under the Edit Student Answer Sheet tab, you can change the student‘s answers, session name, session type, session date and subject. Copyright © 2007 -2011 All Rights Reserved by QOMO HiteVision. www.qomo.com...
- Page 46 Copyright © 2007 -2011 All Rights Reserved by QOMO HiteVision. www.qomo.com...
- Page 47 The saved edited session data will be recorded in the system database. If the edited session data is not saved, the editing changes will be lost. Copyright © 2007 -2011 All Rights Reserved by QOMO HiteVision. www.qomo.com...
- Page 48 Select the student you choose to edit by clicking the student name and highlighting it in the Student list window. Select a question you choose to edit by clicking the question number. Copyright © 2007 -2011 All Rights Reserved by QOMO HiteVision. www.qomo.com...
- Page 49 Edit Session window. The alternate way to open the Edit Course Grade window is by double clicking on the session you wish to open. The following SESSION INFORMATION can be modified: Session title Session type Copyright © 2007 -2011 All Rights Reserved by QOMO HiteVision. www.qomo.com...
- Page 50 Shift key and then click the start and the end session in the list. All of the sessions between the start and end session are now selected. Copyright © 2007 -2011 All Rights Reserved by QOMO HiteVision. www.qomo.com...
- Page 51 You may select multiple sessions by holding the Shift key and clicking the start and the end session in the list. All of the sessions between the start and the end session will be selected. Copyright © 2007 -2011 All Rights Reserved by QOMO HiteVision. www.qomo.com...
- Page 52 Manager groups, click the Save As button to open the file browser to save the selected course grade session to a file. The import and saving of the course grade session data is a Copyright © 2007 -2011 All Rights Reserved by QOMO HiteVision. www.qomo.com...
- Page 53 ―By Default‖ is a key to revert the report to the initial status.There are four categories of reports, each report focusing on different areas. These categories are: Student Report Copyright © 2007 -2011 All Rights Reserved by QOMO HiteVision. www.qomo.com...
- Page 54 Correct Rate Statistics Study Guide Response Spread Report Attendance Report Standard Analysis Report Personal Standards Report Attendance Survey Report Vote Report Copyright © 2007 -2011 All Rights Reserved by QOMO HiteVision. www.qomo.com...
- Page 55 All reports include a Report Title which includes: Class Name Date of Session Subject Name Teacher Name Session Name Student Report includes the following: Copyright © 2007 -2011 All Rights Reserved by QOMO HiteVision. www.qomo.com...
- Page 56 The student response report provides detailed information for each question by the student. This report includes: Report Title Student name and the total points earned during the session Questions and option content Student answer and check Copyright © 2007 -2011 All Rights Reserved by QOMO HiteVision. www.qomo.com...
- Page 57 The study guide report includes: Report Title Incorrect Question and option identification per student Copyright © 2007 -2011 All Rights Reserved by QOMO HiteVision. www.qomo.com...
- Page 58 Correct/Incorrect answer comparison per question for each student Switch to the new report: Copyright © 2007 -2011 All Rights Reserved by QOMO HiteVision. www.qomo.com...
- Page 59 The question report provides a composite analysis of each question. The question report list includes: Report Title Question and option content The number and percentage of response to each option Copyright © 2007 -2011 All Rights Reserved by QOMO HiteVision. www.qomo.com...
- Page 60 Highlighted correct answer per question 3D pie chart for the percentage of each option A table listing all of the student responses to the question Switch to the new report: Copyright © 2007 -2011 All Rights Reserved by QOMO HiteVision. www.qomo.com...
- Page 61 Copyright © 2007 -2011 All Rights Reserved by QOMO HiteVision. www.qomo.com...
- Page 62 Report Title Student answer time and individual answers Correct rate for particular answer time Distribution period for particular answer time. Copyright © 2007 -2011 All Rights Reserved by QOMO HiteVision. www.qomo.com...
- Page 63 The student session report lists the students overall performance in the session. This list includes: Report Title Student name and ID Correct answer ratio relating to the total number of questions. Correct answer percentage. Copyright © 2007 -2011 All Rights Reserved by QOMO HiteVision. www.qomo.com...
- Page 64 The class response report provides a composite analysis of the overall class performance. The class response report list includes: Report Title Question and option content Student response percentages per question Copyright © 2007 -2011 All Rights Reserved by QOMO HiteVision. www.qomo.com...
- Page 65 Highlighted correct answer per question Switch to the new report: Copyright © 2007 -2011 All Rights Reserved by QOMO HiteVision. www.qomo.com...
- Page 66 A table is provided showing the overall response percentage of the class to the individual item. The response spread report includes: Report Title Question number List of all option items and the percentage of responses to the item. Copyright © 2007 -2011 All Rights Reserved by QOMO HiteVision. www.qomo.com...
- Page 67 The names and IDs of students who are late for this session and their login time The names of students who are absent for this session and their IDs Copyright © 2007 -2011 All Rights Reserved by QOMO HiteVision. www.qomo.com...
- Page 68 This report also provides the percentage of correct responses to the question as well as identifying individual student performance for each standard code. The Standard Analysis report includes: Report Title Code and standard associated to the question Copyright © 2007 -2011 All Rights Reserved by QOMO HiteVision. www.qomo.com...
- Page 69 The Personal Standards report includes: Report Title Code and standard associated to the question Percentage of correct responses to each student Copyright © 2007 -2011 All Rights Reserved by QOMO HiteVision. www.qomo.com...
- Page 70 The Attendance Report also provides the comparative percentage of those in attendance and those students who are absent. The Attendance Copyright © 2007 -2011 All Rights Reserved by QOMO HiteVision. www.qomo.com...
- Page 71 Names of students in attendance and those who are absent SURVEY REPORT The Survey Report provides the result for each survey item. The survey report is reserved for the Copyright © 2007 -2011 All Rights Reserved by QOMO HiteVision. www.qomo.com...
- Page 72 Report Title List of survey title and the survey result The total vote count for each survey item and weight design Switch to the new report: Copyright © 2007 -2011 All Rights Reserved by QOMO HiteVision. www.qomo.com...
- Page 73 The vote report list includes Report Title Participant name and individual responses Percentage of the participants yes or no responses Copyright © 2007 -2011 All Rights Reserved by QOMO HiteVision. www.qomo.com...
- Page 74 Total abstained vote count Switch to the new report: Copyright © 2007 -2011 All Rights Reserved by QOMO HiteVision. www.qomo.com...
- Page 75 The elimination vote report lists the candidates who have lower percentage were eliminated from voting in the session, This list includes: Report Title Percentage of the participants Eliminated candidates Copyright © 2007 -2011 All Rights Reserved by QOMO HiteVision. www.qomo.com...
- Page 76 Swittch to the new report: Copyright © 2007 -2011 All Rights Reserved by QOMO HiteVision. www.qomo.com...
- Page 77 Under the Group participation mode, QClick also generates various reports. In like manner, the group reports are created with the selection of the various activity modes. Copyright © 2007 -2011 All Rights Reserved by QOMO HiteVision. www.qomo.com...
- Page 78 The Group Result report provides overall points of each group performance. This report includes: Report title Group number A List of each group‘s points, extra points and total points. Copyright © 2007 -2011 All Rights Reserved by QOMO HiteVision. www.qomo.com...
- Page 79 Student Report includes: Report title The number of each group students‘ response to each option The total number of each group Highlighted correct answer per question Copyright © 2007 -2011 All Rights Reserved by QOMO HiteVision. www.qomo.com...
- Page 80 GENERATE REPORTS To generate a report, follow these steps: Click the session you wish to generate a report from. Click the Report button in the Create Report group. Copyright © 2007 -2011 All Rights Reserved by QOMO HiteVision. www.qomo.com...
- Page 81 Create Report window. The printer selection window will be displayed. Choose the printer from the list and click the Print button or click the Cancel button to cancel the printing. Copyright © 2007 -2011 All Rights Reserved by QOMO HiteVision. www.qomo.com...
- Page 82 Select a zoom control from the Zoom drop-down list to properly view a report. Switch the old-new report Select the image file from the computer to change background image Hide background image Copyright © 2007 -2011 All Rights Reserved by QOMO HiteVision. www.qomo.com...
-
Page 83: Course Grade
Click the Reports tab on the QClick main window. This opens the reports tool. Under the report tool tab, select the Course Grade tab. The QClick Course Grade has two main categories; Data Manager and Create Report: Copyright © 2007 -2011 All Rights Reserved by QOMO HiteVision. www.qomo.com... - Page 84 ―Attendance‖. Click the Create Report tab to enter the Create Course Grade Report window. The 4 types of reports which may be previewed and printed include: Copyright © 2007 -2011 All Rights Reserved by QOMO HiteVision. www.qomo.com...
- Page 85 Data Manager group. The Course Grade set up includes Set Period Set Weight Letter Grade Session Type Copyright © 2007 -2011 All Rights Reserved by QOMO HiteVision. www.qomo.com...
- Page 86 To delete an existing period, right click on the period setup you choose to delete. Then select Delete from the pop-up, drop-down menu. To set up a weight, follow these steps: Copyright © 2007 -2011 All Rights Reserved by QOMO HiteVision. www.qomo.com...
- Page 87 To delete a weight setup, right click the weight item you wish to delete in the Weight List window. From the popup drop-down menu select delete. To set up a letter grade, follow these steps: Copyright © 2007 -2011 All Rights Reserved by QOMO HiteVision. www.qomo.com...
- Page 88 To delete a letter grade conversion, right click on the letter grade conversion you wish to delete in the Letter Grade window. From the popup, drop-down menu select delete. To set up a session type, follow these steps: Copyright © 2007 -2011 All Rights Reserved by QOMO HiteVision. www.qomo.com...
- Page 89 Note: The weight used for the Course Grade report generation should contain the same number of session types as the number of session types included in all sessions selected for the Course Grade Copyright © 2007 -2011 All Rights Reserved by QOMO HiteVision. www.qomo.com...
- Page 90 Course Grade report by checking the box in front of them. 7. Select a weight set for the Course Grade report from the Weight Set drop-down list. Copyright © 2007 -2011 All Rights Reserved by QOMO HiteVision. www.qomo.com...
- Page 91 The student‘s point after weight calculation for each type of session will be listed in the student list window. The total grade points and the final letter grade for each student will also be Copyright © 2007 -2011 All Rights Reserved by QOMO HiteVision. www.qomo.com...
- Page 92 To preview the report and export and print the preview report, please refer to the session 2.3.1.1.12Create Report about the portion PRINT REPORTS, EXPORT REPORTS and CONTROL OF PREVIEWING REPORT. To generate the Progressive Report, follow these steps: Copyright © 2007 -2011 All Rights Reserved by QOMO HiteVision. www.qomo.com...
- Page 93 Select the student you choose to report by clicking on the student name in the Course Grade Report list. Click the Preview button and the Progressive Report window for the student will be displayed. Copyright © 2007 -2011 All Rights Reserved by QOMO HiteVision. www.qomo.com...
- Page 94 3. Select the student you choose to report by clicking on the student name in the Course Grade Report list. 4. Click the Preview button and the Academic Summary window for the student will be displayed. Copyright © 2007 -2011 All Rights Reserved by QOMO HiteVision. www.qomo.com...
- Page 95 3. Select the student you wish to report by clicking on the student name in the Course Grade Report list. 4. Click on the Preview button and the Course Grade Summary window for the student will be displayed. Copyright © 2007 -2011 All Rights Reserved by QOMO HiteVision. www.qomo.com...
- Page 96 2. Click on the Class Grade Report from the four reports listed in the window. 3. Click the Preview button and the Class Grade Report window for the class to be displayed. Copyright © 2007 -2011 All Rights Reserved by QOMO HiteVision. www.qomo.com...
-
Page 97: Grade Book
―All‖ from the drop-down list of Class name and Teacher name. 2.3.1.3.1 Import a grade book to the system database from a file In the Data Manager groups, click on the Import button to open the file browser to Copyright © 2007 -2011 All Rights Reserved by QOMO HiteVision. www.qomo.com... - Page 98 5. The file browser will open allowing you to provide a dedicated file name and path to save the grade book data into. 6. Click on the Save button to start saving. Copyright © 2007 -2011 All Rights Reserved by QOMO HiteVision. www.qomo.com...
- Page 99 Select the grading period you wish to create from the Grading Period drop-down list. Select the students you wish to create in the grade book from the student list window. In the Create groups, Copyright © 2007 -2011 All Rights Reserved by QOMO HiteVision. www.qomo.com...
- Page 100 2. Select the printer from the list and click on the Print button or click on the Cancel button to cancel the printing. Copyright © 2007 -2011 All Rights Reserved by QOMO HiteVision. www.qomo.com...
- Page 101 EXPORT REPORT CARD The preview report card can be exported to third-party software applications. These export options include: Crystal Report (*.rpt) Adobe Acrobat (*.pdf) Microsoft Excel (*.xls) Copyright © 2007 -2011 All Rights Reserved by QOMO HiteVision. www.qomo.com...
-
Page 102: Receive Session
QClick system database. The interface of Receive Session Data allows you to upload the session data from the instructor‘s keypad into the system database. To upload the session data, follow these steps: Copyright © 2007 -2011 All Rights Reserved by QOMO HiteVision. www.qomo.com... - Page 103 Receive Session without saving the uploaded session data, the software will prompt you to save the data. If you don’t save the uploaded session data, the data will be lost. Copyright © 2007 -2011 All Rights Reserved by QOMO HiteVision. www.qomo.com...
-
Page 104: Settings
The Software Language Setting allows the selection of languages for the program. Click on the language drop-down list, and then select the language you desire. Currently, QClick software Copyright © 2007 -2011 All Rights Reserved by QOMO HiteVision. www.qomo.com... -
Page 105: Exam Session Setting
Select the desired sound file for the activity and then click on the Save button to save the sound selection into the system. Copyright © 2007 -2011 All Rights Reserved by QOMO HiteVision. www.qomo.com... -
Page 106: Interaction Setting
Note: This function is unavailable under free-style mode. 2.4.1.3 Interaction Setting The Interaction setting contains the Student ID Display, Send Questions, Student Re-answer Times and Display Report/Result at the end of Question: Copyright © 2007 -2011 All Rights Reserved by QOMO HiteVision. www.qomo.com... -
Page 107: Activity Setting
―None”. Click on the Save button to save the system setting, and then click on the Close button to close the setting. 2.4.1.4 Activity Setting The Activity contains Free Style Mode Setting, Voting and Survey. Copyright © 2007 -2011 All Rights Reserved by QOMO HiteVision. www.qomo.com... -
Page 108: Channel
To set up the main receiver channel, follow these steps: Copyright © 2007 -2011 All Rights Reserved by QOMO HiteVision. www.qomo.com... -
Page 109: Hardware Test
To use the hardware test tool, follow these steps: Select the Settings Tab. Click on the Hardware icon; this will display the Hardware test window. Copyright © 2007 -2011 All Rights Reserved by QOMO HiteVision. www.qomo.com... -
Page 110: Database Management
Backup the current database to a file which can be used for recovery. Remember the login information for later use when you need to access the recovery information from this backup file. Copyright © 2007 -2011 All Rights Reserved by QOMO HiteVision. www.qomo.com... -
Page 111: Database Recover
The software will prompt you to back up the current database first. Note: The cleared session test data cannot be recovered without backing the database containing the session test data. Copyright © 2007 -2011 All Rights Reserved by QOMO HiteVision. www.qomo.com... -
Page 112: Del All Records
2. Click the OK button to close the Data Management window. 2.4.5 Login Setup: The default login name and password are: Login: qomo; Password: qomo. It is recommended to change these settings after the first time using the QClick software. -
Page 113: Version Info
Microsoft Office as well as the QClick Hardware and Software versions are displayed. 3. Click the OK button to close the Version Info window. Copyright © 2007 -2011 All Rights Reserved by QOMO HiteVision. www.qomo.com... -
Page 114: Part 3. Hardware & System Installation Illustration
Enclosed in this package are the following items Screwdriver Screws 3.1.2 Illustration 3.1.2.1 Student Keypad Layout LCD: Color display Power: Turns the unit on and off Copyright © 2007 -2011 All Rights Reserved by QOMO HiteVision. www.qomo.com... - Page 115 15. Operation Key : Used to enter a space, the division "/" or the asterisk ―*‖signs 16. Alpha-Numeric Key : Toggles between multiple choice options, and alphabet and numeric key functions Copyright © 2007 -2011 All Rights Reserved by QOMO HiteVision. www.qomo.com...
-
Page 116: Student Keypad Instruction
To use the shortcut to select a menu item, press the ―Selection Key‖ corresponding to the item number in front of the item. For example, to enter ―3. ExamList‖ sub menu, press key Copyright © 2007 -2011 All Rights Reserved by QOMO HiteVision. www.qomo.com... - Page 117 ―Shift Key‖ is used to toggle between upper and lower case letters. 3.1.2.2.4 Confirmation Screens Operations under these menu displays: Copyright © 2007 -2011 All Rights Reserved by QOMO HiteVision. www.qomo.com...
- Page 118 Under the ―SetUserName‖ screen, enter a valid user name and press the ―Menu/OK‖ key to save. Note: All submenu items can be selected by directly pressing their corresponding item numbers displayed at the front of each item. Login to a class: Copyright © 2007 -2011 All Rights Reserved by QOMO HiteVision. www.qomo.com...
- Page 119 These will be introduced in operation (5). Once the student has logged in, an assigned registration number will be displayed on the top of LCD screen. Copyright © 2007 -2011 All Rights Reserved by QOMO HiteVision. www.qomo.com...
- Page 120 The exam is not ready to begin. ―Invalid ID!‖ The software is not able to recognize the student ID. Be sure your student keypad ID is listed in the class the instructor has selected. Copyright © 2007 -2011 All Rights Reserved by QOMO HiteVision. www.qomo.com...
- Page 121 The instructor may look on his or her keypad LCD screen to view the student who is asking the question. Copyright © 2007 -2011 All Rights Reserved by QOMO HiteVision. www.qomo.com...
- Page 122 Press the ―OK‖ ―Left Soft Key‖ to start the exam. The following functions can be performed in the Paper Quiz Screen: Enter your answers by pressing the ―Choice Keys‖. Copyright © 2007 -2011 All Rights Reserved by QOMO HiteVision. www.qomo.com...
- Page 123 Press ―Option‖ ―Right Soft Key‖ to enter into the paper quiz ―Option‖ menu. Select a menu item and press the ―Menu/OK‖ key to confirm the operation. Rush Quiz or Roll Call Screen: Copyright © 2007 -2011 All Rights Reserved by QOMO HiteVision. www.qomo.com...
- Page 124 NoHost screen. 3.1.2.2.7 Homework Mode To use the student keypad for the homework management offline, follow these steps: Under the main menu, select ―3.ExamList‖ to enter into the Homework submenu. Copyright © 2007 -2011 All Rights Reserved by QOMO HiteVision. www.qomo.com...
- Page 125 Note: The cell phone style keypad provides an easy way to enter a character. Use the “Del Key” to modify your inputs. After entering your title search, press the “Menu/OK” key to start your search. Copyright © 2007 -2011 All Rights Reserved by QOMO HiteVision. www.qomo.com...
- Page 126 You may start to work on the questions and save the answers to the keypad and then submit them the next day in class; or just save the question frames to work on them later. 3.1.2.2.8 Student’s keypad special functions Copyright © 2007 -2011 All Rights Reserved by QOMO HiteVision. www.qomo.com...
- Page 127 Under the main menu, select item ―7.Settings‖ to enter into the Settings submenu. Under the Settings submenu, select ―2.ScreenSaver‖ submenu in order to set the duration time before going to the keypad sleep mode. Copyright © 2007 -2011 All Rights Reserved by QOMO HiteVision. www.qomo.com...
- Page 128 You can press ―Send‖ ready but the timer to directly logon has not started. The back to previous class. student keypad joined The LCD displays the the class previously. register screen. Copyright © 2007 -2011 All Rights Reserved by QOMO HiteVision. www.qomo.com...
- Page 129 Note: Before using your student keypad to join a quiz in the self-controlled pace, you should understand the function operation forms on the above table before you can begin your quiz. To join the quiz, follow these steps: Copyright © 2007 -2011 All Rights Reserved by QOMO HiteVision. www.qomo.com...
-
Page 130: Instructor Keypad
Re-secure the back plate and screw, as necessary. Enclosed in this package are the following items Screwdriver Screws Copyright © 2007 -2011 All Rights Reserved by QOMO HiteVision. www.qomo.com... -
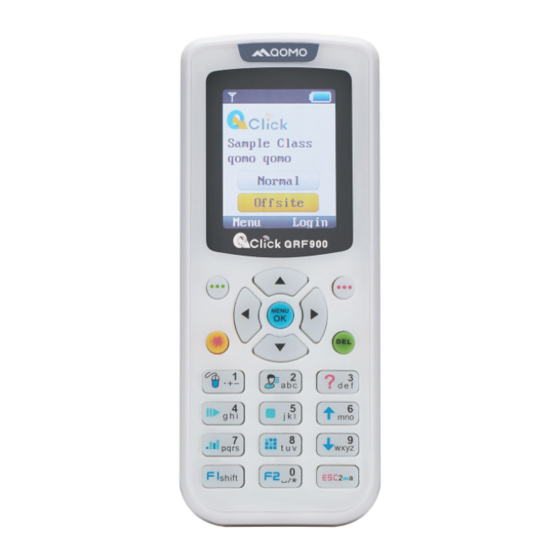
Page 131: Illustration
In Offsite mode: Displays the current question and the correct answer 14. Question Key : Displays the names of the students who have a question 15. Start/Pause Key : Starts or pauses or logs you back into a class Copyright © 2007 -2011 All Rights Reserved by QOMO HiteVision. www.qomo.com... -
Page 132: Remote Mouse Keypad Definition
: Toggles between the mouse and keypad control 10. Question Key : Mouse left-click hold 11. View Key : ―Tab key‖ PC keyboard 12. Slide Up Key : ―Page Up Key‖ PC keyboard Copyright © 2007 -2011 All Rights Reserved by QOMO HiteVision. www.qomo.com... -
Page 133: Nohost Screen
Normal/Offsite mode. The following functions can be performed while on this screen: Press the Menu/OK Key to enter the main menu of your desired mode. Copyright © 2007 -2011 All Rights Reserved by QOMO HiteVision. www.qomo.com... -
Page 134: Normal Mode
Down Key to scroll up or down the selections. Press the Menu/OK Key to select the submenu and the keypad will go to the screen or the submenu. Copyright © 2007 -2011 All Rights Reserved by QOMO HiteVision. www.qomo.com... - Page 135 Under the NoHost screen, select ―Login‖ Right Soft Key to login to your nearby class. Under the NoHost screen, press the “Menu/OK” Key to enter the main menu. Select item ―Login‖ to login into your class. Copyright © 2007 -2011 All Rights Reserved by QOMO HiteVision. www.qomo.com...
- Page 136 LCD screen. After logging in, the following information will be displayed on the instructor keypad screen: The selected activity mode The selected class name Copyright © 2007 -2011 All Rights Reserved by QOMO HiteVision. www.qomo.com...
- Page 137 Note: Under the student list display, press the Menu/OK Key to toggle the display between the student name and the answer report. Note: A message will be displayed if the student list is empty Copyright © 2007 -2011 All Rights Reserved by QOMO HiteVision. www.qomo.com...
- Page 138 Select the item ―HandraiseList‖ to view the list of students who have questions. Note: After responding to the student’s request, select the student name and press the Menu/OK to remove the student from the list. Set up an instant question: Copyright © 2007 -2011 All Rights Reserved by QOMO HiteVision. www.qomo.com...
- Page 139 Under the main menu, select item ―4.Setting‖ to enter into the Settings submenu. Under the Hardware submenu, select ―2.ScreenSaver‖ submenu in order to set the duration time before going to the sleep mode. Copyright © 2007 -2011 All Rights Reserved by QOMO HiteVision. www.qomo.com...
-
Page 140: Offsite Mode
The Offsite mode has these functions: Begin Session Loading Info Upload session Copyright © 2007 -2011 All Rights Reserved by QOMO HiteVision. www.qomo.com... - Page 141 Menu/OK Key . If there are no classes loaded in the keypad, the screen will display ―NoClasslist!‖. Copyright © 2007 -2011 All Rights Reserved by QOMO HiteVision. www.qomo.com...
- Page 142 6. Under No Free Style Activity mode, the instructor can push the question contents into the student clickers. To implement this function, follow these steps: (1) On the activity mode display, enter the menu, and then choose the SendOption Copyright © 2007 -2011 All Rights Reserved by QOMO HiteVision. www.qomo.com...
- Page 143 The display will prompt you to confirm the exit. Enter the session name and then press Menu/OK Key to save the conducted session into the instructor clicker. Copyright © 2007 -2011 All Rights Reserved by QOMO HiteVision. www.qomo.com...
- Page 144 Press the Menu/OK Key confirm the cancellation of saving or press ―Return‖ Right Soft Key to return to the saving screen. Copyright © 2007 -2011 All Rights Reserved by QOMO HiteVision. www.qomo.com...
- Page 145 Select a student name and then press the Menu/OK Key to view the student question responses. Press the Question Key to view the list of students who have raised questions. Copyright © 2007 -2011 All Rights Reserved by QOMO HiteVision. www.qomo.com...
- Page 146 , the session homework mode stays in the Assigning homework mode. After pressing the Start/Pause Key the session is in the Receiving homework mode. 3.2.2.5.2 Loading Information Download student’s information Copyright © 2007 -2011 All Rights Reserved by QOMO HiteVision. www.qomo.com...
- Page 147 4. The display will remind the instructor to load an answer sheet and start the session in the QClick software. Refer to Part 2 Software. Click the Menu/OK Key on the keypad to Copyright © 2007 -2011 All Rights Reserved by QOMO HiteVision. www.qomo.com...
- Page 148 ―Return‖ Right Soft Key to quit uploading. After successfully uploading, the session data will not be purged. To purge the session data, go to the function Session List. Copyright © 2007 -2011 All Rights Reserved by QOMO HiteVision. www.qomo.com...
- Page 149 The maximum number of exams the instructor keypad can store is 8. To view and to delete an exam from the answer sheet list, follow these steps: Copyright © 2007 -2011 All Rights Reserved by QOMO HiteVision. www.qomo.com...
- Page 150 Press the Menu/OK Key to confirm the deletion or press ―Return‖ Right Soft Key to cancel the deletion. After the operation, the keypad will display the previous session list menu. Copyright © 2007 -2011 All Rights Reserved by QOMO HiteVision. www.qomo.com...
-
Page 151: Main Receiver And Usb Cable
Operating Relative Humidity: 0-90% Transmitting and receiving distance: ~200 feet radial 3.3.2 Illustration QRF900 Main Receiver Extension USB: extends the connection between the main receiver and the computer. 3.4 Carrying Case Copyright © 2007 -2011 All Rights Reserved by QOMO HiteVision. www.qomo.com... -
Page 152: Part 4. Fcc Warning Statement
—Increase the separation between the equipment and receiver. —Connect the equipment into an outlet on a circuit different from that to which the receiver is connected. —Consult the dealer or an experienced radio/TV technician for help. Copyright © 2007 -2011 All Rights Reserved by QOMO HiteVision. www.qomo.com... - Page 153 QOMO HiteVision Michigan, USA Information: info@qomo.com Phone: 1-866-990-QOMO (1-866-990-7666) Fax: 1-248-281-1999 (US) or 1-248-281-1998 Web: www.qomo.com Copyright © 2007 -2011 All Rights Reserved by QOMO HiteVision. www.qomo.com...
Need help?
Do you have a question about the HiteVision QRF 900 and is the answer not in the manual?
Questions and answers