
Related Manuals for GTD GTD-L488


Summary of Contents for GTD GTD-L488
- Page 1 LED Cyclorama GTD-L488 User’s Manual Guangzhou GTD Lighting Technology Co., Ltd. Tel: +86-20-61808296 Fax: +86-20-61812282 www.gtd-lighting.com http://...
- Page 2 © 2019 GTD all rights reserved. Information, specifications, diagrams, images, and instructions herein are subject to change without notice. GTD logo and identifying product names and numbers herein are trademarks of GTD. Copyright protection claimed includes all forms and matters of copyrightable materials and information now allowed by statutory or judicial law or hereinafter granted.
-
Page 3: Table Of Contents
GTD-L488 User Manual Contents Safety instructions ................................3 General guidelines ................................4 Packing and shipping................................. 5 Unpacking ........................................ 5 Packing after use ..................................... 5 Accessories..................................5 Product introduction ................................. 6 Installation ..................................6 Clamps installation ....................................6 Device installation ....................................6 Power / Control connection ............................... -
Page 4: Safety Instructions
GTD-L488 User Manual Safety instructions WARNING! Before using the fixture, read the latest version of the product user manual, paying particular attention to the safety instructions. Please check www.gtd-lighting.com for the latest revision/update of the user manual. The manufacture of this fixture, are not responsible for damages, resulting from misuse of this fixture, due to the disregard of the information printed in this user manual. -
Page 5: General Guidelines
Broken or damaged cables can only be fixed or changed by certified technicians, certified local distributors or the manufacturer to ensure operational safety. Do not stick filters or other materials onto the lens. Do not modify the fixture or install other than GTD manufactured parts. ... -
Page 6: Packing And Shipping
GTD-L488 User Manual Packing and shipping Unpacking Notes All products are quality controlled and checked for any faults before they are dispatched to customers. If the fixture is damaged during delivery, the customer must notify the shipper and manufacturer to file a damage insurance claim. -
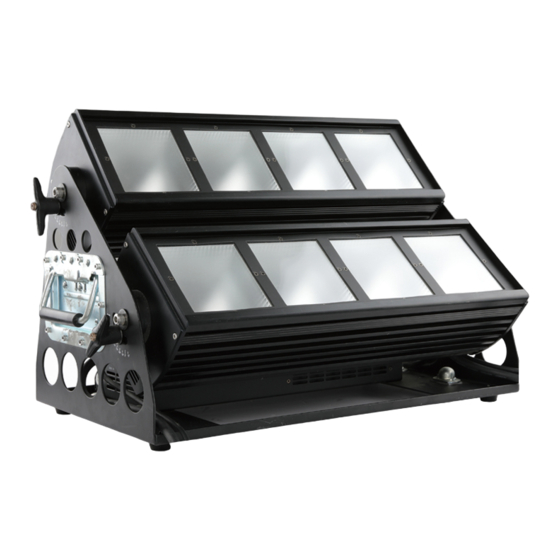
Page 7: Product Introduction
GTD-L488 User Manual Product introduction Cast aluminium cover Stainless steel handle Manually-adjustable screw Base Foot pad Power supply box Display LED lamp Reflector bowl Installation Clamps installation The fixture can be placed on the stage or mounted on the truss facing any direction. Attach the clamp to the mounting position on the base of the fixture. -
Page 8: Power/ Control Connection
GTD-L488 User Manual Placed on the floor Hanging on the truss Power/ Control connection Power connection Connection method: L (Live) Brown wire E (Earth) Yellow / Green bi-color wire N (Neutral) Blue wire The voltage and frequency of the power source must be in compliance with the ones marked on the fixture. Please apply series connection when many sets of fixtures are connected to the power source to avoid heavy load to the power source. -
Page 9: Control Connection
GTD-L488 User Manual Control connection The fixture has 5-pin XLR connectors for DMX data input and output (3-pin optional) as shown below. Connection between the console and fixture, and between fixtures must be made with 2 core screened DMX signal cable. Maximum connecting distance of signal cable is 150 meters. -
Page 10: Control Panel
GTD-L488 User Manual Control panel The control panel with buttons and digital display can access the function menu and configure the fixture easily. Press MENU to check or modify the functions of the fixture; Press UP or DOWN to view or select the function menu. -
Page 11: Menu Structure
GTD-L488 User Manual Menu structure L488 - Menu Structure Revision: A Valid from firmware version: 1.0 Level 1 Level 2 Level 3 Level 4 Info Setting the DMX address Addr AXXX A001 Running build-in program as the master or the slave... -
Page 12: Dmx Protocol
GTD-L488 User Manual DMX protocol L488 - DMX Protocol Revision: A Valid from firmware version: 1.0 DMX mode Default Standard Basic Name DMX value DMX percentage Function (14ch) (8ch) Value 0.0% 12.2% Closed 12.5% 24.7% Open 25.1% 49.8% Synchronous strobe from slow to fast... - Page 13 GTD-L488 User Manual DMX mode Default Standard Basic Name DMX value DMX percentage Function Value (14ch) (8ch) 78.8% 82.7% 6400K 83.1% 87.1% 6600K Color 87.5% 91.4% 6800K 0(0%) temperature 1 91.8% 95.7% 7000K 96.1% 100.0% 7200K 0.0% 9.4% No function 9.8%...
-
Page 14: Technical Specification
GTD-L488 User Manual Technical specification Optical Light source: 48W (RGBWA), quantity: 8pcs Expected average lifetime: 50000 hours Beam angle (fixed): 56° (50% peak angle), 73° (10% peak angle) Photometric Total Output (Lumen): 14500 lumens Color temperature: 3200K-7200K linear regulation Electrical ... -
Page 15: Cleaning And Maintenance
GTD-L488 User Manual Connections AC power: Neutrik powerCon DMX data input/output: Chassis 5-pin Neutrik XLR (in/out) Certification and Safety EMC: EN 55103-1:2009, EN 55103-2:2009, EN 61000-3-2:2006+A2:2009, EN 61000-3-3:2013 Safety: EN 60598-2-17:1989/A2:1991 Photometric Cleaning and maintenance It is required that the fixture should be kept clean and well maintained to ensure its reliability. Its lifespan mainly depen ds on the working environment and proper operation. -
Page 16: Troubleshooting
GTD-L488 User Manual The fixture is equipped with thermal-protection device that will switch off the LED lamp in case of overheating. If this happens, please check that the fans are not blocked, and clean them if they are dirty. Check whether the fans are operational. -
Page 17: System Wiring Diagram
GTD-L488 User Manual System wiring diagram 5 8 0 2 9 1 0 0 8 0 A L C R 0 2 0 1 A L JB 0 3 0 3 A 5 8 0 2 0 1 0 0 2 9 A... - Page 18 GTD-L488 User Manual Appendix 1...
- Page 19 GTD-L488 User Manual Notes: P/N: 1502011031A Time: June 7 , 2017...
Need help?
Do you have a question about the GTD-L488 and is the answer not in the manual?
Questions and answers