Table of Contents
Advertisement
Quick Links
Advertisement
Table of Contents

Related Manuals for BenQ AE120


Summary of Contents for BenQ AE120
- Page 1 AE120 Digital Camera User Manual...
- Page 2 Further, BenQ Corporation reserves the right to revise this publication and to make changes from time to time in the contents hereof without obligation of BenQ Corporation to notify any person of such revision or changes.
- Page 3 Battery Recycling information: See http://www.benq.com/support/recycle for details. CE Regulatory Notice This devise is herewith confirmed to comply with the requirements set out in the Council Directives on the Approximation of the Laws of the Member States relating Electromagnetic Compatibility (2004/108/EC);...
- Page 4 When using the flash, do not go too close to human eyes (particularly for babies, toddlers, and children) • or animal eyes. Otherwise, when the flash fires, the light may cause damage to human eyes or irritate animals. Batteries could explode, for instance. All batteries can cause property damage, injury or burns if a •...
- Page 5 In a closed car that is in direct sunlight • Unstable locations • Do not use your camera outdoors when it is raining or snowing. • Do not use your camera in or near water. • The camera operating temperature is between 0 and 40 degrees Celsius. It is normal for the operating •...
- Page 6 Do not hold the camera by excessive force. To avoid accidental falling, please attach the Plus, be sure to protect the camera from hand strap to the camera and always hold strong impacts. the camera by keeping the hand strap around your wrist.
-
Page 7: Table Of Contents
Table of Contents Introduction ............................9 System Requirements ........................ 9 Package Contents ........................10 Camera Views ........................... 11 Navigation Control ........................13 Getting Started ..........................14 Attach the Camera Strap ....................... 14 Inserting the Battery ....................... 14 Inserting an SD/SDHC/SDXC Memory Card ..............15 Charging the Battery by USB .................... - Page 8 Reset All ............................. 61 Making Connections ......................... 62 Connecting the Camera to a TV ..................62 Connecting the Camera to a PC ..................62 Connecting the Camera to a Printer................... 63 Setting the Print Mode Menu ....................64 Troubleshooting and service information ..................65 Technical support ........................
-
Page 9: Introduction
Introduction System Requirements For Windows: • Windows XP/Vista/Win7 • Processor: Pentium II 450MHz or above • Memory: Minimum 512MB RAM (Over 1G recommended) • HDD space: 200MB or above • 24bit color display monitor • Microsoft DirectX 9.0C • USB port and CD-ROM drive For Macintosh: •... -
Page 10: Package Contents
Package Contents Please check the contents of your camera package. It should contain: Digital camera Rechargeable battery Camera pouch Wrist strap USB adapter USB cable CD-ROM Quick Guide... -
Page 11: Camera Views
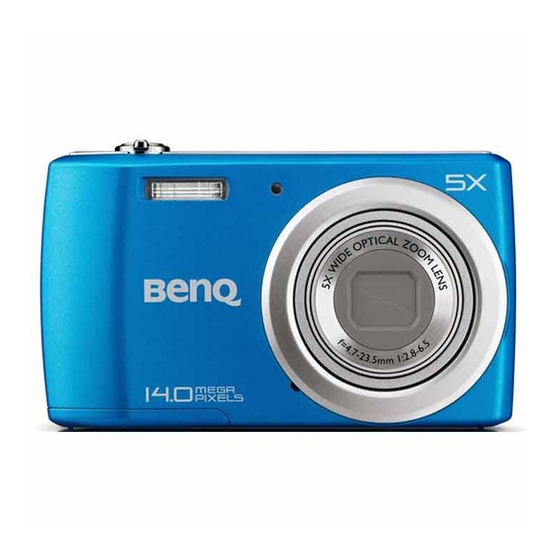
Camera Views Front View Flash Self-timer LED Lens Microphone Back View LCD monitor Movie button Menu button OK button/4-way navigation control Playback button Function/Delete button Top View Power button Zoom dial Shutter button... - Page 12 Bottom View Battery/Memory card compartment Tripod screw hole Speaker Left Right View USB/TV Out Strap ring Button Description Power Press the Power button to turn the power on/off. Shutter Press to capture an image or start/stop recording audio clip. In photo and movie mode, spin the zoom dial to left to zoom out, right to zoom in. Zoom dial In Playback mode, spin to zoom in to magnify image or zoom out enter 9-image/calendar thumbnails.
-
Page 13: Navigation Control
Playback Press to enable Playback mode or return Record mode. Movie Press to start/stop recording video. Navigation Control The 4-way Navigation Control and the OK button allow you to access the various menus available from the On Screen Display (OSD). You can configure a wide range of settings to ensure maximum results from your images and videos. -
Page 14: Getting Started
Getting Started Attach the Camera Strap Inserting the Battery 1. Make sure the power is off before inserting the battery. 2. Unlock and open the battery/memory card compartment at the bottom of the camera. 3. Insert the battery into the compartment with the terminal facing inside the camera with correct orientation as shown. -
Page 15: Inserting An Sd/Sdhc/Sdxc Memory Card
Inserting an SD/SDHC/SDXC Memory Card 1. Unlock and open the Battery/memory card compartment at the bottom of the camera. 2. Insert the SD/SDHC/SDXC card into the memory card slot with the metallic part facing the back side of the camera. 3. -
Page 16: Turning The Power On And Off
Turning the Power On and Off • Press the Power button, then the startup image displays briefly and the startup sound plays if enabled. The zoom lens extends and the camera is turned on in Record mode. • Press the Playback button, then the camera is turned on in Playback mode. The zoom lens is not extended. To turn off the camera, press the Power button. -
Page 17: Using The Lcd Monitor
Using the LCD monitor LCD Monitor Layout Photo Mode Screen Layout Item Description Record Mode Indicates the current mode. Flash Indicates flash settings. Self-timer/Burst Indicates drive mode settings. Zoom indicator Displays zoom. Shots remaining Indicates the remaining shots available. Battery Indicates battery level. -
Page 18: Recording Layout
Movie Mode Screen Layout Recording Layout Item Description Key indicator Displays the commands on 4-way Navigation Control button Recorded time Displays recorded time. Recording status Indicates recording status. The Pre-Record icon appears on the screen in red color as the same position as zoom indicator. - Page 19 Playback Mode Screen Layout The Playback mode display varies depending on the type of image being viewed. Playback mode display of still images: Item Description Playback mode Indicates playback mode. Protect Indicates file is protected. Voice memo Indicates voice memo is attached. Button intro Indicates the button to press on the camera to play a video or audio file.
- Page 20 Playback mode of videos: Item Description Playback mode Indicates playback mode. Protect Indicates file is protected. Video clip Indicates the file is a video. Button intro Indicates the button to press on the camera to play a video or audio file. File no./Total no.
- Page 21 Playback mode of audio clips: Item Description Playback mode Indicates playback mode. Protect Indicates file is protected. Button intro Indicates the button to press on the camera to play a video or audio file. File no./Total no. Indicates the file number over the total number of files in the storage card. Battery Indicates battery level.
-
Page 22: Changing The Lcd Monitor Display
Changing the LCD Monitor Display The type of information displayed on the LCD monitor can be changed using the button. Press the button repeatedly to change the LCD display from one type to another. In Photo/Movie Mode, the LCD display can be changed into any of the following: •... -
Page 23: Setting The Zoom Control
Setting the Zoom Control 1. Spin the Zoom dial to zoom in or zoom out an image. 2. The zoom indicator appears on the LCD monitor. Zoom dial Spin the dial clockwise (right) to zoom in. Spin the dial counterclockwise (left) to zoom out. Activate digital zoom. -
Page 24: Using Flash
Using Flash When taking pictures in difficult lighting conditions, use the Flash/Right button to get correct exposure. This function cannot be activated in recording videos or continuous shooting. • Press the Flash/Right button on your camera repeatedly until your desired flash mode is displayed on the LCD Flash/Right monitor. -
Page 25: Using The Function Menu
Using the Function Menu The Function Menu is used to adjust capture settings in Photo Mode. Press the FUNC button of your camera to launch the Function Menu. Press the FUNC button again to close the menu. Menu Options • The Menu bar displays the current status of your camera settings. - Page 26 The table below shows the Photo Size values for still images when selecting Aspect ratio 4:3. Icon Pixel Size Printing Size Suggestion 4320 x 3240 A2 Size 3264 x 2448 A3 Size 2592 x 1944 A4 Size 2048 x 1536 A5 size 640 x 480 E-mail...
- Page 27 EV Compensation Images can be captured with the overall scene intentionally made brighter or darker. • To adjust EV settings, press the keys to increase/decrease the value. As you adjust the settings, the LCD monitor synchronously displays the image applying the EV settings.
- Page 28 Metering This sets the metering method for calculating the exposure. Icon Item Description Multi The entire area of the screen is measured, and the exposure is calculated. Averages the light metered from the entire frame, but gives greater weight to Center the subject matter at the center.
-
Page 29: Recording Videos
Recording Videos 1. Press the Movie button to start recording. 2. Focus your camera on the subject that you want to take. 3. Use the Zoom dial to zoom in and zoom out an image. 4. To pause recording, press the key 5. - Page 30 Internet Mode The Internet Mode allows you to record videos with predefined video settings for easy upload to the Internet website. Therefore when you record using the Internet Mode, the following standards are followed: • Recorded videos are set to Internet standard resolution of 640 X 480. •...
-
Page 31: Using The Record Menu
Using the Record Menu If you are in Photo Mode, you can access the Record menu simply by pressing the MENU button on your camera. When the menu is displayed, use the 4-way navigation control and the OK button to move through menu selections and apply your desired settings. - Page 32 This feature is used to capture images with over-saturated colors, off-kilter LOMO exposure or blurring. For shooting firework displays in vivid colors. It's recommended to use a Fireworks tripod. Snow This feature is used for beach and snow scenes. Sports This feature captures still images in high speed motions.
- Page 33 D-Lighting This feature enhances the shadow and highlight details of an image. Fisheye Lens This feature captures images with fisheye lens effects. Photo Stitch This feature combines a panoramic photo from multiple shots. Blur the parts of photo to make the scene looks like a miniature scale model. It Miniature Effect is recommended to capture from a high angle to simulate the miniature effect.
- Page 34 Using Intelligent Scene This feature is most useful for novice users to capture great images even without basic knowledge of photography. Simply frame the shot with the help of Intelligent Scene Mode, the camera automatically recognizes 11 kinds of scenes - Portrait, Landscape, Sunset, Macro, Text, Snow, Backlight, Backlight Portrait, Night Scene, Night Portrait and Foliage - and selects the ideal settings.
- Page 35 Using Food Mode This mode features on macro focus and auto flash designed for close-up photography. Using Foliage Mode In foliage mode, the greens, blues, are brilliantly enhanced making scenic pictures pop out with bright color. Using LOMO Mode The LOMO mode applies the following effects on the photo: 1.
- Page 36 Using Auction Mode The camera composes a combined image in lower resolution suited to online posting. 1. Select Auction mode from Scene mode menu. 2. Use keys to choose a pattern. 3. Press the OK button to start shooting. 4. Frame the subject and press the Shutter button to take the first shot.
- Page 37 Auction mode provides 4 kinds of pattern as follow The image is set to low quality and VGA (640x480) size only. Using Smile Capture Mode Smile capture mode detects every smile all the time and performs Automatic Focus (AF) to capture an image without pressing Shutter button.
- Page 38 2. Ask someone else to record a shot of you against your original pre-composed background, telling him/her to compose the image by using the 1/3 semi-transparent screen image as a guide. 3. Move your position until photographer confirm your whole or half body in the frame and in the right place.
- Page 39 Using Photo Stitch Mode Use this feature to create a panoramic photo from multiple shots. You can combine up to 2 or 3 shots into one single image quickly and easily. Enter Photo Stitch mode and press the UP key to A guidance bar appears after taking the first select the direction how shots will be stitched.
- Page 40 After taking the second shot, the yellow block Once the icon overlaps the yellow block, moves to the end of the guidance bar, and the you can get another shot without pressing the OK button appears as well. You can press the shutter button.
-
Page 41: Using Voices Recording
Using Voices Recording 1. From the Scene menu, select Voice REC. The Voice Recording screen layout is displayed on the LCD monitor. 2. Press the Shutter button to start recording. 3. Press the Shutter button again to stop recording. Setting the Drive Mode Your camera features a Self-timer and Burst which can be set in the Drive mode function in the Record Menu. - Page 42 Setting the AEB AEB stands for Automatic Exposure Bracketing. It permits 3 consecutive images in the order of standard exposure, under exposure and overexposure compensation. 1. From the Record menu, select AEB. 2. Use the keys to go through the selection. 3.
- Page 43 Setting Saturation 1. The Saturation function lets you adjust the color saturation in your images. From the Record menu, select Saturation. 2. Use the keys to go through the selection. 3. Press the OK button to save and apply changes. Icon Item Description...
- Page 44 Setting Quality The Quality sets the quality (compression) at which the image is captured. Icon Item Description Superfine 3x compression rate. 7x compression rate. Fine 12x compression rate. Normal Setting the Digital Zoom Your camera enlarges an image using the optical zoom first. When the zoom scale exceeds 5X, the camera uses digital zoom.
- Page 45 Setting the Date Stamp The date of recording can be printed directly on the still images. This function must be activated before the image is captured. Once date and time are stamped on an image, they can no longer be edited or deleted.
-
Page 46: Playback
Playback Viewing in Single Navigation The Single navigation mode displays the image one by one on the LCD monito 1. Press the Playback button on the camera. 2. The LCD monitor displays an image. To understand the icons and other information on the screen, please see "Photo Mode Screen Layout"... -
Page 47: Zooming Images
Thumbnail icons: When you view the thumbnails, some images may contain icons. These icons indicate the type of file or recording. Icon Type Description Voice Record Indicates a voice recording file. File Error Indicates an error file. Zooming images The zoom view function works with still images only. •... -
Page 48: Playing Voice Recording
To capture screenshot image from a video clip 1. During playback of video, press the key to pause playback on your desired video frame to capture. 2. Press the Shutter button to capture a screenshot. 3. The camera stop playback. The LCD monitor displays the captured image in Single navigation mode. -
Page 49: Playing Voice Memo
Playing Voice Memo Voice memo is separately recorded and attached to a captured image. See "Voice Memo" on page 54 on how to record voice memo. 1. Press the Playback button on the camera. 2. Use the navigation controls to scroll through the saved images. An image file with voice memo has a voice memo icon located on the top center of the LCD monitor. -
Page 50: Deleting An Image/Video/Audio
Deleting an Image/Video/Audio • Using the Delete button. • Using Playback Menu Delete settings. See "Delete" on page 51. Using the Delete Button Use the Fn/Delete button on your camera to delete an image/video/audio clip. 1. Press the Playback button on the camera. -
Page 51: Playback Menu
Playback Menu 1. Press the Playback button on the camera. 2. Press Menu button to launch the Playback Menu. 3. Use the keys to move through the menu selections. 4. To select a menu, press or the OK button. 5. Change the submenu settings using the 4-way navigation control. - Page 52 To delete multiple files: 1. Select Multi in the Delete submenu, the images are displayed in thumbnail view on the LCD monitor. 2. Use the navigation control to move through the files. 3. When the desired image/video/audio clip is highlighted, press the OK button to mark image/video/audio clip for deletion.
- Page 53 To protect files: 1. From the Playback menu, select Protect. 2. The Protect submenu is displayed on the LCD monitor. • Single. Select one file to lock/unlock. • Multi. Select multiple files from the thumbnail view to lock/unlock. • Lock All. Lock all files •...
- Page 54 Red-eye Correction The Red-eye Correction function is used to reduce red eye in captured images. This function is only available for still images. 1. Press the Playback button on the camera. 2. Press the keys to scroll and select an image. 3.
- Page 55 5. Press the keys to scroll and select an option. As you move through the selection, the preview on the LCD monitor changes synchronously. Icon Item Description No effect is added to the image. Sepia Image is saved with a sepia tone. B&W Image is saved in black and white.
- Page 56 Trim The Trim function allows you to trim an image to another image size. This function is only available for still images. 1. Press the Playback button on the camera. 2. Use the keys to scroll and select an image to trim. 3.
- Page 57 Resize Resizes a previously saved image and only resizing to a smaller size is available. 1. Press the Playback button on the camera. 2. Use the keys to scroll and select an image to resize. 3. Press the MENU button to launch the Playback menu. 4.
- Page 58 To set DPOF on a single image/all images: 1. Select Single or All on the DPOF submenu. 2. For single image, use the keys to scroll and select an image to mark for printing. 3. Specify the number of copies. Use the increase/decrease number.
-
Page 59: Using The Setup Menu
Using the Setup Menu 1. Press Menu button to launch the Record/Playback Menu. 2. Use the keys to switch the menu tab to Setup menu. 3. Use the keys to move through the menu selections. 4. To select an item, press the OK button or key. -
Page 60: Setting Lcd Save
Setting LCD Save Enable the LCD Save function to automatically decrease the LCD brightness to conserve battery power. When the camera is idle for 20 seconds, the LCD darkens. Press any button to resume to normal brightness. • The camera is idle and enters LCD Save mode when no buttons are pressed. -
Page 61: Setting Tv Out
Setting TV Out Use the TV Out function to adjust video output signal to accommodate different regional settings. If TV out is not set correctly, the image may not display properly on TV. • NTSC. Applicable in Japan, USA, Canada, Taiwan and others. •... -
Page 62: Making Connections
Making Connections You can connect your camera to: TV, computer, or a printer. Connecting the Camera to a TV You can play back your images on a TV screen. Before connecting to any video devices, make sure to select NTSC/PAL to match the broadcast standard of the video equipment you are going to connect to the camera. 1. -
Page 63: Connecting The Camera To A Printer
5. The PC starts to detect the connection while the LCD monitor appears Connecting… 6. Connection established after PC MODE appeared on the LCD monitor 7. Access the files in the camera by your PC. Connecting the Camera to a Printer You can print your images directly using a PictBridge compatible printer. -
Page 64: Setting The Print Mode Menu
Setting the Print Mode Menu Print Mode menu appears on the screen after the connection between a printer and your camera is established. • Print Select. An image can then be selected to print. • Print All. Prints all images. •... -
Page 65: Troubleshooting And Service Information
Troubleshooting and service information If your camera cannot operate normally, see the frequently encountered problems and solutions listed below. If the problem persists, contact your nearest service center or technical support. Problem Cause Solution The camera cannot power There is no battery or the battery is not Insert the battery correctly. -
Page 66: Technical Support
Connect the camera to the printer, turn on the camera, and PictBridge-compliant when the camera is powered off. then select Printer. printers. Technical support For technical assistance, free driver updates, product information, and news releases, visit the following web site: http://www.BenQ.com... -
Page 67: Specifications
Specifications Sensor 14 Mega Pixels, 1/2.3 inch CCD Zoom Optical: 5X Digital: 5X Lens f = 4.7 (W) ~ 23.5 (T) mm Normal: W = 15 cm ~ Infinity, T = 60 cm ~ Infinity Focus Range Super Macro: 2 cm 2.7”... - Page 68 Accessories USB Cable / Software & User Manual CD / Quick Guide / Hand Strap / Pouch / Li-ion battery / AC power adapter Available accessories depend on the actual items shipped and may vary from the list above. All information, designs, and specifications are subject to change without prior notice.
Need help?
Do you have a question about the AE120 and is the answer not in the manual?
Questions and answers