Table of Contents
Advertisement
Quick Links
Advertisement
Table of Contents

Related Manuals for Beta D3000


Summary of Contents for Beta D3000
- Page 1 D3000 Installation & Setup Guide Page 1 of 15 17483-00 Rev B s1 April 2009...
-
Page 2: Table Of Contents
Installation & Setup Guide D3000 Contents Description Page Safety ……………………………………………………....Installation Standards ………………………………………… Specification ………………………………………………………. Circuit Board Connection Mounting Dimensions ………………………………………… Installation Procedure ………………………………………… Mechanical Installation …………………………………… Electrical Installation………………………………………………… Probe Connection ……………………………………………… Low Level and Pressure Switch Connections Remote Trigger Signal Connections Setup ……………………………………………………………………... -
Page 3: Safety
Installation & Setup Guide D3000 Safety These symbols on or inside the unit mean: Use caution to avoid personal injury or damage to equipment. Caution! Risk of electrical shock. Always wear the required Personal Protective Equipment (including gloves and goggles that must be worn when potentially exposed to any hazardous materials and when carrying out hazardous work tasks). - Page 4 Installation & Setup Guide D3000 Installation Category II, FOR INDOOR USE ONLY Speed & Displacement Detergent Unit 0 - 148 ml / 0 - 5 oz/min. nominal Rinse Unit 2 - 18 ml / 0.07 - 0.6 oz/min. nominal Hydraulic Performance Detergent unit 20 psi max.
-
Page 5: Circuit Board Connection
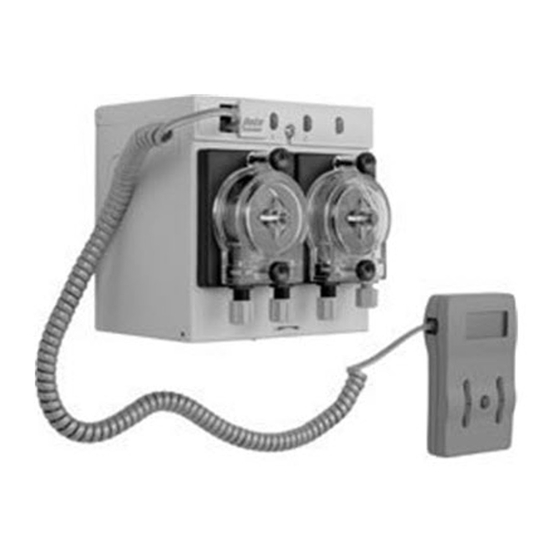
Installation & Setup Guide D3000 Figure 1b. Circuit Board Connection A. Conductivity Probe B. Temperature Probe C. Blue Wire D. Red Wire E. Yellow Wire F. Green Wire Part Identification 1. Wash 24V Power 2. Rinse 24V Power 3. Rinse Pump 4. -
Page 6: Mounting Dimensions
Mount the D3000 unit on a vertical flat surface away from steam and spray in an operating temperature range of +2°C to 40°C (36 to 104°F) Mounting hole size ø5.4mm (0.21 inches). Use the 3rd hole for locking into place. -
Page 7: Electrical Installation
Installation & Setup Guide D3000 Electrical Installation External Transformer Units 1. Mount 2 transformers in protective enclosure (typically inside dishmachine. 2. Connect primary legs of each power source to the transformers as shown in the table below. 3. Connect secondary wires (brown and blue wires in white sheath) to the WHITE terminal block inside the dispenser. -
Page 8: Low Level And Pressure Switch Connections
Figure 7. D3000 PCB, Pressure Switch and Low Level Connections Remote Trigger Signal Connection If the D3000 is used in Timed or Speed mode with Uniview programmer and Door with external power is selected, then the unit is triggered to dose product by a closed contact on connector J3 pins 3 &... -
Page 9: Setup
24. -Rinse Saver option, Mode 4, Menu 4: This option sets the D3000 unit to only dispense rinse aid if there has previously been a wash signal received or the wash signal is present at the same time as the rinse. This will stop rinse aid being dispensed when the dishwasher is filling through the rinse as this process usually involves multiple rinse activations with no wash taking place. - Page 10 To change the mode to conductivity, change the switch on the PCB from “TIME” to “COND” (See Figure 11). Adjust the knobs per the chart on the left to program the D3000. 1. Detergent setpoint dial 2. Rinse setting dial 3.
- Page 11 Example: The wash power is on and the tank concentration is 40 Beta Units. Wash power turns off, so the unit stores the value of 40 Beta units. A drain occurs, and the wash tank is filled with clean water. Tank concentration is now 3 Beta units. Wash power turns back on, the unit delays for 4 seconds, then compares the new tank concentration to the previously stored old concentration.
- Page 12 “Uniview” and press the “send” button. You will not be able to do any programming until you complete this task. Using Uniview Uniview can be used to program the D3000.A cable connects the Uniview to the D3000 through the communications port.
- Page 13 - - - 1 = HI default = 1 Tank Concentration without C3M or - - - - - - averaging (0-70 Beta Units, Hi/Lo) Control Source Control Source Control Source 0 = POTS 0 = POTS 0 = POTS...
- Page 14 Installation & Setup Guide D3000 D3000 Uniview Menus - When Potentiometer Controlled Ensure Menu 23=0. The only menus which can be edited by the UniView are menus 10 & 23 Menu POT Controlled POT Controlled Conductivity Mode Timed Mode Mode Switch Position...
- Page 15 Installation & Setup Guide D3000 Beta Technology http://www.beta-technology.com 913 William Leigh Drive Phone 1-866-651-4323 Tullytown. PA. 19007 1-215-945-0937 Page 15 of 15 17483-00 Rev B s1 April 2009...
Need help?
Do you have a question about the D3000 and is the answer not in the manual?
Questions and answers