
Related Manuals for Amprobe WT-30


Summary of Contents for Amprobe WT-30
- Page 1 WT-30 Salinity Meter Users Manual • Mode d’emploi • Bedienungshandbuch • Manual d’Uso • Manual de uso...
- Page 2 WT-30 Salinity Meter Users Manual July 2009, Rev.1 ©2009 Amprobe Test Tools. All rights reserved. Printed in China...
- Page 3 To obtain service during the warranty period, return the product with proof of purchase to an authorized Amprobe Test Tools Service Center or to an Amprobe dealer or distributor. See Repair Section for details. THIS WARRANTY IS YOUR ONLY REMEDY.
- Page 4 Non-Warranty Repairs and Replacement – US and Canada Non-warranty repairs in the United States and Canada should be sent to a Amprobe® Test Tools Service Center. Call Amprobe® Test Tools or inquire at your point of purchase for current repair and replacement rates.
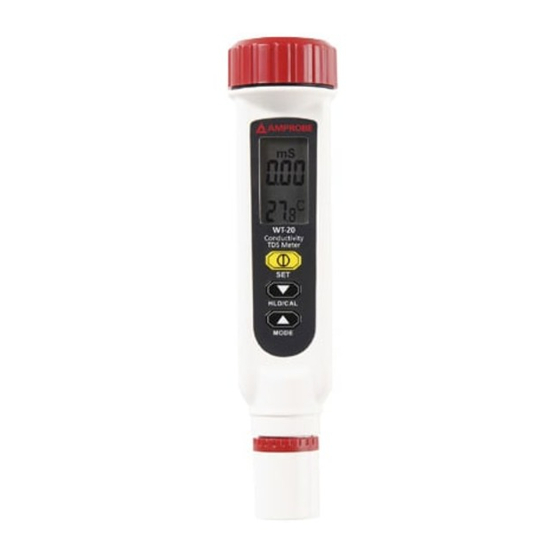
- Page 5 WT-30 Salinity Meter 1) Battery Cover 2) Lcd Display 3) Power / Set Key 4) Hld / Cal / Down Key 5) Mode / Up Key 6) Electrode Cover 7) Salinity Reading (unit:ppt) 8) Display temperature in either degree Celsius or...
-
Page 6: Table Of Contents
CONTENTS SYMBOLS ................2 UNPACKING AND INSPECTION ........2 INTRODUCTION ..............2 Features ................ 2 OPERATION ............... 3 Auto Power Off ............4 Setup ................4 Calibration Mode ............5 SPECIFICATION ..............7 MAINTENANCE AND REPAIR ........... 8 Battery Replacement ..........9 TROUBLE SHOOTING ............ -
Page 7: Symbols
If any of the items are damaged or missing, return the complete package to the place of purchase for an exchange. INTRODUCTION Congratulations on your purchase of WT-30 salinity meter. A convenient instrument to measure water salinity and temperature. Features •... -
Page 8: Operation
OPERATION 1. Remove the electrode cover to expose the electrode out. 2. Press “POWER” to power on. LCD will display parameters (ex: tnr, rAn) in turns and then enter normal display. 3. The meter is default in auto-ranging status. Press “p“ key more than 2 seconds can manually select the range when the meter is in normal measurement mode. -
Page 9: Auto Power Off
“n” appeared on the screen and then release keys to return to normal mode.(Fig.3) Setup In WT-30, Built-in NaCL conductivity to TDS conversion factor, Temp. Coefficient and Normalization Temperature are all fixed. However, the advanced setup mode still lets you customize your meter. -
Page 10: Calibration Mode
P4.1: Range 1 calibration info: In P4.0, press “SET“ to enter P4.1 and review the last calibration concentration. If the meter is not yet calibrated, “---” will display on the LCD. The calibration information will be override after recalibration. P4.2: Range 2 calibration info: In P4.1, press “p“... - Page 11 Salinity calibration 1. Dip the probe into demineralized or distilled water for about 30 minutes to rinse the probe. 2. Select the NaCL standard for calibration. 3. Pour enough solution into two separate clean containers. 4. Power on the meter. 5.
-
Page 12: Specification
SPECIFICATION Range : 0.00~10.00ppt, 10.1~70.0ppt Resolution : 0.01ppt or 0.1ppt Accuracy : 1% Full Scale±1digit ATC : 0~50°C Temperature Accuracy : ±0.5°C Temp. Coefficient : Built-in NaCL temperature coefficient Normalization Tempe. : Fixed at 25°C Operation temp. : 0~50°C Power Requirements : 4pcs1.5V(Type: A76 or LR44) �... -
Page 13: Maintenance And Repair
MAINTENANCE AND REPAIR If there appears to be a malfunction during the operation of the meter, the following steps should be performed in order to isolate the cause of the problem. 1. Check the battery. Replace the battery immediately when the “ ” symbol appears on the LCD. -
Page 14: Battery Replacement
BATTERY REPLACEMENT 1. Turn off the meter and loose the battery cover in counter-clockwise direction. 2. Replace the old batteries with four new LR44 button cells. 3. Put back the battery cover and turn it tightly. the Red LED Low Battery indicator illuminates. The batteries should be replaced as quickly as possible. -
Page 15: Trouble Shooting
TROUBLE SHOOTING Power On But No Display • Make sure you press power key more than 100 mS. • Check the battery conditions and replace if necessary • Move batteries away for one minute and then re-install. Display Disappear • Check whether the low battery icon is appeared before the display is off. - Page 16 “E03“ Salt value is over the range limit (70.0ppt) or meter is damaged. • Put the meter in standard solution. If E03 still appears, send back for repair. “E04“ Caused by temp. error • Refer to error code of temperature. After solving the error of temp., E04 will disappear.
Need help?
Do you have a question about the WT-30 and is the answer not in the manual?
Questions and answers