Table of Contents
Advertisement
Quick Links
Advertisement
Table of Contents

Related Manuals for Amprobe DM-5


Summary of Contents for Amprobe DM-5
- Page 1 DM-5 Power Quality Analyzer Manual DM-5 Logging...
- Page 3 DM-5 Power Quality Analyzer Instruction Manual 11/2015, 6006992 Rev A ©2015 Amprobe. All rights reserved.
- Page 4 Limited Warranty and Limitation of Liability Your Amprobe product will be free from defects in material and workmanship for 1 year from the date of purchase. This warranty does not cover fuses, disposable batteries or damage from accident, neglect, misuse, alteration, contamination, or abnormal conditions of operation or handling.
-
Page 5: Table Of Contents
DM-5 Power Quality Analyzer CONTENTS SAFETY WARNINGS ....................4 UNPACKING AND INSPECTION ................. 8 1 INSTRUMENT OVERVIEW ..................9 1.1 Functional overview .......................9 1.2 Features ...........................12 1.3 Constructional drawing ....................14 1.4 Steps for measurement ....................15 2 INSTRUMENT LAYOUT ................... 16 2.1 Display (LCD)/ Keys ......................16... - Page 6 DM-5 Power Quality Analyzer 4.5 Recording procedures ....................35 Start of recording ......................35 End of recording ......................35 Start measurement with “Quick Start Guide” .............36 5 SETTINGS ........................ 44 5.1 List of setting items ......................44 5.2 Basic setting ........................44 Settings of wiring system ....................45 Wiring connection ......................46 Settings of voltage measurement .................48 VT/CT ..........................49 Settings of current measurement ..................50 Settings of external input terminal/ reference frequency ...........52 5.3 Measurement setting .....................53...
- Page 7 DM-5 Power Quality Analyzer 6.3 Demand ...........................88 Showing the measured values ..................88 Shifts in specific period ....................89 Demand change ......................90 6.4 Vector ..........................91 6.5 Waveform ........................93 6.6 Harmonics ........................94 Displaying harmonics on the bar graph ................95 Displaying the list of harmonics ..................96 6.7 Power quality ........................99 Factors impair power quality and symptoms ..............99 Displaying recorded events ....................101 Displaying measured flicker values in list form ............104 Displaying trend graph of Pst, 1min ................105 Displaying changes of Plt ....................106 7 OTHER FUNCTIONS ....................
-
Page 8: Safety Warnings
It is essential that the above instructions are adhered to. Failure to follow the above instructions may cause injury, instrument damage and/or damage to equipment under test. Amprobe assumes no responsibility for damage and injury caused by misuse or not following the instructions in the manual. - Page 9 Safety warningS DANGER � • The instrument is to be used only in its intended applications or conditions. Otherwise, safety functions equipped with the instrument will not work, and instrument damage or serious personal injury may occur. Verify proper operation on a known source before taking action as a result of the indication of the instrument.
- Page 10 Safety warningS • Do not connect a voltage test lead unless required for measuring the desired parameters. • Connect voltage test leads to the instrument first, and only then connect them to the circuit under test. • Keep your fingers behind the barrier during a measurement. Barrier: provides protection against electrical shock and ensuring the minimum required air and creepage distances. • Never disconnect the voltage test leads from the connectors of the instrument during a measurement (while the instrument is energized).
- Page 11 Safety warningS Clamp sensor • Do not bend or pull the cable of the clamp sensor. Treatment after use • Power off the instrument and disconnect the power cord, voltage test leads and clamp sensors from the instrument. • Remove the batteries if the instrument is to be stored and will not be in use for a long period.
-
Page 12: Unpacking And Inspection
UnPaCKing anD inSPeCtiOn Your shipping carton should include: DM-5 power quality meter CT-53 flex AC current clamp CT-500 flex AC current clamp Test lead with alligator clip (red/black/blue/green) US power cord SD card (2G) USB cable Cable tie (8 colors) AA batteries User manual PC Software (CD ROM) -
Page 13: Instrument Overview
1. inStrUment Overview 1.1 Functional overview Start/ Stop Choose either “Quick start guide” or “Start now” to start recording. Perform simple and fast start-up setting by selecting “Quick start guide”. See “Start/Stop Recording” for further details. Inst/ Integration/ Demand Display the avg/ max/ min instantaneous values of current/ voltage/ active power/ apparent power/ reactive power. - Page 14 1. inStrUment Overview Vector and Wiring Check Vectors of voltage and current per CH are displayed on a graph. DM-5 will perform wiring check. See “Vector” for further details. Waveform Waveforms of voltage and current per CH are displayed on a graph.
- Page 15 1. inStrUment Overview Power Quality (QUALITY) event Display voltage swell, dip, int, transient, inrush currentand flicker. See “Power Quality” for further details. Setting (SET UP) Make settings for DM-5 and measurements. See “Setting” for further details.
-
Page 16: Features
Voltage and current can be displayed by waveform or vector. Saving data The DM-5 features a logging function with preset recording intervals. Data can be saved by manual operation or by specifying date and time. A screenshot of the data on the screen can be saved by using the Print Screen function. - Page 17 Data in the SD card or the internal memory can be saved in PC via USB. Analysis of the downloaded data and instrument settings are possible by using the special software “Windows for DM-5”. Real-time communication with compatible devices is available via wireless connectivity to Bluetooth®...
-
Page 18: Constructional Drawing
1. inStrUment Overview 1.3 Constructional drawing Current input AC voltage input Power cord DM-5 Digital output (1 ch) to recorder or alarm Analog input (2 ch) from thermometer or illuminometer Size AA alkaline dry-cell battery (LR6) Logging or Size AA Ni-MH... -
Page 19: Steps For Measurement
Chap. 4: Getting started (P.28) Cord and Sensor Connection Clause 4.3: Voltage test leads and clamp sensor connection (P.33) Turning on the Instrument. Clause 4.4: Start DM-5 (P.34) Basic Settings. Reading the Setup Data Clause 5.2: Basic setting (P.44) Clause 5.6: Saved data (P.71) Wiring Clause 5.2: Basic setting –... -
Page 20: Instrument Layout
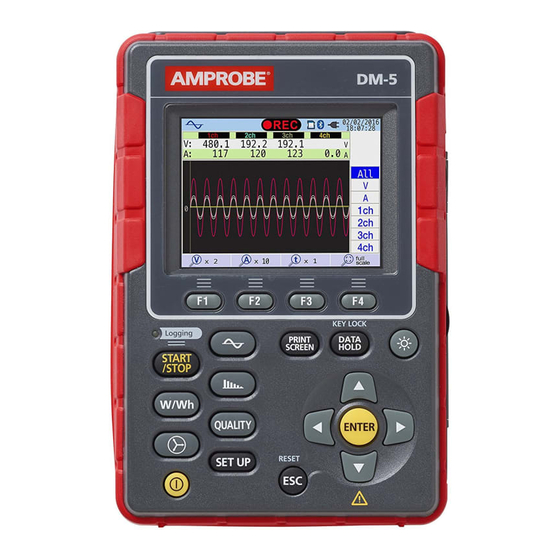
2. inStrUment layOUt 2.1 Display (LCD)/ Keys DM-5 Display (LCD) Logging Keys... -
Page 21: Connector
2. inStrUment layOUt 2.2 Connector AC voltage input terminal (VN, V1, V2, V3) Current clamp input terminal (A1, A2, A3, A4) Terminal cover Power connector AC Voltage Input Current Input Wiring configuration Terminal Terminal* Single-phase 2-wire (1-system) 1P2W×1 VN, V1 Single-phase 2-wire (2-system) 1P2W×2 VN, V1... -
Page 22: Side Face
2. inStrUment layOUt 2.3 Side face When the connector cover is closed. SD slot cover USB port cover Analog output / Digital output cover When the connector cover is opened. SD card slot USB port Analog output / Digital output terminal... -
Page 23: Voltage Test Lead And Clamp Sensor
2. inStrUment layOUt 2.4 Voltage test lead and clamp sensor Alligator clip * Attached to the top part of voltage test lead Barrier Barrier is a mechanical safety part and provides protection against electrical shock and ensuring the minimum required air and creepage distances. Keep your fingers and hands behind the barrier during a measurement. CT-53 Coupling point of the measuring head Flexible measuring head... -
Page 24: Basic Operations
Execute the displayed function. DATA HOLD Key/ KEY LOCK Freeze the readings on the display. DM-5 * Measurement continues while the readings freeze on the display. Press > 2 seconds to lock all keys to prevent operational errors. Press > 2... -
Page 25: Icons On The Lcd
3. BaSiC OPeratiOnS 3.2 Icons on the LCD Icon Status DM-5 is operating with batteries. This icon varies in 4 steps according to the battery power condition. DM-5 is operating with AC power. Data hold is activated. All keys are locked. -
Page 26: Symbols On The Lcd
3. BaSiC OPeratiOnS 3.3 Symbols on the LCD Phase voltage Line voltage Current Active + consumption Reactive + lagging Apparent power power - regenerating power - leading Power + lagging Frequency factor - leading Analog input Analog input voltage at 1ch voltage at 2ch Phase + lagging Capacitance... -
Page 27: Screens
3. BaSiC OPeratiOnS 3.5 Screens Inst/ Integration/ Demand values Press the button to toggle the screens. W (Inst value) Wh (Integration value) Demand Customize Select and change the items to be displayed. Zoom Trend Zoom and display the selected items. Changes to the measured values are displayed on a graph to track trends. -
Page 28: Vector
3. BaSiC OPeratiOnS Vector Wiring check Checked results will be displayed. Wiring diagram Diagram of the selected wiring is displayed. : toggle the line lengths of voltage vector. * time(s) : toggle the line lengths of current vector. * time(s) -
Page 29: Waveform
3. BaSiC OPeratiOnS Waveform Select the items with up and down keys and check for the waveforms. Measured values per CH : toggle the magnifications of voltage waveform (vertical). * time(s) : toggle the magnifications of current waveform (vertical). * time(s) : toggle the magnifications of time axis (horizontal). -
Page 30: Harmonic Analysis
3. BaSiC OPeratiOnS Harmonics Voltage, Linear, Overall display Current Power Zoom List, Rate of content Logarithm Phase angle RMS value Current Power... -
Page 31: Power Quality
3. BaSiC OPeratiOnS Power Quality Flicker Event Settings Toggle the screens with the Cursor Key. left or right ) -
Page 32: Getting Started
4. getting StarteD 4.1 Power supply DM-5 operates with either an AC power supply or batteries. Capable of performing measurements in the event of AC power interruption, power to the instrument is automatically restored by the batteries installed in the instrument. Size AA alkaline dry-cell batteries (LR6) or size AA Ni-MH batteries can both be used. -
Page 33: Battery Symbol On The Lcd/ Battery Level
4. getting StarteD Battery Icon on the LCD/ Battery Level Power supply icon changes as follows, and the battery icon varies according to the battery condition. Powered by AC 4-level Possible continuous measurement hours: - approx. 3 hours with size AA alkaline Powered by batteries, and battery... -
Page 34: How To Install Batteries
4. getting StarteD How to Install Batteries: Follow the steps below and install batteries. Screw Battery compartment cover LR6: Size AA Alkaline battery 1. Disconnect the power cord, voltage test leads and clamp sensors from the instrument, and power off the instrument. 2. -
Page 35: Power Supply Rating
2. Connect the power cord to the power connector on the instrument. 3. * Connect another end of the power cord to the outlet. * Powering on the DM-5 is possible two seconds after it is connected to a power source. The Key does not function within this two second period. -
Page 36: Placing / Removing Sd Card
“Stop recording” disappears. Notes: • Newly purchased SD cards must be formatted with the DM-5 before use. Data might not be successfully saved on SD cards that are formatted externally. For details, please refer to “Format” (P.86) in this manual. -
Page 37: Voltage Test Leads And Clamp Sensor Connection
4. getting StarteD 4.3 Voltage Test Leads and Clamp Sensor Connection � Check the following before connecting the test leads and sensors. � DANGER • Use only the voltage test leads supplied with this instrument. • Use the dedicated clamp sensors for this instrument, and confirm that the measurement current rating of the clamp sensor is not exceeded. • Do not connect all the voltage test leads or clamp sensors unless required for measuring the desired parameters. -
Page 38: Start Dm-5
If the connected clamp sensors are not the same ones used during the previous test, the list of the connected sensors will be displayed for five sec; but the settings will not be updated automatically. Press the key and re-detect the sensors or modify the settings directly. The DM-5 retains and adopts the previous settings if no sensor is connected. -
Page 39: Recording Procedures
4. getting StarteD 4.5 Recording Procedures Start of Recording Press the Choose either “Quick start guide” or “Start now” to start recording. Settings for wiring and recording can be quickly and easily selected using the “Quick start guide”. Press the key and adjust advanced settings if necessary. -
Page 40: Start Measurement With "Quick Start Guide
4. getting StarteD Start Measurement with “Quick start guide” Select the Select the Confirm the Check the test recording item wiring system connections environment (1) Select the item you want to record. * The number of selected items will have effect on file size and also on max recording time. - Page 41 See SD Card/Saved Data (7)(8)(9) Select a recording method. See Setting for recording method (10) Prepared. Recording will start. DM-5 The mark “ REC ” will appear on the screen when the recording starts and the green LED (status indicator) lights up.
- Page 42 4. getting StarteD Wiring system Any of the followings can be selected. Load Load 1P2W×1 1P3W×1 1P2W 1P3W Load 1P2W×2 1P2W 1P3W×2 Load Load 1P2W×3 1P2W 1P3W Load 1P2W×4 1P2W L1(R) L1(R) L1(R) L1(R) Load Load L2(S) L2(S) 3P3W×1 L2(S) L2(S) 3P3W 3P3W...
- Page 43 4. getting StarteD Test environment check “Start test” “ENTER” Select and press button to start the test. The test result will be displayed on the screen. Wiring check Test results of each item will be displayed. * NG result may be given, even if the wiring is correct, at the measurement site under bad power factors.
- Page 44 4. getting StarteD NG judgment Wiring check Close the result display. Then, the blinking vectors and the values of NG items will be displayed. If all the results are OK, the ideal vector diagram will be displayed at the lower left corner. Criteria of judgment and cause Check Check...
- Page 45 4. getting StarteD Self-diagnosis If “NG” judgment is given frequently, there might be something wrong with the instrument. “Troubleshooting” Stop using the instrument and refer to in the full instruction manual. Sensor detection If the detection result is NG, each sensor type will be displayed in red. Criteria of judgment and cause Causes Check Causes...
- Page 46 Example: When the date & time are specified as above, the recording period will be as follows. From 8:00 on August 2, 2013 to 18:00 on August 7, 2013 Specify the recording time period. DM-5 performs recording during the selected time period at the preset intervals, and repeats recording processes during the preset time period. Example: When the time period is specified as above, the recording period is as follows.
- Page 47 4. getting StarteD Selecting displayed parameters For standard functions, the is used for selecting an item, the is for confirming the selection, and the Key is for canceling the alternation. Taking the procedures in “Quick Start Guide” as an example, Key operations are explained as follows. blue highlight Press the Key to move the...
-
Page 48: Settings
Measurement Recording Basic Saved data Others (Demand) (REC item) (Wiring) (REC data) (Environment) (Harmonics) (REC method) (Voltage) DM-5 setting) (DM-5 setting) (Power quality) (Manual/ (Current) Constant rec./ Time period rec.) (Flicker) (External input DC) (Capacitance (Frequency) Calc.) 5.2 Basic Settings Press the Key. -
Page 49: Settings Of Wiring System
5. SettingS Wiring System Settings ”Basic wiring” Choose one according to the wiring system to be measured. Selection (1) 1P2W×1 (5) 1P3W×1 (7) 3P3W×1 (2) 1P2W×2 (6) 1P3W×2 (8) 3P3W×2 (3) 1P2W×3 (9) 3P3W3A (4) 1P2W×4 (10) 3P4W * Current terminals that are not used in the selected wiring system can be used to measure rms currents and harmonics. - Page 50 5. SettingS Wiring diagrams When the blue highlight is located at “Wiring”, you can check the wiring diagram of the selected wiring system with the key. The displayed diagram can be switched with key. Confirm. Cancel.
-
Page 51: Wiring Connection
5. SettingS � Read the following precautions prior to connecting wiring. � DANGER • With attention to the measurement category to which the object under test belongs, do not perform measurements on a circuit in which the electrical potential exceeds the following values. -
Page 52: Settings Of Voltage Measurement
5. SettingS Voltage Measurement Settings “Voltage range” Choose a desired voltage range. * For measurements according to IEC61000-4-30 Class S, set the range to “600V”. Selection 600V/1000V * Default setting is highlighted in gray. Move the blue highlight to “V Range”. Show the pull-down menu. -
Page 53: Vt/Ct
5. SettingS VT/CT* * Current measurement setting. DANGER � • With attention to the measurement category to which the object under test belongs, do not make measurements on a circuit in which the electrical potential exceeds the following values. * 300V AC for CAT. IV, 600V AC for CAT. III, 1000V AC for CAT. II • Never connect the power cord to an outlet of AC240V or higher. -
Page 54: Settings Of Current Measurement
5. SettingS “Nominal voltage” Set the nominal voltage values applied from the measured object. Selection 50V - 600V(100V) * Default setting is highlighted in gray. Move the blue highlight to “Nominal V”. Show the value entry window.* Enter the nominal voltage value. Confirm. - Page 55 5. SettingS “Clamp” : Clamp sensors for current measurement Select the model names of the connected sensors. If an optional sensor is used and set for “+ Clamp”, an exceptional sensor can be set for 4ch. The rated current and the max conductor size are displayed in a pop-up while opening the list of sensor model names.
-
Page 56: Settings Of External Input Terminal/ Reference Frequency
5. SettingS “CT Ratio” Set the proper CT ratio when CTs (current transformer) are installed in the measured system. The selected CT ratio will be reflected to all the values measured during any current measurements. The details about CT are described in “VT/CT”. Selection 0.01 - 9999.99(1.00) * Default setting is highlighted in gray. Move the blue highlight to “CT Ratio”. Show the value entry window.* Set the CT Ratio. -
Page 57: Measurement Setting
5. SettingS “Frequency” Choose the nominal frequency of the system to be measured. If it is difficult to specify the voltage frequency, for example, in the event of power interruption, the DM-5 performs measurements based on the preset nominal frequency. Selection 50Hz/ 60Hz * Default setting is highlighted in gray. Move the blue highlight to “Nominal f”. - Page 58 5. SettingS “Measurement cycle” Disable the demand measurement or set the demand measurement cycle in the preset recording period. When a demand measurement starts, the measured demand values will be recorded at the selected measurement cycle. The cycle time should be selected from the following.
-
Page 59: Outline Of Demand Measurement Concept
5. SettingS “Inspection cycle” The buzzer sounds when the predicted value exceeds the target value within the selected inspection cycle. The inspection cycle should be shorter than the demand measurement cycle. The relations between the measurement and inspection cycles are as follows. Selection Inspection cycle 10 min/ 15 min... -
Page 60: Settings For Harmonic Analysis
5. SettingS Harmonic Analysis Settings “THD calculation” THD stands for ”Total Harmonic Distortion”. Select “THD-F” to calculate the total harmonics distortion based on the basic wave and “THD-R” to do the calculation based on all rms values. Selection THD-F (based on basic wave)/ THD-R (based on all rms values) * Default setting is highlighted in gray. -
Page 61: Threshold Setting For Power Quality (Event)
5. SettingS “Edit allowable range” Set the EMC allowable range (rate of content) for harmonics per order. The edited ranges are displayed as a bar graph on the graph of harmonics. Selection Default/ can be customized (V/ A) * Default setting is highlighted in gray. Move the blue highlight to “Edit allowable range”. - Page 62 5. SettingS Caution: � Threshold values for “Swell”, “Dip” and “INT” are the percentage of the nominal voltage. So when the nominal voltage is changed, threshold voltage will be altered accordingly. For “Transient”, if the nominal voltage is changed, the initial value will be automatically set to “300%”, which is three times the new nominal voltage (peak voltage).
- Page 63 5. SettingS “SWELL”: Instantaneous voltage rise” Set the threshold value (rms voltage in one cycle) for swell in percentage of the nominal voltage. The following selection range varies depending on the selected VT ratio. The preset hysteresis has an effect on this threshold value. Selection 100 - 200% against the nominal voltage (110%) * Default setting is highlighted in gray.
- Page 64 5. SettingS “DIP”: Instantaneous voltage drop Set the threshold value (rms voltage in one cycle) for dip in percentage of the nominal voltage. The following selection range varies depending on the selected VT ratio. The preset hysteresis has an effect on this threshold value. Selection 0 - 100% against the nominal voltage (90%) * Default setting is highlighted in gray.
-
Page 65: Filter Setting For Flicker Measurement
5. SettingS Filter Setting for Flicker Measurement “Filter coefficient” Set a proper filter coefficient according to the nominal voltage for accurate flicker measurements. Select the values of nominal voltage, nominal frequency and filter coefficient values appropriate to the actual measured object. If possible, harmonize the filter coefficient and the nominal voltage. Selection 230V/ 220V/ 120V/ 100V * Default setting is highlighted in gray. Move the blue highlight to “Filter”. Show the pull-down menu. Select proper Filter coefficient. Confirm. Cancel. Target Power Factor for Capacitance Calculation... -
Page 66: Target Power Factor For Capacitance Calculation
5. SettingS “Target power factor” Set a target power factor for capacitance calculation. The power factor is negatively influenced if inductive loads, such as motors, that are connected to the power supply because current phases lag behind the voltage phases in this case. Usually, phase advanced capacitors are installed in high-voltage-receiving installations, to reduce such influences. Improving the power factor may cut down electricity tariffs if the customer is on low-, high- or industrial power construction. -
Page 67: Settings For Recording Items
5. SettingS Settings for Recording Items The possible recording time on SD cards or the internal memory varies depending on the number of the recorded items and the preset intervals. Select “Do not record” for the items which are not necessary to record to secure a longer recording time. The details are described in “Possible recording time”... -
Page 68: Saved Items
5. SettingS Saved Items The following data measured on each CH will be saved according to the selected recording method. Saved items are dependent on the selected recording method and wiring system. Meas./ Rec. setting REC file REC item Power +Harmonics +Event RMS voltage (line/ phase) -
Page 69: Recording Method
5. SettingS Recording Method “Interval” Set the interval to record the measured data on the SD or internal memory. Seventeen different intervals are available, but it cannot be set to a longer time than the demand measurement cycle. The preset recording interval may be changed automatically according to the selected demand measurement cycle. -
Page 70: Possible Recording Time
5. SettingS “Constant recording” Measured data will be recorded continuously at the preset interval during the specified start/ stop time and date. Please refer to “(8)/ (9) Setting for recording method”. Selection Selection Start time and date Day/ Month/ Year Hour:Minute (00/00/0000 00:00) Stop time and date Day/ Month/ Year Hour:Minute (00/00/0000 00:00) Move the blue highlight to “REC Start”/ “REC End”. -
Page 71: Other Settings
5. SettingS * Possible recording time does not account for data from power quality events. The max possible recording time will be shortened by recording such events. The max file size per recording is 1GB. * For best performance, use only the SD cards provided with this instrument or as optional parts. -
Page 72: Setting
3CH: Blue/ 4CH: Green. Changes done by user will not be restored to default even after the system is reset. Move the blue highlight to “CH Color”. Show the color setting window. Select colors. Confirm. Cancel. DM-5 Setting DM-5 setting... - Page 73 5. SettingS “Time” Adjust and set the internal system clock. Selection dd/ mm/ yyyy hh:mm * The selected date format has an effect on this setting. Move the blue highlight to “Time”. Show the value entry window. Adjust the time and date. Confirm.
- Page 74 “Power” Select to enable or disable the auto-power-off function. This setting is for situations when the DM-5 operates from an AC power supply. Auto-power-off activates in 5 min after the last operation while DM-5 is operating from Battery power. Selection For: Power off in 5 min.
-
Page 75: Saved Data
5. SettingS 5.6 Saved Data Press the Key. Change the tabs to “Saved data”. DM-5 setting Save the “ ”: Measurement data, “ ”: Print screen” and “ ”: Setting data” on the “ ”SD card or in the “... -
Page 76: Type Of The Saved Data
5. SettingS “Delete data” Show the list of the recorded data, and then select unwanted data. Icons on the screen means: : SD card, : Internal memory, Measured data, : Print screen, : Setting data Data are not listed in time sequence. The recorded date and time are displayed to the right of file name. As for the data which are previously transferred from the internal memory to an SD card, the displayed time means when the data were transferred. - Page 77 * Max number of files: 3 * Internal Settings / Number of DM-5 setting and print screen data files memory only Print screen * Max number of files: 8 “BACK” To return to the “Saved data” screen, press the...
- Page 78 5. SettingS “Transfer data” Select the data you want to transfer from the “ ”: internal memory to the SD card “ ”. Data files which can be transferred are: “ ”: Measurement data, “ ”: Print screen, “ ”: Setting data. Data are not listed in time sequence. The recorded date and time are displayed to the right of file name.
- Page 79 5. SettingS “Format” Format the “ ”: SD card or “ ”: Internal memory. Data are not listed in time sequence. The recorded date and time are displayed to the right of file name. As for the data which are previously transferred from the internal memory to an SD card, the displayed time means when the data were transferred. The scroll bar is displayed when the list of the recorded data exceeds the display area.
- Page 80 Dest. code File No. Extension SD:SD card (000-999) (BMP file) ME:Internal memory * Dest. = Destination “DM-5 Setting” Press the key and move to “Saved data” tab, and then select “Save Settings”. File name: SUP 0000 .PRE Dest. code File No.
- Page 81 5. SettingS “Interval data” DM-5 setting File name 0000 .AMP Measurement setting 0000 .AMP Power measurement 0000 . AMP Harmonics measurement 0000 . AMP Dest. code Data No. SD:SD card (0000-9999) M:Internal memory “Power quality data” Event type File name EVT 0000 .
-
Page 82: Settings And Data Loading
5. SettingS DM-5 Settings and Data Loading Select a desired language. Confirm. DM-5 setting “Save settings” Save the “ ”: Setting data on the “ ”: SD card or in the “ ”: internal memory. Data are not listed in time sequence. The recorded date and time are displayed to the right of file name. As for the data which were previously transferred from the internal memory to an SD card, the displayed time means when the data were transferred. - Page 83 Key to close the information window. Please refer to “Space” for further details. “BACK” To return to the “Saved data” screen, press the Key. The following settings for DM-5 can be saved. Basic setting Measurement setting Setting item Setting item...
- Page 84 5. SettingS “Read settings” Read the “ ”: Setting data from the “ ”: SD card or from the “ ”: internal memory. Data are not listed in time sequence. The recorded date and time are displayed to the right of file name. As for the data which were previously transferred from the internal memory to an SD card, the displayed time means when the data were transferred.
-
Page 85: Displayed Items
6. DiSPlayeD itemS 6.1 Instantaneous value “W” Press the Key. Display the screen for “W”: Instantaneous value. List Display of the Measured Values “List” (/Zoom) e.g.) Instantaneous values measured under 3P3W3A+1A (Three-phase Three-wire + Current (optional sensor)) Measured at 1CH Measured at 2CH Measured at 3CH Measured with an... - Page 86 6. DiSPlayeD itemS e.g.) Instantaneous values measured under 1P3W-2 (2 systems) “Switching the Displayed Systems” Press the key and switch the displayed systems. Items displayed in a screen depend on the selected wiring configuration and the number of systems. The dotted lines represent the space of each display area. 1P2W-1 to -4 (Single phase, 2-wire, 1 –...
- Page 87 6. DiSPlayeD itemS 3P3W-1, -2 (Three-phase, 3-wire, Blondel’ s theorem, 1 or 2 systems) Σ 1-system 2-system Computed Computed values on Measured Measured values on Sum of Sum of Measured Measured values on values on 1, 2 and 1, 2 and values on values on 3ch of...
-
Page 88: Zoom Display
6. DiSPlayeD itemS Zoom Display Example: 8-split screen Displayed item Type of value: Inst/ AVG…. Select 4 or 8 values and display the values on one screen. The displayed text will be enlarged so it is easy to see. ”Displayed items” Select the items to be displayed in each column. -
Page 89: Displaying Trend Graph
6. DiSPlayeD itemS Move the blue highlight to a Type of value in any column. Show the pull- down menu. Select a desired item to be displayed. Confirm. Cancel. “List display” Press the (List) key to display all the values on the list. ”4-Split”/ ”8-Split”... -
Page 90: Changing Displayed Items And Display Position
6. DiSPlayeD itemS ”Change the items displayed on trend graph” Press the key and change the items displayed on the trend graph. ∑ ” /CH” ∑ Press the /CH) key to switch the graphs: one is to display the sum and total values ∑... -
Page 91: Integration Value "Wh
6. DiSPlayeD itemS 6.2 Integration Value “Wh” Press the Key. Display the screen for “Wh”: Integration value. e.g.) 1P3W-2 (Single-phase Three-wire, 2-system) Elapsed time Σ : Total amount Σ : sum per system Power used in the certain period is displayed as integral power consumption. Integral power consumption is used to calculate electricity tariffs or to control the power consumption. -
Page 92: Demand
6. DiSPlayeD itemS ”Demand” Press the (Demand) Key to display the screen for demand value. Please refer to “6.3 Demand” in this manual. 6.3 ”Demand” Press the Key. Display the screen for demand value. Change the screens to display the demand measurement results in various forms. Change the displayed chs”... -
Page 93: Shifts In Specific Period
6. DiSPlayeD itemS Instantaneous Value “W” Press the (W) Key to show instantaneous values on the screen. Please refer to “6.1 Instantaneous value “W” in this manual for further details. Shifts in Specific Period Items displayed on the LCD Remaining time Demand interval is counted down. -
Page 94: Demand Change
6. DiSPlayeD itemS Demand Change Cursor Scroll bar Press the Key to move the cursor and to scroll the graph to right and left. The white bar shows the percentage of hidden pages and the dark orange bar shows the percentage of the present displayed page. -
Page 95: Vector
6. DiSPlayeD itemS 6.4 Vector Press the Key. e.g.) 3P4W Vector display Measured values V: rms voltage* /Phase angle* A: rms current / Phase angle* For 3P3W3A, rms line voltages are displayed. Phase angled is displayed: using Phase of V1 as the base (0 Phase angle (Leading) Vector display:... - Page 96 6. DiSPlayeD itemS e.g.) Vector of 3P4W: ”V x desired magnification” : toggle the line lengths of voltage vector. ”A x desired magnification” : toggle the line lengths of current vector. ”Diagram” Press the (Diagram) Key to show the wiring diagram for the selected wiring configuration. Please refer to “Wiring diagram”...
-
Page 97: Waveform
6. DiSPlayeD itemS 6.5 Waveform Press the Key. e.g.) Waveform of 1P3W-2 (Single-phase 3-wire, 2-system): Measured values V: rms voltage* A: rms current Colored waveforms For 3P3W3A, rms line per ch voltages are displayed. Voltage and current waveforms are displayed: for 10 cycles max. at 50Hz, for 12 cycles max. at 60Hz. -
Page 98: Harmonics
6. DiSPlayeD itemS ”A x desired magnification” : t oggle the magnifications of current waveform (vertical). ”t x desired magnification” : t oggle the magnifications of time axis (horizontal). “full scale” : Restore all the changed magnification settings and automatically select the appropriate magnification. 6.6 Harmonics Press the Key. Displaying Harmonics on the Bar Graph Press the (Graph) Key. e.g.) The following represents 3P4W (Three-phase 4-wire) while “Linear” and “Full-scale display”... -
Page 99: Displaying Harmonics On The Bar Graph
6. DiSPlayeD itemS Bar graph display e.g.) “Linearity” is displayed in “Full-scale”. Rate of content Harmonics analysis: up to 50 order In the above example, “Linear” and “full-scale” are selected. In this case, the upper limit of the rate of content is “100%” and all harmonics, 1st to 50th, are displayed on one screen. Items displayed on the LCD Rate of content Harmonic content of each order against the 1st basic wave. - Page 100 6. DiSPlayeD itemS Items displayed on the graph Displayed when the rate of harmonics content of each order is more Exceeding the than 10%. The rate of harmonics content of the 1st basic waveform is axis value “100%”, therefore, always exceeding the axis value in “LOG” display. Max values recorded during measurements are displayed.
-
Page 101: Displaying The List Of Harmonics
6. DiSPlayeD itemS Press the (LOG/Linear) Key to switch the display modes. Linear display, with ticks of 0% - 100%, and Logarithm display, with ticks of 0.1% - 10%, are switchable on the vertical axis. It is useful to analyze lower level of harmonics. “Full”/”Zoom”... - Page 102 6. DiSPlayeD itemS “Change the displayed harmonics orders” Press the Key to scroll the page vertically. ”Graph”/ ”List” Press the Key to display voltage/ current/ power harmonics, from 1st to 50th order, in list or graphic form. Only the rate of harmonics content can be checked on graph display screen.
-
Page 103: Power Quality
6. DiSPlayeD itemS 6.7 Power Quality Press the Key to display Power quality screen. Factors Impair Power Quality and Symptoms Power quality Waveform Symptom Adverse effect Burnout of capacitors and Inverter and Thyristor reactors, buzzes circuits (phase-control from transformers, circuit) are used for malfunction of Harmonics the control circuit of... - Page 104 6. DiSPlayeD itemS Power quality Waveform Symptom Adverse effect Burnout of capacitors and Instantaneous large reactors, buzzes currents (surge) flow from transformers, on devices with a malfunction of Inrush current motor, incandescent circuit breakers, lamp and flat flicker on screen or capacitor when noises on stereos powering them on. due to currents with harmonic components.
-
Page 105: Displaying Recorded Events
To record power quality events, short interval is useful in analysis. Occurred time Time and date when DM-5 detect the start and end of the event. and date Event detection on poly-phase systems. ”INT”... - Page 106 6. DiSPlayeD itemS Measurement of Swell/ Dip/ INT/ Inrush current Each event will be detected with the r.m.s. values in one gapless waveform and with a half-wave over-lapping. The beginning of the waveform where the first event is detected is regarded as the start of the event. If further events are not detected in the following waveform, the beginning of the waveform is regarded as the end of the event.
- Page 107 6. DiSPlayeD itemS Detection of Transient Voltage waveforms will be monitored at approx 40ksps, gapless, to calculate and check for transient event every 200ms. The beginning of the 200ms period where the first transient is detected is regarded as the start of the event. If further events are not detected in the following 200ms period, the beginning of the period is regarded as the end of the event. The detected transient is assumed to be continued between the start to the end of event detection.
-
Page 108: Displaying Measured Flicker Values In List Form
6. DiSPlayeD itemS “Change the displayed area” Press the Key to scroll the page vertically. ”Flicker” Press the (Flicker) Key to display the recorded flicker values. Details are described in “Displaying measured flicker values in list form” “Event detection” Press the (Detection) Key and toggle the displayed type of event. All events Swell Transient Inrush current... -
Page 109: Displaying Trend Graph Of Pst, 1Min
6. DiSPlayeD itemS If variable loads, such as arc furnace, are connected, voltages may vary and cause changes in illumination levels. Such phenomenon is called “voltage flicker” and its severity level is indicated by “Pst” and “Plt”. Items displayed on the LCD Counted down time until a Pst calculation completes. Usually it takes Time left about 10 min. -
Page 110: Displaying Changes Of Plt
6. DiSPlayeD itemS Displaying Changes of Plt Cursor Scroll bar Press the Key to move the cursor or to scroll the page to right and left. The black bar shows the percentage of hidden pages and the dark orange bar shows the percentage of the present displayed page. -
Page 111: Other Functions
”Backlight Auto-off” While DM-5 is connected to an AC power source: The LCD backlight is turned off automatically 5 min after the last key operation. Press any key except for the Power key to turn on the light again. To disable the Backlight auto-off function, select “Disable auto-off”... - Page 112 “Sensor detection” Press the “Detection” key on the SETUP menu to detect the connected clamp sensors. The DM-5 automatically detects the connected sensors and checks the settings of the sensors. “Recovery from power failure” When the power supply to the instrument is inadvertently lost during a record, the interrupted record will be resumed after the power supply is restored.
-
Page 113: Device Connection
Logging Android device Before starting to use this function, download the special application “DM-5” from www.Amprobe.com. The application “DM-5” is available on the download site for free. (Internet access is required and charges may be incurred.) ® * “Bluetooth ” is a registered trademark of Bluetooth SIG. -
Page 114: Signal Control
8. DeviCe COnneCtiOn 8.3 Signal Control Connection to Input/ Output Terminals � CAUTION • Voltages applied to the terminals should not exceed the following ranges. * for input terminals: within ± 11V, for output terminals: between 0 and 30V(50mA, 200mW) Otherwise, the instrument may be damaged. • The root of each L-terminal is the same. - Page 115 8. DeviCe COnneCtiOn ”Input terminal” For monitoring the voltage output signals of thermo sensors. These terminals are useful to measure the signals from other devices and power failures at the same time. Number of Ch: 2ch Input resistance : approx 225.6kΩ ”Output terminal”...
-
Page 116: Getting Power From Measured Lines
8. DeviCe COnneCtiOn 8.4 Getting Power from Measured Lines If it is difficult to get power from an outlet, the DM-5 operates with power from the measured line by using the PC-5 Power Adapter and voltage test leads. � DANGER • When the instrument and the test lead are combined and used together, whichever... -
Page 117: Pc Software For Setting And Data Analysis
9. PC SOftware fOr Setting anD Data analySiS The data analysis and settings software “Windows for DM-5” is available for the DM-5. * Automatic creation of graphs and tables from recorded data. * Uniform management of settings and recorded data acquired from multiple devices. -
Page 118: Specification
10. SPeCifiCatiOn 10.1 Safety Requirements Location for use In door use, Altitude up to 2000m Temperature & 23ºC±5ºC, Relative humidity 85% or less (no condensation) humidity range (guaranteed accuracy) Operating Temperature & 0ºC to 45ºC, Relative humidity 85% or less (no condensation) humidity range Storage Temperature &... - Page 119 Backlight (Press the LCD Key to turn off, press any key other than “Power” to turn on.) IEC 61000-4-30 Ed.2 Class S measurement Dimension 175(L)×120(W)×68(D)mm Weight approx. 900g (including batteries) DM-5 power quality meter 1 CT-53 flex AC current clamp 1 CT-500 flex AC current clamp Test lead with alligator clip (red/black/blue/green) US power cord SD card (2G) Accessories USB cable...
- Page 120 10. SPeCifiCatiOn External communication function: USB * USB cable length: 2m max. Connector mini-B Communication method USB Ver2.0 Vendor ID: 12EC(Hex) USB identification no. Product ID: 6315(Hex) Serial no.: 0+7 digit individual no. ® Bluetooth Communication method Bluetooth®Ver2.1+EDR Class2 Profile Frequency 2402 - 2480MHz Modulation method...
-
Page 121: Measurement Specification
10. SPeCifiCatiOn SD card Storage capacity 2GB (Data storage capacity: 1.86 Gbyte) 14,623 byte/data (Max:1,271,964 data) *3P3W-2/1P3W- Max data size (2GB) 2(Power+ Harmonics) Max number of saved 65536 * Number of times that you can start a measurement. file (2GB) Icon display When the SD card is available, the “... -
Page 122: Items Measured At Instantaneous Measurement
10. SPeCifiCatiOn Items Measured at Instantaneous Measurement Frequency f [Hz] Displayed digit 4-digit Accuracy ±2dgt (40.00Hz - 70.00Hz, V1 Range 10% - 110%, sine wave) Display range 10.00 - 99.99Hz Input source V1 (fix) 10-sec average frequency f10 [Hz] Displayed digit 4-digit * e.g. - Page 123 10. SPeCifiCatiOn R.M.S. Current A [Arms] CT-500 (1000A): 100.0/1000A/AUTO Range CT-53 (3000A): 300.0/1000/3000A Displayed digit 4-digit Effective input range 1% - 110% of each Range (rms) and 200% of Range (peak) Display range 0.15% - 130% of each range (“0” is displayed at less than 0.15%) Crest factor 3 or less Meas.
- Page 124 10. SPeCifiCatiOn Active power P [W] Range Current CT-500 CT-53 1000A 100.0A 3000A 1000A 300.0A Voltage 1000V 1000k 100.0k 3000k 1000k 300.0k 600.0V 600.0k 60.00k 1800k 600.0k 180.0k Displayed digit 4-digit ±0.3%rdg±0.2%f.s.+ accuracy of clamp sensor (PF 1, sine wave, 40-70Hz) Accuracy *Sum values are total amounts of the used channels.
-
Page 125: Items To Be Calculated
10. SPeCifiCatiOn Items to be Calculated Apparent power S [VA] Range Same as active power. Displayed digit Same as active power. Accuracy ±1dgt against each calculated value (for sum : ±3dgt) Sign No polarity indication Equation ×a ; when P >S , regarding P : measurement channel... - Page 126 10. SPeCifiCatiOn Power factor: PF Display range -1.000 to 0.000 to 1.000 Accuracy ±1dgt against each calculated value (for sum : ±3dgt) -: leading phase + (no sign): lagging phase Sign Harmonics reactive power is calculated per ch, and the polarity sign of the reversed basic waveform is displayed.
- Page 127 10. SPeCifiCatiOn Current unbalance ratio Aunb [%] Displayed digit 5-digit Display range 0.00% to100.00% Wiring 3P3W, 3P4W Equation * The 1st order components of harmonic current are used. * For 3P4W system, phase voltages are converted to line voltages for calculation. Capacitance calculation Displayed digit 4-digit, Unit: nF, µF, mF, kvar...
-
Page 128: Items Measured At Integration Measurement
10. SPeCifiCatiOn Items Measured at Integration Measurement Power consumption (if P≥0) Active power energy +WP [Wh] Displayed digit 6-digit, Unit: m, k, M, G, T (harmonized with + 0.00000mWh - 9999.99TWh (harmonized with + Display area * “OL” is displayed when the display area is exceeded. Equation h: integration period (3600 sec), c: Measurment channel, i: Data point no. - Page 129 10. SPeCifiCatiOn Reactive power energy +WQ [Varh] Displayed digit 6-digit, Unit: m, k, M, G, T (harmonized with + 0.00000mvarh - 9999.99Tvarh (harmonized with + Display area * “OL” is displayed when the display area is exceeded. Leading phase Leading Equation phase h: integration period (3600 sec), n: System No., c: Measurement...
- Page 130 10. SPeCifiCatiOn Apparent power energy -WS[VAh] Displayed digit 6-digit, Unit: m, k, M, G, T (harmonized with + 0.00000mVAh - 9999.99TVAh (harmonized with + Display area * “OL” is displayed when the display area is exceeded. Equation h: integration period (3600 sec), c: Measurment channel, i: Data point no.
-
Page 131: Items Measured At Demand Measurement
10. SPeCifiCatiOn Items Measured at Demand Measurement Target value (DEM Target Displayed digit 4-digit Unit m, k, M, G, T Display range 0.000mW(VA) - 999.9TW(VA) *according to the selected values Predicted value (DEM Guess Displayed digit 6-digit Unit m, k, M, G, T (depending on DEM Target value 0.00000mW(VA) - 99999.9TW(VA) Display range... -
Page 132: Items Measured At Harmonics Measurement
10. SPeCifiCatiOn Items Measured at Harmonics Measurement Meas. system Digital PLL synchronization Analyze harmonics, and then add and display the inter-harmonics Meas. method components adjacent to the integral order of the analyzed harmonics Effective frequency 40 - 70Hz range Order analysis 1 - 50th Window width 10-cycle at 50Hz, 12-cycle at 60Hz... - Page 133 10. SPeCifiCatiOn R.m.s. harmonics current Ak [Arms] Range Same as r.m.s. current Displayed digit Same as r.m.s. current Same as r.m.s. current Display range * Rate of content: 0.0% - 100.0% (percentages to the basic wave) Complied with IEC61000-4-7, IEC61000-2-4 Analysis window width: 10/12 cycle for 50/60Hz, Measured values Meas.
- Page 134 10. SPeCifiCatiOn Harmonics reactive power Qk [var] (used for internal calculation only) Pck=v ×a ×a c(10k)r c(10k)i c(10k)i c(10k)r c: Measurement channel: A , k: Harmonics of each order. r: Real number after FFT conversion. Equation i: Imaginary number after FFT conversion. Measurement cycle in this equation is 10-cycle.
- Page 135 10. SPeCifiCatiOn Harmonics voltage total distortion factor THDVR [%] Displayed digit 4-digit Display range 0.0% - 100.0% c: Meas. channel V: Harmonics voltage Equation k: Harmonics of each order 1P2W-1 to 4 thDvf 1P3W-1 to 2 thDvf , thDvf 3P3W-1 to 2 Line voltage thDvf , thDvf 3P3W3A...
- Page 136 10. SPeCifiCatiOn Total harmonics current phase angle Ak [deg] Displayed digit 4-digit Display range 0.0º to ±180.0º c: Measurement channel A: Harmonics current Equation k:Harmonics of each order r: Real number after FFT conversion, i: Imaginary number after FFT conversion Harmonics voltage current phase angle difference k [deg] Displayed digit 4-digit...
-
Page 137: Items Measured At Power Quality Measurement
10. SPeCifiCatiOn Items Measured at Power Quality Measurement Voltage transient Meas. system Approx. 40.96ksps (every 24µs) gapless event detection (50Hz/60Hz) Displayed digit 4-digit Effective input range 50V - 2200V (DC) Display range 50V - 2200V (DC) Accuracy 0.5%rdg * at 1000V (DC) Input impedance Approx. - Page 138 10. SPeCifiCatiOn Inrush current Meas. system Same as r.m.s. current Displayed digit Same as r.m.s. current Effective input range Same as r.m.s. current Display range Same as r.m.s. current Crest factor Same as r.m.s. current Input impedance Same as r.m.s. current Threshold value Percentage of the measurement range Calculate r.m.s.
- Page 139 10. SPeCifiCatiOn Flicker Time left: Counted down time until a Pst calculation completes. V: r.m.s. voltage per half-wave, 1 sec average Pst(1min): Flicker value for 1 min (Pst ref. value) Pst: Severity of short term flicker (10 min) Displayed items Plt: Severity of long term flicker (2 hours) Max Pst: Max value of Pst, and time information Max Plt: Max value of Plt, and time information Pst(1min) Latest trend graph (for the recent 120 min) Plt trend graph for the recent 600 hours...
-
Page 140: Specification Of Clamp Sensor
10. SPeCifiCatiOn 10.4 Specifications of Clamp Sensor CT-53 CT-500 300A Range: AC 300 Arms( 424Apeak) Rated 1000A Range: AC 1000 Arms(1850Apeak) current AC 1000 Arms(1414Apeak) 3000A Range: AC 3000 Arms(4243Apeak) 300A Range: AC0 - 500mV(AC500mV/AC300A): 1.67mV/A 1000A Range: Output AC0 - 500mV AC0- 500mV(AC500mV AC1000A): voltage (AC500mV/AC1000A):0.5mV/A... - Page 141 10. SPeCifiCatiOn CT-53 CT-500 Output Approx. 100Ω or less impedance Location for In-door use, altitude 2000m or less IEC 61010-1,IEC 61010-2-032 IEC 61010-1,IEC 61010-2-032 Applicable Meas. CAT. III (600V) Pollution Meas. CAT. III (600V)/CAT.IV (300V) standards degree 2 Pollution degree 2 IEC61326 IEC61326 Withstand...
-
Page 142: Troubleshooting
11. trOUBleShOOting 11.1 General Troubleshooting When defect or breakdown of the instrument is suspected, check the following points first. If your problem is not listed in this section, contact your local Amprobe distributor. Symptom Check When operating with an AC power supply: • Power cord is connected firmly and properly? -
Page 143: Error Messages And Actions
• Check the free space on the SD card. If the space is not Check the amount of enough, delete unnecessary files, format the card or use another card. The SD card should be formatted on the DM-5, free space in the SD not on a PC. See “To delete, transfer or format the recorded card. - Page 144 11. trOUBleShOOting Message Detail & Action • Try again. If still the setting files are not read; there may be a problem with the SD card or the DM-5. If the setting Cannot read the setting files are on the SD card, the SD card may be the issue. If the file. The file may be setting files are on the internal memory, the DM-5 may be the damaged. issue. If a problem with the DM-5 is suspected, stop using the instrument.
- Page 146 Visit www.Amprobe.com for • Catalog • Application notes • Product specifications • User manuals Amprobe ® www.Amprobe.com info@amprobe.com Everett, WA 98203 Tel: 877-AMPROBE (267-7623) Amprobe Europe ® Beha-Amprobe In den Engematten 14 79286 Glottertal, Germany Please Tel.: +49 (0) 7684 8009 - 0...
Need help?
Do you have a question about the DM-5 and is the answer not in the manual?
Questions and answers