Table of Contents
Advertisement
Quick Links
Advertisement
Table of Contents

Related Manuals for ATEN CS176A


Summary of Contents for ATEN CS176A
- Page 1 USB DVI KVMP™ Switch CS176A / CS1764A User Manual www.aten.com...
-
Page 2: Fcc Information
CS176A / CS1764A User Manual FCC Information FEDERAL COMMUNICATIONS COMMISSION INTERFERENCE STATEMENT: This equipment has been tested and found to comply with the limits for a Class A digital device, pursuant to Part 15 of the FCC Rules. These limits are designed to provide reasonable protection against harmful interference when the equipment is operated in a commercial environment. -
Page 3: User Information
CS176A / CS1764A User Manual User Information Online Registration Be sure to register your product at our online support center: International http://eservice.aten.com Telephone Support For telephone support, call this number: 886-2-8692-6959 International China 86-400-810-0-810 81-3-5615-5811 Japan 82-2-467-6789 Korea 1-888-999-ATEN ext 4988... -
Page 4: Package Contents
* Features may have been added to the CS176A / CS1764A since this manual was printed. Please visit our website to download the most up-to-date version... -
Page 5: Table Of Contents
CS176A / CS1764A User Manual Contents FCC Information ..........ii RoHS . - Page 6 CS176A / CS1764A User Manual Invoking HSM ......... . . 22 Alternate HSM Invocation Keys .
-
Page 7: About This Manual
CS176A / CS1764A User Manual About this Manual This User Manual is provided to help you get the most from your CS176A / CS1764A. It covers all aspects of installation, configuration and operation. An overview of the information found in the manual is provided below. -
Page 8: Conventions
For information about all ATEN products and how they can help you connect without limits, visit ATEN on the Web or contact an ATEN Authorized Reseller. Visit ATEN on the Web for a list of locations and telephone numbers: International http://www.aten.com... -
Page 9: Introduction
Digital Visual Interface (DVI) monitor. In addition, CS1762 / CS1764 comes with ATEN’s new Video DynaSync technology, which eliminates boot-up display problems and optimizes resolution, and power on detection, which means if one computer is powered off, the CS1762 / CS1764 will automatically switch to the next powered-on computer. - Page 10 CS1762 / CS1764 User Manual There are three convenient methods to access the computers: port selection pushbuttons located on the unit’s front panel; hotkey combinations entered from the keyboard; and the very latest in mouse port-switching – simply double-click on the scroll wheel of a USB mouse to change ports. There is no better way to save time and money than with a CS1762 / CS1764 installation.
-
Page 11: Features
HDCP compliant Video DynaSync – exclusive ATEN technology optimizes display resolution and eliminates boot-up display problems Power on detection – if one computer is powered off, the switch will automatically switch to the next powered-on computer ... -
Page 12: Hardware Requirements
CS1762 / CS1764 User Manual Hardware Requirements Console A DVI compatible monitor capable of the highest possible resolution A USB mouse A USB keyboard Microphone and speakers (optional) Computers The following equipment must be available on each computer: ... -
Page 13: Operating Systems
Chapter 1. Introduction Operating Systems Supported operating systems are shown in the table, below: Version Windows 2000 / XP / 2003 / 2008 / Vista / 7 Linux RedHat 9.0 and higher SuSE 10 / 11.1 and higher Debian 3.1 / 4.0 Ubuntu 7.04 / 7.10 UNIX... -
Page 14: Components
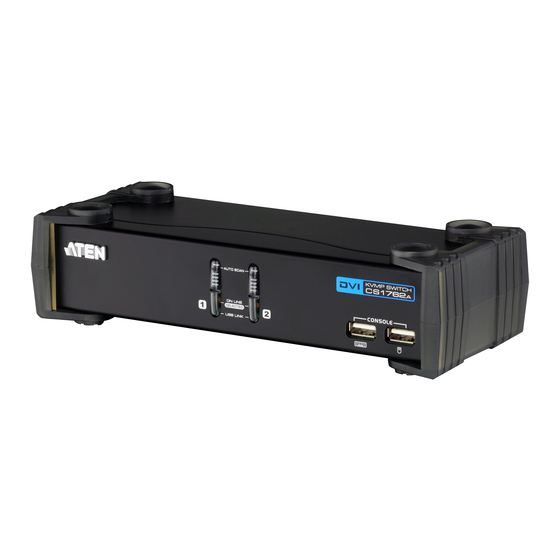
CS1762 / CS1764 User Manual Components CS1762 Front View 1 & 2 CS1764 Front View 1 & 2... - Page 15 Chapter 1. Introduction Component Description Port For manual port selection (see see Manual Switching, Selection page 15, also): Pushbuttons Press a port selection pushbutton for less than two seconds to bring the KVM, USB hub, and audio focus to the computer attached to its corresponding port.
-
Page 16: Cs1762 A Rear View
CS1762 / CS1764 User Manual CS1762 Rear View CS1764 Rear View... - Page 17 Chapter 1. Introduction Component Description USB 2.0 USB peripherals (printers, scanners, etc.) can plug into this/ these port(s) (this may require an extra power adapter). Console CS1762 – The cables from your DVI monitor, speakers, and Port Section microphone plug in here. Each connector is marked with an appropriate icon to indicate itself.
- Page 18 CS1762 / CS1764 User Manual This Page Intentionally Left Blank...
-
Page 19: Hardware Setup
Chapter 2 Hardware Setup 1. Important safety information regarding the placement of this device is provided on page 39. Please review it before proceeding. 2. To prevent damage to your installation from power surges or static electricity. It is important that all connected devices are properly grounded. - Page 20 CS1762 / CS1764 User Manual Note: Verify that all the plugs are in the same KVM Port sockets (all in Port 1, all in Port 2, etc.). Each socket is marked with an appropriate icon. 6. At the other end of the cable, plug the USB, video, microphone, and speaker cables into their respective ports on the computer.
-
Page 21: Installation Diagram
Chapter 2. Hardware Setup Installation Diagram USB DVI KVM Cable Set USB DVI KVM Cable Set... - Page 22 CS1762 / CS1764 User Manual This Page Intentionally Left Blank...
-
Page 23: Basic Operation
Chapter 3 Basic Operation Manual Switching There are three convenient methods to access the computers: Manual – which involves pressing the port selection pushbuttons located on the unit’s front panel; Mouse – which involves clicking the scroll wheel of the mouse; and Hotkey –... -
Page 24: Mouse Port-Switching
CS1762 / CS1764 User Manual Mouse Port-switching The CS1762 / CS1764 supports the very latest in mouse port-switching – simply double-click the scroll wheel of your USB mouse to cycle through the ports. Note: 1. This featured is only supported by USB 3-key scroll wheel mice. 2. -
Page 25: Port Id Numbering
Chapter 3. Basic Operation Port ID Numbering Each KVM port section on the CS1762 / CS1764 switch is assigned a port number. (1 or 2 for the CS1762 ; 1 to 4 for the CS1764 ). The port numbers are marked on the rear panel of the switch (see page 8). The Port ID of a computer is derived from the KVM port number it is connected to. - Page 26 CS1762 / CS1764 User Manual This Page Intentionally Left Blank...
-
Page 27: Hotkey Operation
Chapter 4 Hotkey Operation The CS1762 / CS1764 provides an extensive, easy-to-use, hotkey function that makes it convenient to control and configure your KVM installation from the keyboard. Hotkeys provide independent switching of the KVM, USB hub, and audio focus. Therefore, you can give one computer the KVM focus, another the USB hub focus, while a third has the audio focus. -
Page 28: Going Directly To A Port
CS1762 / CS1764 User Manual Going Directly to a Port Hotkey Action [Scroll Lock] [Scroll Lock] Brings the KVM, USB hub, and audio focus to the [n] [Enter] computer attached to the port corresponding to the specified Port ID. Note: The KVM, USB hub, and audio focus all go to this port even if they were on different ports to begin with. -
Page 29: Auto Scanning
Chapter 4. Hotkey Operation Auto Scanning The CS1762 / CS1764 ’s Auto Scan feature automatically cycles the KVM focus through the computer ports at regular intervals. This allows you to monitor the computer activity without having to take the trouble of switching from port to port manually. -
Page 30: Hotkey Setting Mode
CS1762 / CS1764 User Manual Hotkey Setting Mode Hotkey Setting Mode is used to set up your CS1762 / CS1764 switch configuration. All operations begin with invoking Hotkey Setting Mode (HSM). Invoking HSM To invoke HSM do the following: 1. Press and hold down [Num Lock]. 2. -
Page 31: Alternate Hsm Invocation Keys
Chapter 4. Hotkey Operation Alternate HSM Invocation Keys An alternate set of HSM invocation keys is provided in case the default set conflicts with programs running on the computers. To switch to the alternate HSM invocation set, do the following: 1. -
Page 32: Keyboard Operating Platform
CS1762 / CS1764 User Manual Keyboard Operating Platform The CS1762 / CS1764 ’s default port configuration is for a PC compatible keyboard operating platform. If your console uses a PC compatible keyboard and you have a Mac attached to a port, for example, you can change the port’s keyboard operating platform configuration so that the PC compatible keyboard emulates the Mac keyboard. -
Page 33: Usb Reset
Chapter 4. Hotkey Operation USB Reset If the USB loses focus and needs to be reset, do the following: 1. Invoke HSM (see page 22). 2. Press and release [F5]. Keyboard Language To change the keyboard language, do the following: 1. -
Page 34: Firmware Upgrade Mode
2. Press [R] [Enter]. See Hotkey Default Settings, page 46 Video DynaSync Video DynaSync is ATEN’s exclusive technology that eliminates boot-up display problems and optimizes resolution when switching between ports. To invoke Video DynaSync, do the following: 1. Invoke HSM (see page 22) 2. -
Page 35: Mouse Emulation Control
Chapter 4. Hotkey Operation Mouse Emulation Control The default setting is enabled. To disable, do the following: 1. Invoke HSM (see page 22 2. Press [M]. This procedure is a toggle. Repeat to enable. Mouse Port-switching The Mouse Port-switching function can be enabled or disabled. The default setting is disabled. -
Page 36: Hsm Summary Table
Invokes Firmware Upgrade Mode. See The Firmware [u] [p] [g] [r] [a] [d] [e] [Enter] Upgrade Utility, page 33, for full details. Invokes Video DynaSync, ATEN’s exclusive technology that eliminates boot-up display problems and optimizes resolution when switching between ports. - Page 37 Chapter 4. Hotkey Operation Function [F1] Sets SPC mode so that it works under special operating systems as a standard (104 key) keyboard/mouse.
- Page 38 CS1762 / CS1764 User Manual This Page Intentionally Left Blank...
-
Page 39: Keyboard Emulation
Chapter 5 Keyboard Emulation Mac Keyboard The PC compatible (101/104 key) keyboard can emulate the functions of the Mac keyboard. The emulation mappings are listed in the table below. PC Keyboard Mac Keyboard [Shift] Shift [Ctrl] Ctrl [Ctrl] [1] [Ctrl] [2] [Ctrl] [3] [Ctrl] [4] [Alt]... -
Page 40: Sun Keyboard
CS1762A / CS1764A User Manual Sun Keyboard The PC compatible (101/104 key) keyboard can emulate the functions of the Sun keyboard when the Control key [Ctrl] is used in conjunction with other keys. The corresponding functions are shown in the table below. PC Keyboard Sun Keyboard [Ctrl] [T]... -
Page 41: The Firmware Upgrade Utility
Utility comes as part of a Firmware Upgrade Package that is specific for each device. Check the web site regularly to find the latest packages and information relating to them at http://www.aten.com Before you Begin 1. From a computer that is not part of your KVM installation go to our... - Page 42 CS1762 / CS1764 User Manual 4. At the other end of the USB DVI KVM cable set, connect the USB Type B connector to the Type A USB port in the Port 1 KVM section. Note: The USB DVI KVM cable set’s USB Type B connector can be connected to any USB Type KVM port section, but the Port Selection pushbutton in Step 5, below, must be Port 1.
-
Page 43: Starting The Upgrade
Chapter 6. The Firmware Upgrade Utility Starting the Upgrade 1. Run the downloaded Firmware Upgrade Package file – either by double clicking the file icon, or using a command line to enter the full path. The Firmware Upgrade Utility Welcome screen appears: 2. - Page 44 CS1762 / CS1764 User Manual 4. As you select a device in the list, its description appears in the Device Description panel.After you have made your device selection(s), Click Next to perform the upgrade. If you enabled Check Firmware Version, the Utility compares the device’s firmware level with that of the upgrade files.
-
Page 45: Upgrade Succeeded
Chapter 6. The Firmware Upgrade Utility Upgrade Succeeded After the upgrade has completed, a screen appears to inform you that the procedure was successful: Click Finish to close the Firmware Upgrade Utility. After a successful completion, the CS1762 / CS1764 exits Firmware Upgrade Mode, and resets itself. - Page 46 CS1762 / CS1764 User Manual This Page Intentionally Left Blank...
-
Page 47: Appendix
Appendix Safety Instructions This product is for indoor use only. Read all of these instructions. Save them for future reference. Follow all warnings and instructions marked on the device. Do not place the device on any unstable surface (cart, stand, table, etc.). If the device falls, serious damage will result. - Page 48 CS1762 / CS1764 User Manual If the following conditions occur, unplug the device from the wall outlet and bring it to qualified service personnel for repair. The power cord or plug has become damaged or frayed. Liquid has been spilled into the device. ...
-
Page 49: Technical Support
Appendix Technical Support International For online technical support – including troubleshooting, documentation, and software updates: http://eservice.aten.com For telephone support, see Telephone Support, page iii. North America Email Support support@aten-usa.com Online Troubleshooting http://www.aten-usa.com/support Technical Documentation Support Software Updates Telephone Support... -
Page 50: Specifications
CS1762 / CS1764 User Manual Specifications Function CS1762 CS1764 Computer Connections Port Selection Front Panel Pushbuttons; Hotkey Connectors Console 1 x USB Type A F 1 x USB Type A F Ports (White; front panel) (Black; rear panel) Video 1 x DVI-I F (white) Mouse 1 x USB Type A F 1 x USB Type A F... - Page 51 Appendix Function CS1762 CS1764 Environment Operating Temp. 0–50ºC Storage Temp. -20–60ºC Humidity 0–80% RH, Non-condensing Physical Housing Metal Properties Weight 0.73 kg 0.94 kg Dimensions 21.00 x 8.70 x 5.50 27.00 x 8.70 x 5.50 cm (L x W x H)
-
Page 52: Troubleshooting
CS1762 / CS1764 User Manual Troubleshooting Operation problems can be due to a variety of causes. The first step in solving them is to make sure that all cables are securely attached and seated completely in their sockets. In addition, updating the product’s firmware may solve problems that have been discovered and resolved since the prior version was released. - Page 53 Appendix Symptom Possible Cause Action When switching ports, Monitor is new or this Switch ports again and wait two or the monitor does not is the first time more seconds for the monitor’s EDID to pass to the PC. display. installation.
-
Page 54: Hotkey Default Settings
CS1762 / CS1764 User Manual Hotkey Default Settings The hotkey factory default settings are as follows: Setting Hotkey Default Port Switching [Scroll Lock] [Scroll Lock] Invoking HSM [Number Lock] [-] Auto Scan Interval [Scroll Lock] 5 seconds [Scroll Lock] [A] [Enter] Keyboard Operating Platform [F10] PC Compatible... -
Page 55: Limited Warranty
What is covered by the Limited Hardware Warranty ATEN will provide a repair service, without charge, during the Warranty Period. If a product is detective, ATEN will, at its discretion, have the option to (1) repair said product with new or repaired components, or (2) replace the entire product with an identical product or with a similar product which fulfills the same function as the defective product. - Page 56 All other brand names and trademarks are the registered property of their respective owners. ATEN International Co., Ltd., 3F, No. 125, Sec. 2, Datung Rd., Sijhih District, New Taipei City 221, Taiwan Phone: 886-2-8692-6789 Fax: 886-2-8692-6767 TECHNICAL SUPPORT CENTER: 886-2-8692-6959...
Need help?
Do you have a question about the CS176A and is the answer not in the manual?
Questions and answers