Advertisement
Quick Links
Advertisement

Subscribe to Our Youtube Channel
Related Manuals for Pacific Casual 196-924-2CP-V4-IN


Summary of Contents for Pacific Casual 196-924-2CP-V4-IN
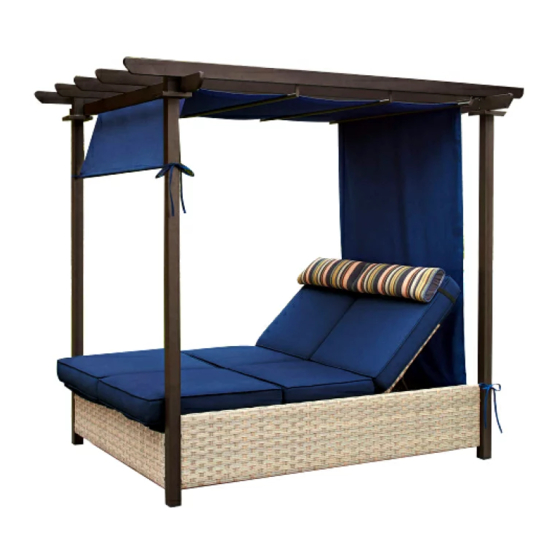
- Page 1 戶外休閒躺床 ITM. / ART. 1900615 產品编号 # 196-924-2CP-V4-IN 此為重要參考資料,請妥善保存,並仔細閱讀 組裝及使用說明 供應商:Pacific Casual L.L.C. 地址:1060 Avenida Acaso, Camarillo, CA 93012 電子邮件:CustomerService@PacificCasual.com 電話:1-888-445-4533 (提供英文,法文及西班牙服務) (太平洋區標準時間,星期一至星期五上午 7:30 至下午 4:30 ,僅限美國和加拿大地區) 產品使用條件: 僅限家庭使用。不得作為商業性用途。...
- Page 2 目錄 警告及注意事項 ............2 零件清單.................3 保養與維護 ..............2 組裝.................4 警告及注意事項 警告:請將所有易燃物和熱源遠離此帳篷織物。這款帳篷採用符合CPAI-84規格的織物製成,可防阻燃,但並 不完全防火。如果與任何火焰源持續接觸,織物將燃燒。帳篷織物接觸任何外來物質可能使阻燃性能無效。 警告:此藤架不是永久性結構,是專為遮陽和隱私而設計,必須在正常天氣條件下使用。我們建議在有風的 條件下拆除織物遮篷,因為遮篷像雨傘一樣不耐風。但是,您必須在任何惡劣天氣條件(如雷暴、颶風和/或 大風、下雨)來臨之前完全拆卸設備。未能移除織物頂端或拆卸裝置將導致遮篷結構損壞甚至坍塌。 注意:始終安裝在水準地面上。不要將花園房屋永久固定在木質甲板或混凝土表面上。 注意:涼棚織物具有防水性能但不完全防水,降水時可能會漏水。面料會因直接暴露在陽光下而褪色。我們 建議在雨天條件下移除織物遮篷,因為水會積聚在頂部。 注意:讓所有兒童和寵物遠離安裝區域。開始組裝時任何障礙物距離不少於2米(6.5英尺),如柵欄、車庫、 房屋、懸垂的樹枝、晾衣繩或電線。有些部件可能包含鋒利邊緣,必要時請戴防護手套。建議至少安排兩人 或兩人以上進行安全性群組裝。 保養與維護 使用前,請用乾淨乾燥的布料擦拭。不要使用漂白劑或溶劑。用液態蠟處理框架,以最大程 度地防止紫外線和含鹽的潮濕空氣。用溫和的肥皂水溶液清洗遮篷,徹底清洗、風乾。 請正確擰緊所有硬體並在使用過程中定期檢查是否有破裂的焊縫或鬆動的螺母或螺栓。 請將靠墊沖洗乾淨,晾乾。 請勿使用洗衣機或乾衣機,否則可能會導致靠墊縮水。 請勿使用漂白劑或任何其他溶劑於布料上。 如有任何問題,請致電 1-888-445-4533 聯繫我們的客戶服務部門。 需要兩個人一起組裝。組裝前請先將所有零件作編排,並確認所有零件都已包含在內。 兩個人完成組裝大約需要 45 分鐘。...
- Page 3 零件清單 需要工具(不包括在內) 裝配前請準備一個獨立的梯子。 金屬零件: 注意:零件顯示非實際大小。 零件 說明 數量 零件 說明 數量 扳手 六角扳手(S4) 螺栓(M6× 15) 螺栓(M6× 35) 螺栓(M6× 40) 塑膠墊片(2.5H) 螺母(M6) 墊圈(M6)...
- Page 4 零件清單(續) 包裝內容: 零件 說明 數量 零件 說明 數量 角柱 丁字架 角柱 支撐板 橫樑 座椅面板 橫樑 槽鋼 橫樑 後板 遮篷 U形杆 長邊側板 靠墊和枕頭 2 套 短邊側板...
- Page 5 組裝 識別角柱 安裝側板 使用扳手 (HH) 將角柱 (B) 安裝在帶有墊圈 (GG) M6 × 15 M6 × 35 和螺栓(CC)的長側板(G)的左外側。 16 PCS 16 PCS GG 32PCS 使用扳手 (HH) 將角柱 (A) 安裝在帶有墊圈 (GG) 和螺栓(CC)的長側板(G)的右外側。 將每對角柱(A)和(B)與短邊連接。 帶墊圈(GG)的面板(H)和使用扳手(HH) 的螺栓(CC)。 重要提示:在此步驟結束前,請勿完 全擰緊螺栓。 在每個內角處,使用扳手(HH)將一個支撐板 (J)連接到帶有墊圈(GG)和螺栓(BB)的兩...
- Page 6 組裝(續) 安裝T 形杆 M6 × 15 GG 8 PCS 8 PCS 將 T 形杆 (I) 連接到帶有墊圈 (GG) 和螺栓 (BB) 形杆 ( 的兩個長側板(G)的內側。 安裝橫樑(C) M6 × 35 8 PCS GG 8 PCS 使用六角扳手(HH)將橫樑(C)連接到短邊上的帶墊圈(GG)和螺栓(CC)的角柱(A 和 B)頂部。...
- Page 7 組裝 (續) 安裝橫樑(D)和(E) × GG 4 PCS 4PCS 圖 5.1 使用六角扳手(HH)將橫樑(D)安裝在帶墊圈(GG)和螺栓(BB)的橫樑(C)頂部。(圖5.1) × GG 6 PCS 6 PCS 圖 5.2 使用六角扳手(HH)將橫樑(E)安裝在帶墊圈(GG)和螺栓(BB)的橫樑(C)頂部。(圖5.2)...
- Page 8 組裝(續) 將T形杆連接到橫樑(D) M6 × 15 GG 8 PCS 8 PCS 將U形杆(F)放在兩個橫樑(D)之間。 使用六角扳手(HH)將U形杆(F)連接到帶墊圈(GG)和螺栓(BB)的橫樑(D)上。 將 U 形杆安裝到座椅面板上(D) M6 × 15 4 PCS GG 4 PCS 將座椅面板(K)倒置在平坦光滑的表面上。 使用六角扳手(HH)將U形杆(L)安裝在帶墊圈(GG)和螺栓(BB)的座板(K)底部。...
- Page 9 組裝 (續) 將座椅面板安裝到長側面板上 M6 × 35 4 PCS GG 4PCS 將座椅面板(K)放在兩個長側面板(G)之間。 使用六角扳手(HH)將座椅面板(K)連接到帶墊圈(GG)和螺栓(CC)的兩個長側面板(G)上。...
- Page 10 組裝(續) 將背板連接到座椅面板( K ) × 8PCS M6 8PCS 8PCS M6 16PCS 將背板(M)與座椅面板(K)對齊。 使用扳手(AA)和(HH)將背板(M)用塑膠墊片(EE)、墊圈(GG)、螺栓(DD)和螺母(FF) 固定到座椅面板(K)上。 完全擰緊框架上的所有螺栓和螺母。 將遮篷和墊子放在裝置上 讓頂篷(N)穿過頂端框架並將其固定在帶有織 物環的角柱上。 將背板放置在所需位置,並將墊子(O)放在裝 置上。...
- Page 11 DOUBLE CHAISE WITH PERGOLA ITM. / ART. 1900615 MODEL # 196-924-2CP-V4-IN READ CAREFULLY IMPORTANT, RETAIN FOR FUTURE REFERENCE: ASSEMBLY AND USE INSTRUCTIONS Address: 1060 Avenida Acaso, Camarillo, CA 93012 TEL: 1-888-445-4533 (English, French and Spanish is offered.) (7:30am to 4:30pm PST, Monday to Friday, for US and Canada only) Conditions for use of the product: This item is intended for outdoor domestic use only.
-
Page 12: Warning And Cautions
Contents Warning and Cautions..........2 Parts................. Care and Maintenance ..........2 Assembly...............4 Warning and Cautions WARNING : Keep all flame and heat sources away from this tent fabric. This tent is made with fabric that meets CPAI-84 specification for flame resistance. It is not fire proof. The fabric will burn if left in continuous contact with any flame source. The application of any foreign substance to the tent fabric may render the flame-resistance properties ineffective. -
Page 13: Parts
Parts TOOLS REQUIRED (not included) . y l HARDWARE INCLUDED NOTE: Hardware not shown to actual size. Part Description Quantity Part Description Quantity Wrench Hex wrench (S4) Bolt (M6×15) Bolt (M6 ×35 ) Bolt (M6×40) Plastic spacer (2.5H) Nut (M6) Washer (M6) - Page 14 (continued) Parts PACKAGE CONTENTS Part Description Quantity Part Description Quantity Corner post T-bar Support plate Corner post Cross beam Seat panel U-bar Cross beam Cross beam Back panel U-bar Canopy Long side panel 2 sets Cushion and pillow Short side panel...
-
Page 15: Assembly
Assembly Identifying corner posts Attaching side panels □ Attach corner post (B) to the outside left of long side panel (G) with washers (GG) and bolts (CC) using wrench (HH). □ Attach corner post (A) to the outside right of long side panel (G) M6 ×... - Page 16 Assembly (continued) M6 × 15 8 PCS GG 8 PCS □ Attach T-bars (I) to the inner side of both long side panels (G) with washers (GG) and bolts (BB) using hex wrench (HH). Attaching cross beams (C) M6 × 35 8 PCS GG 8 PCS □...
- Page 17 Assembly (continued) ) E ( × GG 4 PCS 4PCS Fig. 5.1 Attach cross beams (D) on to the top of cross beams (C) with washers (GG) and bolts (BB) using hex wrench (HH). (Fig. 5.1) × GG 6 PCS 6 PCS Fig.
- Page 18 Assembly (continued) Attaching T-bars to Cross Beams (D) M6 × 15 8 PCS GG 8 PCS Place U-bar (F) between two cross beams (D). Attach U-bars (F) to cross beams (D) with washers (GG) and bolts (BB) using hex wrench (HH). Attaching U-bars to seat panels (D) M6 ×...
- Page 19 Assembly (continued) Attaching seat panels to long side panels M6 × 35 4 PCS GG 4PCS □ Place the seat panel (K) between two long side panels (G). □ ) K ( h t i s t l . ) H...
- Page 20 Assembly (continued) t t A ) K ( × M6 8PCS 8PCS 8PCS M6 16PCS □ Align back panels (M) to the seat panel (K). □ Attach back panels (M) to the seat panel (K) with plastic spacer (EE), washers (GG), bolts (DD) and nuts (FF) using wrenches (A A) and (HH). □...
- Page 21 DISTRIBUTED BY: DISTRIBUTED BY: COSTCO WHOLESALE CORPORATION COSTCO WHOLESALE ICELAND EHF. P.O. BOX 34535 KAUPTÚN 3-7, 210 GARDABAER SEATTLE, WA 98124-1535 ICELAND WWW.COSTCO.IS 1-800-774-2678 WWW.COSTCO.COM IMPORTED BY / IMPORTÉ PAR : IMPORTED BY: COSTCO WHOLESALE CANADA LTD.* COSTCO WHOLESALE AUSTRALIA PTY LTD 17-21 PARRAMATTA ROAD 415 W.
Need help?
Do you have a question about the 196-924-2CP-V4-IN and is the answer not in the manual?
Questions and answers