
Related Manuals for autosen AF003


Summary of Contents for autosen AF003
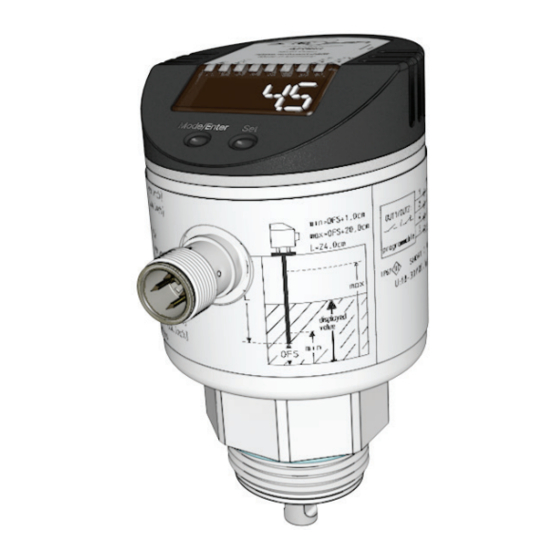
- Page 1 Operating instructions Electronic level sensor AF003 autosen Made in Germany Made in Germany...
-
Page 2: Table Of Contents
Contents 1 Preliminary note ���������������������������������������������������������������������������������������������������4 1�1 Symbols used ������������������������������������������������������������������������������������������������4 2 Safety instructions �����������������������������������������������������������������������������������������������4 3 Items supplied������������������������������������������������������������������������������������������������������5 4 Functions and features ����������������������������������������������������������������������������������������7 4�1 Operation with single probe ���������������������������������������������������������������������������7 4�2 Operation with coaxial probe �������������������������������������������������������������������������7 4�3 Applications ���������������������������������������������������������������������������������������������������8 4�3�1 Restriction of the application area ��������������������������������������������������������8 5 Function ���������������������������������������������������������������������������������������������������������������9 5�1 Measuring principle ���������������������������������������������������������������������������������������9 5�2 Features of the unit ��������������������������������������������������������������������������������������10... - Page 3 6�4�2 Installation in closed metal tanks (with flange plate) ��������������������������22 6�4�3 Installation in open tanks ��������������������������������������������������������������������23 6�4�4 Installation in plastic tanks ������������������������������������������������������������������24 6�5 Installation of the unit with coaxial probe in the tank �����������������������������������24 6�6 Alignment of the sensor housing �����������������������������������������������������������������25 7 Electrical connection ������������������������������������������������������������������������������������������25 8 Operating and display elements ������������������������������������������������������������������������26 9 Menu ������������������������������������������������������������������������������������������������������������������27...
-
Page 4: Preliminary Note
11�3 Changing the display unit in the Run mode �����������������������������������������������35 11�4 Error indications �����������������������������������������������������������������������������������������36 11�5 Output response in different operating states ��������������������������������������������37 12 Technical data and scale drawing ��������������������������������������������������������������������37 12�1 Setting ranges ������������������������������������������������������������������������������������������37 13 Servicing ����������������������������������������������������������������������������������������������������������38 14 Factory setting �������������������������������������������������������������������������������������������������39 1 Preliminary note 1.1 Symbols used ►... -
Page 5: Items Supplied
According to the current state of science the operation of the unit can be classified to be harmless to human health� 3 Items supplied • Level sensor AF003 • Operating instructions In addition, the following is necessary for installation and operation: • 1 rod (for operation of the unit with single probe→ 4.1) - Page 6 The following components are available as accessories: Rods Length (cm / inch) Order no� 45 / 17�7 AA926 70 / 27�6 AA927 100 / 39�4 AA928 Coaxial pipes Length (cm / inch) Order no� with G¾ process connection 45 / 17�7 AA929 70 / 27�6 AA930...
-
Page 7: Functions And Features
4 Functions and features The unit continuously detects the level in tanks and generates output signals according to the parameter settings� 2 outputs are available: one analogue output and one switching output� They can be set separately� 4.1 Operation with single probe The single probe is made up of one individual rod�... -
Page 8: 4�3 Applications
Application examples: • Detection of coolant emulsion in a machine tool� • Detection of cleaning liquid in a parts cleaning system� • Monitoring of hydraulic oil in a hydraulic power unit (only for operation with coaxial probe) 4.3.1 Restriction of the application area Incorrect measurements or signal loss may be caused by the following media: - Highly absorbing surfaces (e�g�... -
Page 9: Function
5 Function 5.1 Measuring principle Fig. 5-1 Fig. 5-2 The unit operates to the principle of guided wave radar� It measures the level using electromagnetic pulses in the nanosecond range� The pulses are transmitted by the sensor head and guided along the rod (fig� 5-1)� When they hit the medium to be detected they are reflected and guided back to the sensor (fig�... -
Page 10: 5�2 Features Of The Unit
5.2 Features of the unit 5.2.1 Easy set-up • When the unit is supplied with operating voltage for the first time, the probe length, the medium to be detected and the type of probe used must be entered� Then the unit is ready for operation. (→ 10.2). • If necessary, parameters for the output signals and optimisation of the monitoring functions can be set ( → 10.3 to→ 10.5). - Page 11 Curve of the analogue signal (factory setting): I / U 20 mA /10 V 4 mA / 0 V L: level; A: active zone; I1: inactive zone 1; I2: inactive zone 2 (→ Technical data sheet); ①: [OU1] = [I] / [U]; ②: [OU2] = [InEG] / [UnEG]. Curve of the analogue signal (measuring range scaled): I / U 20 mA /10 V...
-
Page 12: 5�2�4 Switching Functions
5.2.4 Switching functions The unit signals via the switching output (OUT1) that a set limit value has been reached or that the level is below the limit value� For each output the following switching functions can be selected: • Hysteresis function / normally open (fig� 5-3): [OU1] = [Hno]� • Hysteresis function / normally closed (fig�... -
Page 13: 5�2�6 Probes For Different Tank Heights
The IO-Link interface enables direct access to the process and diagnostic data and provides the possibility to set the parameters of the unit during operation� In addition communication is possible via a point-to-point connection with a USB adapter cable� Further information about IO-Link is available at www�autosen�com�... -
Page 14: Installation
You will find the IODDs necessary for the configuration of the IO-Link unit and detailed information about process data structure, diagnostic information and parameter addresses at www�autosen�com� Parameter setting tools You will find all necessary information about the required IO-Link hardware and software at www�autosen�com�... - Page 15 • For probe lengths > 70 cm the rod can be considerably deflected by movement of the medium� To avoid contacting the tank wall or other structures in the tank in such cases, the minimum distances should be increased� Reference values: Probe length Distance to the tank wall or structures in the tank 70���100 cm...
- Page 16 Fig. 6-3 Fig. 6-4 50mm To avoid incorrect measurements in case of heavy foam formation and turbulence: ► if possible, install the sensor in a steady area� Example how to create a steady area: - Use of a coaxial probe (only for clean, low-viscosity media) - Installation in bypass or still pipe (see fig�...
-
Page 17: 6�1�2 Unit With Coaxial Probe
Fig.: 6-5 6.1.2 Unit with coaxial probe • No minimum distances to the tank wall and the baffles (B) are required� • Minimum distance to the bottom of the tank: 10 mm� • The vent hole (A) must not be covered by mounting elements or similar�... -
Page 18: 6�2 Installation Of The Probe
6.2 Installation of the probe Rod and coaxial pipe are not included in the scope of delivery� They must be ordered separately (→ 3 Items supplied). 6.2.1 Installation of the rod Fixing of the rod: ► Screw the rod to the unit and tighten it� Recommended tightening torque: 4 Nm�... -
Page 19: 6�2�2 Installation Of The Coaxial Pipe
6.2.2 Installation of the coaxial pipe This subchapter is only relevant if the unit is to be operated with a coaxial probe� The coaxial pipe and the rod must be of the same end length� The coaxial pipe can be shortened (→ 6.3.2). ► Screw the rod to the unit and tighten it� Recommended tightening torque: 4 Nm�... -
Page 20: 6�3 Shortening Of The Probe
6.3 Shortening of the probe 6.3.1 How to shorten the rod and to determine its length L The rod can be shortened to adapt the probe to different tank heights� Ensure that the probe length is never below the minimum permissible probe length of 10 cm (L )! The unit does not support probe lengths below 10 cm�... -
Page 21: 6�3�3 Determination Of The Rod Length L When Coaxial Probes Are Used
Fig.: 6-6 ► Remove fastening bracket and centring piece (A, B)� ► Shorten the coaxial pipe to the requested length: L = L + 9 mm� ► After shortening, at least one hole (C) for insertion of the fixing bracket has to be left�... -
Page 22: 6�4�1 Installation In Closed Metal Tanks (Without Flange Plate)
6.4.1 Installation in closed metal tanks (without flange plate) Fig.: 6-7 Fig.: 6-8 Fig.: 6-9 ► The lower edge of the process connection should be flush with the installation environment (fig� 6-7)� ► Avoid non-flush installation (fig� 6-8)� ► Use seals or washers (D in fig� 6-9) to reach the required height� ►... -
Page 23: 6�4�3 Installation In Open Tanks
► Arrange for a bore hole in the tank lid� It must have a minimum diameter (d) to enable sufficient transfer of the measured signal to the probe (fig� 6-10)� The diameter depends on the wall thickness of the tank lid: Wall thickness [mm] 1���5 5���8... -
Page 24: 6�4�4 Installation In Plastic Tanks
► Use seals or washers (see D in fig� 6-9) to reach the required height� 6.4.4 Installation in plastic tanks 150 mm To enable sufficient transfer of the measured signal, note in case of installation in plastic tanks or metal tanks with plastic lid: ►... -
Page 25: 6�6 Alignment Of The Sensor Housing
Voltage supply according to EN 50178, SELV, PELV� ► Disconnect power� ► Connect the unit as follows: OUT2 OUT1/IO-Link Connection Core colours for autosen sockets brown blue OUT2 = analogue output white • OUT1 = PNP switching output black • IO-Link... -
Page 26: Operating And Display Elements
8 Operating and display elements 3 4 5 6 Mode/Enter 1 to 8: Indicator LEDs - LED 1: green = indication of the level in cm - LED 2: green = indication of the level in inch� - LED 3: green = indication of the level in % of the final value of the measuring range� - LED 4 - LED 7: not used - LED 8: yellow = output 1 is switched�... -
Page 27: Menu
9 Menu 9.1 Menu structure cm inch S... -
Page 28: 9�2 Explanation Of The Menu
9.2 Explanation of the menu SP1/rP1 Upper / lower limit value for the level at which OUT1 switches� FH1/FL1 Upper / lower limit for the acceptable range (monitored by OUT1)� Output function for OUT1: switching signal for level limit value� Hysteresis or window function, normally closed or normally open Output function for OUT2: Analogue signal for the current level, 4…20 mA / 0���10 V or... -
Page 29: Parameter Setting
10 Parameter setting During parameter setting the unit remains in the operating mode internally� It continues to monitor with the existing parameters until the parameter setting has been completed� 10.1 Parameter setting in general 3 steps must be taken for each parameter setting: Select parameter ►... - Page 30 • Change from menu level 1 to menu level 2: ► Press [Mode/Enter] until [EF] is displayed. Mode/Enter Set ► Briefly press [Set]� > The first parameter of the submenu is Mode/Enter Set displayed (here: [res])� • Locking / unlocking The unit can be locked electronically to prevent unintentional settings�...
-
Page 31: 10�2 Basic Settings (Unit On Delivery)
10.2 Basic settings (unit on delivery) On delivery of the unit, you must first enter the basic settings� The complete parameter setting menu cannot be accessed before this� Malfunctions may occur if wrong basic settings are entered� 10.2.1 Entering the probe length ►... -
Page 32: 10�3 Configuration Of The Display
10.3 Configuration of the display ► Select [Uni] and set the unit of measurement: [cm], [inch]� Factory setting: cm� ► Select [SELd] and set type of indication: - [L] = The level is indicated in cm or inch� - [L%] = The level is indicated in percent of the final value of the measuring range�... -
Page 33: 10�5�4 Setting Of The Switch-Off Delay For Out1
► Select [FL1] and set the lower limit of the acceptable range� FL1 is always lower than FH1� The unit only accepts values which are lower than the value for FH1� 10.5.4 Setting of the switch-off delay for OUT1 ► Select [dr1] and set the value between 0�2 and 60 s� At 0�0 (= factory setting) the delay time is not active�... -
Page 34: 10�6 Reset All Parameters To Factory Setting
10.6 Reset all parameters to factory setting ► Select [rES], then press [Set] and keep it pressed until [----] is displayed� ► Briefly press [Mode/Enter]� > The unit reboots and the factory settings are restored� Note: On delivery the unit is not operational� First, the basic settings must be entered → 10.2. -
Page 35: Operation
11 Operation After power on, the unit is in the Run mode (= normal operating mode)� It carries out its measurement and evaluation functions and generates output signals according to the set parameters� 11.1 Operating indicators Numerical value + LED 1 Current level in cm�... -
Page 36: 11�4 Error Indications
11.4 Error indications Possible cause Recommended measures [E�000] Fault in the electronics� Replace the unit� Probe detached from the unit; Check whether the probe is still [E�031] possibly incorrect setting of the attached to the unit� probe length� Check the parameter [LEnG]� Measurement disturbed by • Install the unit in a still pipe or bypass�... -
Page 37: 11�5 Output Response In Different Operating States
4 mA / 0 V for FOU2 = OFF Fault (E�0xx) ON for FOU1 = on 20 mA / 10 V for FOU2 = on 12 Technical data and scale drawing Technical data and scale drawing at www�autosen�com� 12.1 Setting ranges [LEnG] inch Setting range 10���100... -
Page 38: Servicing
The setting ranges for analogue start point (ASP) and analogue end point (AEP) depend on the probe length (L)� In general the following applies: inch 1�0 (3�0) 0�4 (1�2) L - 1�2 Step increment 0�5 0�2 Minimum distance between [ASP] and [AEP] = 25 % of the active zone� The values apply if [OFS] = 0�... -
Page 39: Factory Setting
= LEnG value minus 3�5� When the LEnG value is entered, the program calculates the basic setting� * The values in brackets apply to the setting [MEdI] = [LOW] (setting for the detection of oils and oil-based media)� More information at www�autosen�com... - Page 40 Technical data and further information at: www.autosen.com...
Need help?
Do you have a question about the AF003 and is the answer not in the manual?
Questions and answers