Advertisement
Quick Links
Package Contents
The u25x package includes:
VESA mounting hardware
●
Power supply (12V 3A adapter and plug)
●
Rubber feet
●
Ethernet cable
●
u25x appliance
●
Installation
If necessary, use the included VESA mounting hardware to mount the appliance.
●
If you are not mounting the appliance, attach the included rubber feet to the bottom of the appliance.
●
Connect the ethernet cable from your Internet modem or router to the Internet port (LAN 1) located on the rear panel.
●
Connect the ethernet cable from your LAN switch to the LAN port (LAN 2) located on the rear panel.
●
Plug in the power adapter to a power source and connect it to the 12V power input located on the rear panel.
●
Review the power indicator on the front of the appliance. If the indicator is green, the appliance is powered on.
●
If the appliance is not powered on, press the power button.
●
untangle.com | © Copyright 2018. Untangle, Inc. All rights reserved.
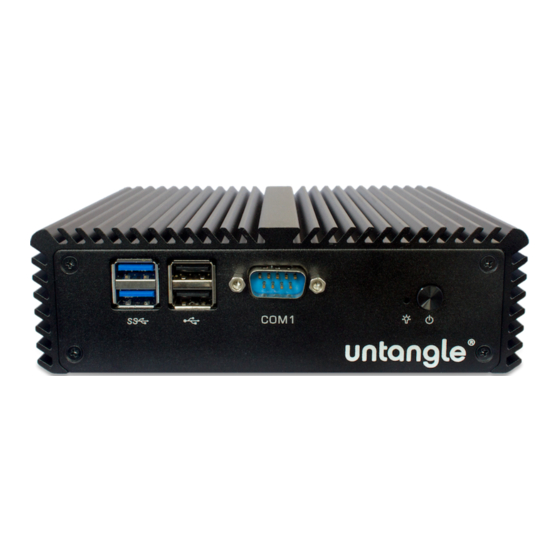
Rear Panel
Front Panel
u25x rear and front panels
u25x Setup
Power input
HD1
HDMI port
HD2
HDMI port (disabled)
USB3 ports
USB2 ports
-1
Internet port
-2
LAN port
Microphone (disabled)
Audio (disabled)
WiFi (not available)
COM1
Serial port (disabled)
Power indicator
Power button
u25x Setup Guide - Page 1
Guide
Advertisement

Related Manuals for Untangle u25x


Summary of Contents for Untangle u25x
- Page 1 Review the power indicator on the front of the appliance. If the indicator is green, the appliance is powered on. ● If the appliance is not powered on, press the power button. ● untangle.com | © Copyright 2018. Untangle, Inc. All rights reserved. u25x Setup Guide - Page 1 ...
- Page 2 Via Command Center Provisioning a new u25x appliance via Command Center is a convenient way to deploy and configure NG Firewall. To set up and manage your new appliance from Command Center follow these steps: ...
Need help?
Do you have a question about the u25x and is the answer not in the manual?
Questions and answers