Table of Contents
Advertisement
Quick Links
Advertisement
Table of Contents

Related Manuals for Progress PBN23001X


Summary of Contents for Progress PBN23001X
- Page 1 User Manual Oven PBN23001X...
-
Page 2: Table Of Contents
2 Progress CONTENTS Safety information Additional functions Safety instructions Hints and tips Product description Care and cleaning Before first use Troubleshooting Daily use Installation Using the accessories Energy efficiency Subject to change without notice. SAFETY INFORMATION Before the installation and use of the appliance, carefully read the supplied instructions. -
Page 3: Safety Instructions
Progress 3 General Safety Only a qualified person must install this appliance and • replace the cable. WARNING: The appliance and its accessible parts • become hot during use. Care should be taken to avoid touching heating elements. Always use oven gloves to remove or put in accessories or •... - Page 4 4 Progress • The appliance must be earthed. • Do not change the specification of this • Make sure that the parameters on the appliance. rating plate are compatible with the • Make sure that the ventilation openings electrical ratings of the mains power are not blocked.
- Page 5 Progress 5 • This appliance is for cooking purposes • If you use an oven spray, follow the only. It must not be used for other safety instruction on it's packaging. purposes, for example room heating. • Do not clean the catalytic enamel (if •...
-
Page 6: Product Description
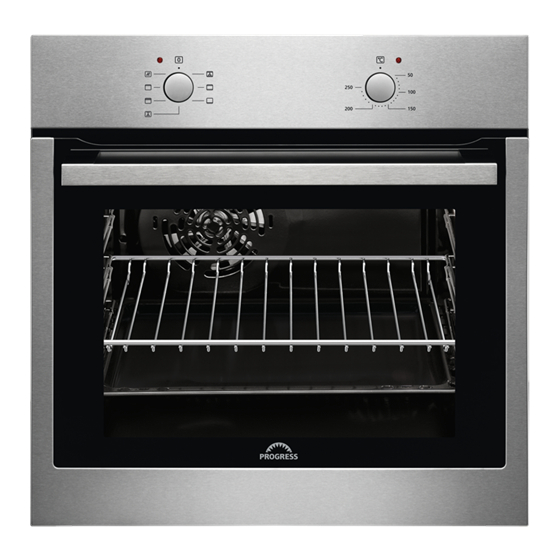
6 Progress PRODUCT DESCRIPTION General overview Control panel Power lamp / symbol Knob for the heating functions Control knob (for the temperature) Temperature indicator / symbol Air vents for the cooling fan Heating element Lamp Shelf support, removable Shelf positions Accessories •... -
Page 7: Using The Accessories
Progress 7 Oven Functions Oven Application function Oven Application function This function is designed to save energy during cooking. The oven is off. For the cooking instructions Moist refer to "Hints and tips" Baking Off posi‐ chapter, Moist Baking. The... -
Page 8: Additional Functions
8 Progress Push the shelf between the guide bars of Wire shelf and baking tray together: the shelf support and make sure that the Push the baking tray between the guide feet point down. bars of the shelf support and the wire shelf on the guide bars above. - Page 9 Progress 9 Baking cakes The temperature and baking Do not open the oven door before 3/4 of times in the tables are the set cooking time is up. guidelines only. They depend If you use two baking trays at the same on the recipes and the quality time, keep one empty level between them.
- Page 10 10 Progress Food Top / Bottom Heat Fan Cooking Time Com‐ (min) ments Temper‐ Shelf po‐ Temper‐ Shelf po‐ ature sition ature sition (°C) (°C) Apple 2 (1 and 80 - 100 In two 20 cake (Ap‐ cm cake ple pie)
- Page 11 Progress 11 Food Top / Bottom Heat Fan Cooking Time Com‐ (min) ments Temper‐ Shelf po‐ Temper‐ Shelf po‐ ature sition ature sition (°C) (°C) Plate 25 - 35 In a 20 tarts cm cake mould Victoria 1 or 2...
- Page 12 12 Progress Flans Food Top / Bottom Heat Fan Cooking Time Com‐ (min) ments Temper‐ Shelf po‐ Temper‐ Shelf po‐ ature sition ature sition (°C) (°C) Pasta 40 - 50 In a flan mould Vegeta‐ 45 - 60 In a...
- Page 13 Progress 13 Food Top / Bottom Heat Fan Cooking Time Com‐ (min) ments Temper‐ Shelf po‐ Temper‐ Shelf po‐ ature sition ature sition (°C) (°C) English 51 - 55 On a wire roast shelf and beef me‐ a deep dium...
- Page 14 14 Progress Grilling Set the temperature to 250 °C. Preheat the oven for 10 minutes. Use the third position. Food Quantity Time (min) Pieces Quantity 1st side 2nd side (kg) Fillet steaks 12 - 15 12 - 14 Beef steaks...
- Page 15 Progress 15 Food Quantity Time (min) Pieces (kg) 1st side 2nd side Fish slices 4 - 6 12 - 15 8 - 10 Moist Baking For best results follow suggestions listed in the table below. Food Accessories Tempera‐ Shelf po‐...
- Page 16 16 Progress Food Accessories Tempera‐ Shelf po‐ Time (min) ture (°C) sition Cookies, 16 baking tray or dripping 20 - 30 pieces Macaroons, 20 baking tray or dripping 40 - 45 pieces Muffins, 12 baking tray or dripping 30 - 40...
-
Page 17: Care And Cleaning
Progress 17 Food Function Acces‐ Tem‐ Time (min) Comments sories pera‐ po‐ ture si‐ (°C) tion Short Conven‐ Baking 20 - 35 Preheat the bread tional tray oven for 10 mi‐ Cooking nutes. Toast Grilling Wire max. 2 - 4 minutes... - Page 18 18 Progress Cleaning the door gasket CAUTION! Do not use the oven without the internal glass Regularly do a check of the door gasket. panel. The door gasket is around the frame of the oven cavity. Do not use the oven if the 1.
- Page 19 Progress 19 90° 7. First lift carefully and then remove the glass panel. 4. Put the door on a soft cloth on a stable surface. 8. Clean the glass panels with water and soap. Dry the glass panels carefully. Do not clean the glass panels in the dishwasher.
-
Page 20: Troubleshooting
20 Progress 2. Clean the glass cover. The back lamp 3. Replace the lamp with a suitable 300 °C heat-resistant lamp. 1. Turn the lamp glass cover to remove it. 4. Install the glass cover. TROUBLESHOOTING WARNING! Refer to Safety chapters. -
Page 21: Energy Efficiency
Progress 21 Building In Electrical installation The manufacturer is not responsible if you do not follow the safety precautions from the Safety chapters. This appliance is supplied with a main min. 550 plug and a main cable. Cable min. 560... - Page 22 22 Progress Model identification PBN23001X Energy Efficiency Index 94.9 Energy efficiency class Energy consumption with a standard load, conventional 0.83 kWh/cycle mode Energy consumption with a standard load, fan-forced 0.75 kWh/cycle mode Number of cavities Heat source Electricity Volume 57 l...
- Page 23 Progress 23...
- Page 24 867348436-A-432018...
Need help?
Do you have a question about the PBN23001X and is the answer not in the manual?
Questions and answers