Advertisement
Table of Contents
Advertisement
Table of Contents

Subscribe to Our Youtube Channel
Related Manuals for Midea 1025F1A


Summary of Contents for Midea 1025F1A
- Page 1 Commercial Microwave Oven INSTRUCTION MANUAL Model : 1 025F A Read these instructions carefully before using your microwave oven, and keep it for refer nce If you follow the instructions, your oven will provide you with many years of dependable service. CAREFULLY...
-
Page 2: Table Of Contents
CONTENTS IMPORTANT SAFEGUARDS PRECAUTIONS IMPORTANT SAFETY INSTRUCTIONS GROUNDING INSTRUCTIONS RADIO INTERFERENCE SAFETY BEFORE THE FIRST USE UTENSILS PARTS & FEATURES NAMES OF PARTS & ACCESSORIES INSTALLATION CONTROL PANEL OPERATION INSTRUCTION USER OPTION DEFAULT COOK TIMES FUNCTION INST CTION CLEANING & MAINTENANCE CLEANING INSTRUCTION MAINTENANCE SPECIFICATIONS... -
Page 3: Precautions
PRECAUTIONS TO AVOID POSSIBLE EXPOSURE TO EXCESSIVE MICROWAVE ENERGY Do not attempt to operate this oven with the door open sincere open-door operation can result in harmful exposure to microwave energy.It is important not to defeat or tamper with the safety interlocks. Do not place any object between the oven front face and the door or allows soil or cleaner residue to accumulate on sealing surfaces. - Page 4 IMPORTANT SAFETY INSTRUCTIONS This appliance should be serviced only by qualified service personnel. Contact nearest authorized service facility for examination, repair, or adjustment. Do not cover or block any openings on the appliance. Do not store this appliance outdoors. Do not use this product near water - for example, near a kitchen sink, in a wet basement, near a swimming pool, or similar location.
-
Page 5: Grounding Instructions
GROUNDING INSTRUCTIONS This appliance must be grounded. In the event of an electrical short circuit, grounding reduces the risk of electric shock by providing an escape wire for the electric current. This appliance is equipped with a cord having a grounding wire with a grounding plug. The plug must be plugged into an outlet that is properly installed and grounded. -
Page 6: Radio Interference
RADIO INTERFERENCE Operation of the microwave oven may cause interference to your radio, TV or similar equipment. When there is interference, it may be reduced or eliminated by taking the following measures: Clean door and sealing surface of the oven. Reorient the receiving antenna of radio or television. -
Page 7: Utensils
1 . 0 To prevent delayed eruptive boiling of hot liquids and beverages or scalding yourself, stir liquid before placing the container in the oven and again halfway through cooking time. Let stand in the oven for a short time and stir again before removing the container. - Page 8 Materials you can use in microwave oven UTENSILS REMARKS Shielding only. Small smooth pieces can be used to cover thin parts of meat Aluminum foil or poultry to prevent overcooking. Arcing can occur if foil is too close to oven walls. The foil should be at least 1 inch (2.5cm) away from oven walls. Follow manufacturer* instructions.
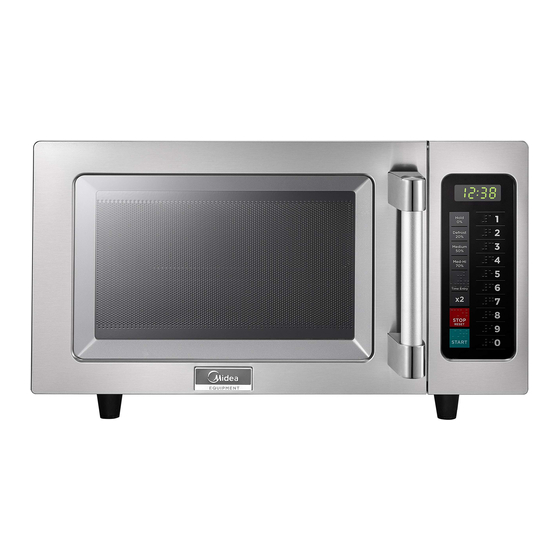
- Page 9 SETTING UP YOUR OVEN Names of Oven Parts and Accessories Remove the oven and all materials from the carton and oven cavity. Your oven comes with the following accessories: Instruction Manual A) Control panel B) Observation window C) Door assembly D) Safety interlock system E) Ceramic Bottom Plate 1) Don't press the ceramic bottom plate forcibly.
-
Page 10: Installation
Countertop Instructions Cabinet: Remove any protective Remove all packing material and film found on the microwave accessories. Examine the oven for oven cabinet surface. any damage such as dents or broken door. Do not install if oven is damaged. INSTALLATION 1. -
Page 11: Control Panel
CONTROL PANEL Control Panel and Features (1) Power Buttons (2) Time Entry Button (3) X2 Button (4) S p/ Reset tton (5) Start Button (6) Number Button Display... -
Page 12: Operation Instruction
OPERATION INSTRUCTION Five power levels are available. Level M. High Defrost Hold High Med. Power 100% Display PL10 Appendix. A User Options OPTION SETTING DISCRIPTION OP:10 3 seconds beep 1 EOC Tone OP:11 Continuous beep OP:12 5 quick beeps,Repeating Beeper Off OP:20 OP:21 2 BeeperVolume... -
Page 13: Default Cook Times
OPERATION INSTRUCTION Appendix. B Default Cook Times The oven shall ship with the following Preset Cook Times and power level otherwise noted in the product Specification. BUTTON DISPLAY(TIME) POWER 0:10 0:20 0:30 0:45 1:00 100% 1:30 2:00 3:00 4:00 5:00... - Page 14 OPERATION INSTRUCTION Power Up " _ _ _ _ " displays when the oven is plugged in for the first time. If " STOP " button pressed, the oven will change to Idle Mode. Note: Under dle ode, no button can be pressed. Idle Mode 1) The oven shall enter Idle Mode after period of time ha expired in Ready Mode or...
- Page 15 OPERATION INSTRUCTION Pause Mode STOP 1) While in cooking state, if the door is opened and then closed, or if the " " pad is pressed, the oven will enter Pause Mode. 2) While paused,the screen will display the remaining cooking time. STOP 3) In Pause Mode,if the "...
- Page 16 OPERATION INSTRUCTION 3) If you press " "," "," " or " " button to select power level, the screen will display the related power. If the same button pressed twice, the power PL10 will change to PL10. If no power chosen, " "...
- Page 17 OPERATION INSTRUCTION For example: set the program as memory cooking. Power level 70% and cooking time is 1 minute and 25 seconds. Step 1: Open the door, press number button "1" for 5 seconds,"ProG" displays. Step 2: Press number button "3", 2 seconds later, the screen will display therelated time .
- Page 18 OPERATION INSTRUCTION a. Open the door,press number button "1" for 5 seconds,"ProG" displays. b. Press number button "3", after two seconds,the screen will display the related time. c. Press "1","2","5" to input the cooking time. "1:25" displays. d. Press " "...
-
Page 19: Cleaning Instruction
Cleaning Instructions Always keep the oven clean 1. Cleaning the glass viewing window, the inner door panel and oven front face. For best performance and to maintain the high degree of safety, the inner door panel and oven front face should be free of food or grease build-up. -
Page 20: Maintenance
or call the help center at 1-855-238-5604. damp with a mild cleanser wipe with a damp towel then sanitizer. with cover e. Cook food covered. Call support center. with cover cover d. e. Cook food PN:16170000A60748...
Need help?
Do you have a question about the 1025F1A and is the answer not in the manual?
Questions and answers