Table of Contents
Advertisement
Quick Links
Technical Overview ...................................................................................................................................... 2
I. Important Notes ..................................................................................................................................... 2
II. Before You Purchase/Open .................................................................................................................. 2
III. Space Requirements ............................................................................................................................ 2
IV. Before You Begin Installation ............................................................................................................... 2
V. What is Reverse Osmosis ..................................................................................................................... 2
Installation Introduction ................................................................................................................................. 3
I. Working with Quick Connect Fittings ...................................................................................................... 3
II. Flushing ................................................................................................................................................ 3
Installing Connections .................................................................................................................................. 3
I. Feed Water Connection ......................................................................................................................... 3
II. Drain Clamp .......................................................................................................................................... 3
III. Drilling Faucet Hole - Stainless Steel Sink) .......................................................................................... 3
IV. Mounting the Faucet ............................................................................................................................ 4
................................................................................................................................................................. 4
V. Storage Tank Assembly ........................................................................................................................ 4
VI. Assembling the System (Photos Below) .............................................................................................. 5
Connecting the RO System .......................................................................................................................... 6
I. Tubing .................................................................................................................................................... 6
System Start Up & Operation........................................................................................................................ 6
I. Plumber Commissioning Steps .............................................................................................................. 6
II. Client can Complete Commissioning ..................................................................................................... 6
III. Automatic Shut Off ............................................................................................................................... 7
IV. Turning the System On/Off .................................................................................................................. 7
Maintenance ................................................................................................................................................. 7
I. Replacement Parts................................................................................................................................. 7
II. Replacement Cartridges ....................................................................................................................... 7
III. Testing Filters ...................................................................................................................................... 7
Troubleshooting ............................................................................................................................................ 8
Additional Extras......................................................................................................................................... 11
I. Water Hammer Arrester ....................................................................................................................... 11
II. Leak Shut Off Kit ................................................................................................................................. 11
GT1-26-5
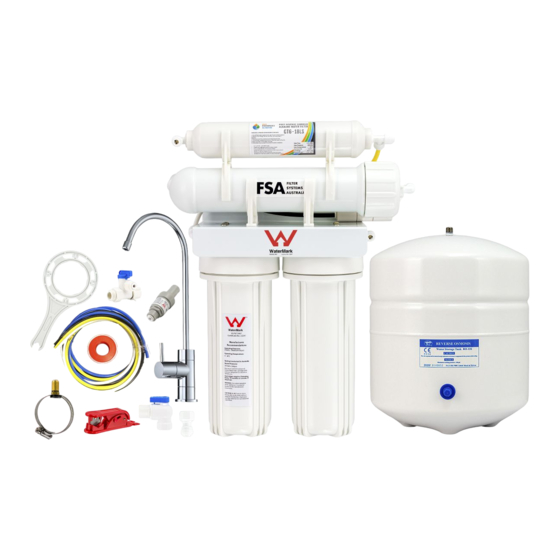
5 Stage Undersink RO
Contents
Page | 1
Advertisement
Table of Contents

Subscribe to Our Youtube Channel
Related Manuals for FSA GT1-26-5


Summary of Contents for FSA GT1-26-5
-
Page 1: Table Of Contents
GT1-26-5 5 Stage Undersink RO Contents Technical Overview ............................2 I. Important Notes ............................. 2 II. Before You Purchase/Open ........................2 III. Space Requirements ..........................2 IV. Before You Begin Installation ....................... 2 V. What is Reverse Osmosis ........................2 Installation Introduction .......................... -
Page 2: Technical Overview
Technical Overview I. Important Notes For correct operation of this appliance, it is essential to observe the manufacturer’s instructions. Installation must be carried out by a qualified plumber or authorised technician to comply with Australian Plumbing Codes. This RO system is certified to WaterMark Standards AS/NZS 3497 Under the Certificate number 23247. -
Page 3: Installation Introduction
Installation Introduction I. Working with Quick Connect Fittings If you come across a push-fit fitting, you need to firmly push the tubing into the opening until you feel a “click” which signifies that the tubing has pushed through the internal O-ring and is seated correctly. -
Page 4: Mounting The Faucet
For installation on other types of sinks – such as stone, it is best to employ a specialist to drill the hole to ensure it is done correctly – where possible it is best to get the sink manufactured with a pre-drilled hole. IV. -
Page 5: Assembling The System (Photos Below)
VI. Assembling the System (Photos Below) 1. Disconnect tubing from the membrane housing cap, unscrew the cap and check the o-rings to ensure they are it working order. 2. Unwrap the Reverse Osmosis Membrane and install it into the membrane housing, ensure that you only handle the membrane by the end stems as shown. -
Page 6: Connecting The Ro System
Connecting the RO System I. Tubing Measure a length of white tubing (Inlet Tubing) to be installed between the FWA and the ‘Inlet’ port on the filter system. Cut using a sharp Box Cutter knife or tube cutters. When connecting to the system refer to the ‘Quick Connect Fitting’... -
Page 7: Automatic Shut Off
9. This system is an alkaline unit which means minerals are dissolved into the water to balance the pH and ‘alkalise’ the water. When the system is new the pH can be higher than normal (which is still safe to drink) but you may notice a ‘bitter’ or ‘metallic’ taste in the water which is caused by the pH, NOT from any harmful chemicals or plastics. -
Page 8: Troubleshooting
deemed to be ‘expired’ if the overall reduction rate is <85% (as a general rule). To apply this to the above example, 200 – 85% = 30mg/L. So, if your test reading was approaching 30mg/L or higher, it would be time to change the membrane. - Page 9 as hardness and salt can cause the system to block or not produce water. I am getting much 1. Water Pressure 1. Our units are designed to run at approx. 1:1 – 1:2 waste more waste water water ratio at 70 psi. If your pressure is lower than 70 psi, the than filtered water production rate may decrease and cause more drain water than filtered water.
- Page 10 4. Mixed Up Drain restrictor is being run to waste, do not use this water for Line and Drinking drinking. Your drinking water line should be marked with either Line ‘To Faucet’, ‘Drinking Water’ or ‘Aquarium Water’. Flow has 1. Tank lost air 1.
-
Page 11: Additional Extras
Additional Extras I. Water Hammer Arrester Sioux Chief shock arresters are designed for use in hydraulic hammer arresting applications. They are built to reduce or eliminate hydraulic shock, otherwise known as water hammer. They do this by absorbing pressure surges within water or other fluids that are suddenly stopped or forced in other directions by fast closing valves. - Page 12 FSA will not cover any labour charge incurred by the consumer for the replacement or repair of a product. The warranty is strictly parts only for the parts supplied by FSA. This warranty only applies to the original consumer of the product and is non-transferable.
- Page 13 ² Other products not manufactured or assembled by FSA are covered under the applicable manufacturer’s warranty. ³ FSA specifies recommended or required filter maintenance – see product information for further details. If a maintenance schedule is not specified, filter maintenance is required at least once per 12 month period.
Need help?
Do you have a question about the GT1-26-5 and is the answer not in the manual?
Questions and answers