Table of Contents
Advertisement
Quick Links
WARNING: ...................................................................................................................................................................... 2
I. Before You Begin .................................................................................................................................................... 2
II. Important Note: ....................................................................................................................................................... 2
Reverse Osmosis Filtration ........................................................................................................................................... 2
I. Overview ................................................................................................................................................................... 2
II. Feed Water Conditions ......................................................................................................................................... 2
Installing Inlet Fitting ...................................................................................................................................................... 2
I. Kitchen Diverter Valve (Not Supplied) ................................................................................................................. 2
II. ¾" Garden Tap Adaptor (Supplied as Standard) .............................................................................................. 3
III. Washing Machine Block Adaptor (Supplied as Standard) ............................................................................. 3
IV. Connecting Tubing Using Compression Fittings ............................................................................................. 3
System Installation/Start-Up ......................................................................................................................................... 4
I. Pre-Flushing ............................................................................................................................................................. 4
II. Tubing Connections ............................................................................................................................................... 4
III. Initial Start-Up ........................................................................................................................................................ 4
IV. Using the System ................................................................................................................................................. 5
V. After Use & Storage .............................................................................................................................................. 5
VI. Long Periods of no use ....................................................................................................................................... 5
TDS Monitor .................................................................................................................................................................... 5
I. What is TDS ............................................................................................................................................................. 5
II. Installation ............................................................................................................................................................... 5
III. Usage ..................................................................................................................................................................... 6
IV. Calibration ............................................................................................................................................................. 6
V. Changing Batteries ................................................................................................................................................ 6
Maintenance .................................................................................................................................................................... 7
I. Sanitation ................................................................................................................................................................. 7
II. Replacement Parts ................................................................................................................................................ 7
III. Replacement Filters ............................................................................................................................................. 7
IV. Testing Filters ....................................................................................................................................................... 7
Troubleshooting .............................................................................................................................................................. 7
Replacement Filters & Parts ....................................................................................................................................... 11
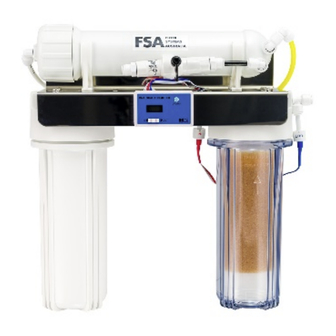
GT1-39RODI Aquarium
RO System
Contents
Advertisement
Table of Contents

Subscribe to Our Youtube Channel
Related Manuals for FSA GT1-39RODI


Summary of Contents for FSA GT1-39RODI
-
Page 1: Table Of Contents
GT1-39RODI Aquarium RO System Contents WARNING: ..................................2 I. Before You Begin ..............................2 II. Important Note: ............................... 2 Reverse Osmosis Filtration ............................2 I. Overview ................................... 2 II. Feed Water Conditions ............................2 Installing Inlet Fitting ..............................2 I. Kitchen Diverter Valve (Not Supplied) ......................... 2 II. -
Page 2: Warning
WARNING: For correct operation of this appliance, it is essential to observe the manufacturer’s instructions. I. Before You Begin Quick Connect Fittings: If you come across a push-fit fitting, you need to firmly push the tubing into the opening until you feel a “click” which signifies that the tubing has pushed through the internal O-ring and is seated correctly. -
Page 3: Garden Tap Adaptor (Supplied As Standard)
tightening is sufficient but gripping tools may be required depending on the tap. NOTE: The knurled section of the diverter valve (top swivel ring) is the part that will tighten, you must tighten this to the tap, not the whole valve. You will know if the diverter has sealed on the washer if you will be able to swivel the valve from side to side but you should feel some resistance. -
Page 4: System Installation/Start-Up
tubing over the stem of the compression fitting can sometimes be difficult as the tubing needs to stretch over it, if you are having trouble, you can run the end of the tubing under warm water (not hot) to help soften the tubing. -
Page 5: Using The System
V. Manual Flush Valve for TDS Creep The GT1-39RODI system includes a manual flush valve built in to the flow restrictor to flush the membrane and clear any residual TDS as a result of ‘TDS Creep’. TDS creep is the result of salts ‘wicking’ through the membrane into the permeate line while the membrane sits in stasis. -
Page 6: Usage
This system has pre-installed Tee fittings for measuring Post Membrane and Post DI filter. The Red lead (in) should be installed into the tee located at the back of the system. The Blue lead (out) should be installed into the tee located on the outlet of the DI filter (right side). -
Page 7: Maintenance
Maintenance I. Sanitation Due to the ‘open circuit’ nature of the portable systems, it is possible for bacterial contamination to occur over time. Tubing may need to be sanitised or replaced along with the fittings. The membrane housing (Which is one of the only parts that doesn’t get replaced) can be cleaned using warm soapy water and then soaked in HydroSil-PURE with water. - Page 8 Water Leaking Between fitting Unseated Tube Check all tubing connections by and tubing. firmly pushing them into the fitting. Check that there are no kinks or any obvious issues. If the problem persists, remove the tubing and check for a clean cut with no burs.
- Page 9 3. Reverse Osmosis required 50psi (Minimum) to operate – 70psi+ is ideal. If you have lower than 50psi pressure this unit may not be suitable for you. Low Pressure Membranes are available for an additional charge that will work down to 20psi. 4.
- Page 10 shop is not going to cut it). We have access to high quality testing equipment and frequently test our units and conduct research. If you feel that there is an issue with your pH, please contact us. Strange taste to the water (New 1.
-
Page 11: Replacement Filters & Parts
being run to waste, do not use this water for drinking. Your drinking water line should be marked with either ‘outlet’, ‘Drinking Water’ or ‘Aquarium Water’. Hot Water has been run through Reverse Osmosis units are the filter designed for cold water only. If you accidentally run hot water through the membrane for a short period of time, it may still... - Page 12 FSA will not cover any labour charge incurred by the consumer for the replacement or repair of a product. The warranty is strictly parts only for the parts supplied by FSA. This warranty only applies to the original consumer of the product and is non-transferable.
- Page 13 ² Other products not manufactured or assembled by FSA are covered under the applicable manufacturer’s warranty. ³ FSA specifies recommended or required filter maintenance – see product information for further details. If a maintenance schedule is not specified, filter maintenance is required at least once per 12 month period.
Need help?
Do you have a question about the GT1-39RODI and is the answer not in the manual?
Questions and answers