
Related Manuals for Pyle PLDVRCAM74


Summary of Contents for Pyle PLDVRCAM74
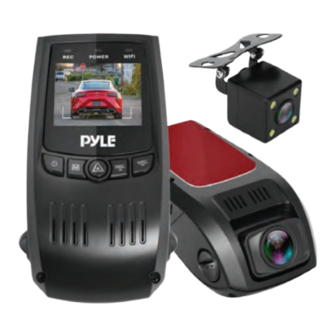
- Page 1 PLDVRCAM74 Dual DVR Dash Cam System Full HD 1080p Vehicle Dash Camera Video Recording with Waterproof Backup Cam...
-
Page 2: Getting Started
To ensure correct operation and avoid damage, please read this user manual carefully before using this product. GETTING STARTED Device Layout www.PyleUSA.com... - Page 3 Button Functions Press and hold in 3 seconds to power ON/OFF Power Press to turn ON/OFF the Screen Press on MENU to enter menu at standby mode. Press UP Menu and DOWN to select options and confirm with OK. After finishing, press MENU to exit Emergency Press to save and lock present video in recording mode...
- Page 4 Status Icons Icon Meaning Video Resolution Wide Dynamic Range Charging via USB Charger Battery Power Level Microphone Mute Microphone On Video Recording Mode Video Playback Mode Photo Mode Loop Recording Memory Card Inserted G- Sensor Sensitivity White Balance License plate number www.PyleUSA.com...
-
Page 5: Installation
INSTALLATION 1. Format the micro sd memory card. (The sd memory card must be formated before use) 2. Insert the micro sd memory card in the SD slot. (Put the card in the right direction and must power o the camera) 3. -
Page 6: Turn On Off The Camera
FIX REAR VIEW CAMERA Rear View Camera Photo Express: Insert into the camera body Connect the Red line anode of the back lamp Connect the back lens Connect the black wire e cathode of the back lamp Rear view camera mounting line reference Install the camera body Install the rear view lens Install the rear view camera... -
Page 7: Video Settings
VIDEO SETTINGS Resolution Recommend setting: 1080FHD Use the following procedure to set the recording resolution: 1. Press MENU once to enter Video Settings 2. Press the UP or DOWN button to navigate to the "Resolution" option 3. Press OK to view available resolutions: 1080FD/1920x1080, 720P/1280x720, etc. -
Page 8: Time Lapse Record
Remember to always make backup copies of all important data stored on the device. The manufacturer’s warranty does not cover loss of data resulting from user actions. 1. Press MENU once to enter Video Settings 2. Press the UP or DOWN button to navigate to the "Loop Recording" option 3. -
Page 9: Wdr Wide Dynamic Range
WDR WIDE DYNAMIC RANGE Recommend Setting: On When enabled, this feature automatically adjusts exposure settings to improve recording quality in particularly bright or dim environments, providing balanced lighting and clearer recorded video. 1. Press MENU once to enter Video Settings 2. -
Page 10: Recording Audio
RECORDING AUDIO You may choose to record audio with video, or turn o the microphone so that all recorded videos will be muted. 1. Press MENU once to enter Video Settings 2. Press the UP or DOWN button to navigate to the "Record Audio" option 3. -
Page 11: Plate Number
PLATE NUMBER Enable this feature to enter your vehicle plate number for video recording. The plate number will stamp in the video. 1. Press MENU once to enter Video Settings 2. Press the UP or DOWN button to navigate to the "Plate Number" option 3. -
Page 12: System Settings
SYSTEM SETTINGS Date/ Time Setup Use the following procedure to change the device’s time and date: 1. Press MENU twice to enter System Settings 2. Press the DOWN button to navigate to the "Date/Time" option 3. Press OK to view date/time in the format: YYYY/MM/DD HH:MM:SS 4. - Page 13 LANGUAGE Use the following procedure to change the device’s time and date. Language availability may vary depending on the region. 1. Press MENU twice to enter System Settings 2. Press the DOWN button to navigate to the "Language" option 3. Press OK to view the current language selection 4.
- Page 14 Format Performing this operation will format memory card. Note: Any les in the memory card will be lost. 1. Press MENU twice to enter System Settings 2. Press the UP or DOWN button to navigate to the "Format" option 3. Press OK to view YES / NO con rmation for this operation 4.
- Page 15 Alternatively, you can use a hot key shortcut for this feature. During Recording Mode, press and hold OK to turn the LCD screen on or o . Restore Default Factory Settings Performing this operation will reset all of your device's settings to their original values.
-
Page 16: Photo Settings
Deleting Files To delete one particular le: 1. Press the UP or DOWN button to navigate through the stored video 2. Press MENU to view options for the highlighted le: Delete/Protect/Slide Show 3. Press the DOWN button once to select "Delete" 4. - Page 17 Capture Mode With this feature you can set a timer for automatically capturing images. 1. Press MODE once to enter Photo Mode 2. Press MENU once to enter Photo Settings 3. Press the UP or DOWN button to navigate to the "Capture Mode" option 4.
- Page 18 4. Press OK to view the current selection: FINE/NORMAL/ECONOMY 5. Press the UP or DOWN button to make your selection 6. Press OK to con rm your entry 7. Press MENU to exit Photo Settings 8. Press OK to capture an image Sharpness This feature will automatically enhance captured images for a clearer, more distinct picture.
- Page 19 Color This feature allows you to choose color e ect for captured images. 1. Press MODE once to enter Photo Mode 2. Press MENU once to enter Photo Settings 3. Press the UP or DOWN button to navigate to the "Color" option 4.
- Page 20 Exposure This setting allows you to adjust the brightness level of captured images. The "+0.0" setting is recommended. 1. Press MODE once to enter Photo Mode 2. Press MENU once to enter Photo Settings 3. Press the UP or DOWN button to navigate to the "Color" option 4.
- Page 21 5. Press the UP or DOWN button to make your selection 6. Press OK to con rm your entry 7. Press MENU to exit Photo Settings 8. Press OK to capture an image Date Stamp This feature will automatically apply date and/or time stamp to captured images.
- Page 22 FEATURES: • 1080p Full HD Car Video Camera • Universal Dash Cam Windshield Mount • Also Includes Exterior Mount Backup Cam • DVR Recording: Save Driving Video Clips • Ability to Snap Pictures + Record Video • Easy Setup: Plug-and-Play Operation •...
- Page 23 TECHNICAL SPECS: • Cam Image Sensor: AR0330, 6G Lens • Video Recording: 1080p / 720p / VGA • Video Filetype Saved: .MOV • Image Capture: 12MP / 8 MP / 5 MP / 3MP / 1.3 MP • Image Filetype Saved: .JPG •...
- Page 24 Questions? Issues? We are here to help! Phone: (1) 718-535-1800 Email: support@pyleusa.com...
Need help?
Do you have a question about the PLDVRCAM74 and is the answer not in the manual?
Questions and answers