Advertisement
Quick Links
Advertisement

Related Manuals for Pyle PLDVRCAM71


Summary of Contents for Pyle PLDVRCAM71
- Page 1 PLDVRCAM71 DVR DASH CAM Full HD 1080p Vehicle Dash Camera Video Recording System USER MANUAL...
- Page 2 INTRODUCTION PLDVRCAM71 DVR Dash Cam is developed to nd evidence in case of tra c accident. This camera can also be used in other occasions such as meetings, monitoring and forensics, location shooting and video evidence. This product is a blend of wide dynamic digital industry...
-
Page 3: Installation Notes
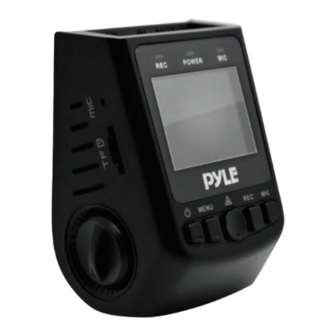
INSTALLATION NOTES This product should be tied together with the original rear-view mirror. To determine the lens in the windshield wiper is in range, ensure good vision, and also good in rainy environments. Don't touch the lens with your ngers, the nger’s grease may remain in the lens, resulting in camera or photograph to be unclear, please clean the lens regularly. - Page 4 1. MIC Interface 10. Screen 2. Micro SD Memory Card Slot 11. MIC Button 3. Knob 12. REC Button 4. USB Interface 13. OK Button 5. GPS Interface (optional) 14. Menu Button 6. AV Interface 15. Power Button 7. MIC Indicator 16.
- Page 5 3. <OK> Button FUNCTION 1: LOCKING During the video-recording process, press the <OK> button to save the video-recording data into a separate folder in the memory card. The les in the folder will not be overwritten cyclically. NOTE: In playback mode, a key-shaped icon in the miniature icon list indicates that the audio recording is locked.
-
Page 6: Installation
5. <MIC> Button FUNCTION 1: PAGE DOWN In the menu setting and playback modes, you can press the <Down> button to page down. FUNCTION 2: FAST FORWARD In playback state, press the <MIC> button to enter the fast forward mode. FUNCTION 3: MODE SWITCHING In standby state, press the <MIC>... - Page 7 3. Inserting a memory card You have to insert a memory card before you can start recording. The recorder supports Micro SD cards with up to 32GB capacity. You are advised to use a Class 10 memory card with at least 8GB capacity. DO NOT insert or remove the memory card when operating the device.
- Page 8 6. Insert the charging interface of the in-vehicle charger into the USB interface the data recorder. 7. Adjust the angle of the data recorder, ensuring that the camera lens keeps level with the ground. 8. Start up the engine and check whether the DASHCAM is mounted properly.
- Page 9 Press the <OK> button to take photos. To switch back to the video-recording mode, press the <MIC> button and press and hold the <OK> button for ve minutes. 4. Collision Sensing The DASHCAM is tted with a built-in collision sensor (G-sensor).
- Page 10 [Prompt] When you use a PC to copy a video-recording le, it is recommended that you use a card reader to copy the video-recording le in the TF card to the PC. 7. Playback of Recording File In power-on state, press the <MIC> button twice to enter the playback mode.
Need help?
Do you have a question about the PLDVRCAM71 and is the answer not in the manual?
Questions and answers