
Related Manuals for Panasonic PP105160


Summary of Contents for Panasonic PP105160
- Page 1 MP3 CD Player/Weather Band Receiver PP105160 PP P/N Operating Instructions TEXT Please read these instructions carefully before using this product and keep this manual for ¡ future reference.
-
Page 2: Safety Information
Safety Information Read the operating instructions for the unit and This manual uses pictographs to show you how to all other components of your truck audio system use the product safely and to alert you to potential carefully before using the system. They contain dangers resulting from improper connections and instructions about how to use the system in a safe operations. - Page 3 Observe the following cautions when Caution installing. Refer wiring and installation to qualified Observe the following cautions when service personnel. using this unit. Installation of this unit requires special skills and experience. For maximum safety, have it installed by Keep the sound volume at an appropriate the dealership.
- Page 4 Safety Information (continued) ¡ Position the iPod device/iPhone model/USB device Caution and USB extension cable so that they do not obstruct your driving. ¡ Do not connect any device other than iPod device/ Observe the following cautions when iPhone model/USB memory or a USB audio player. ®...
- Page 5 The following applies only in the U.S.A. Part 15 of the FCC Rules NOTICE FCC Warning: This equipment has been tasted and found to This device complies with Part 15 of the FCC comply with the limits for a Class B digital device, Rules for Radio Receiver.
-
Page 6: Table Of Contents
Contents Safety Information ....2 Bluetooth ® - General ....28 ® Registration of a Bluetooth device to this Contents ........6 unit Features ........8 Display change Front AUX terminal (AUX1) Setting of PIN (Personal Identity Number) Rear AUX terminal (AUX2) code Connection of the registered Bluetooth ®... - Page 7 Troubleshooting ..... 40 If you suspect something wrong Common Radio MP3/WMA USB (MP3/WMA) Bluetooth ® SiriusXM Satellite Radio Control Product servicing Error Display Messages.... 46 Disc Player USB (MP3/WMA) For use with iPod Bluetooth ® SiriusXM Satellite Radio Control Notes on Discs ...... 49 How to hold the disc Unusable discs Disc insert...
-
Page 8: Features
Features Front AUX terminal (AUX1) Bluetooth ® Your mobile audio player and other devices are con- This feature allows users to use a hands-free phone nectable to this unit without any difficulty. and Bluetooth ® audio systems. Compatible Bluetooth ® devices Rear AUX terminal (AUX2) ¡... -
Page 9: Usb Connector
USB connector *iPhone, iPod, iPod classic, iPod nano, iPod shuffle, and iPod touch are trademarks of Apple Inc., regis- The USB connector is equipped on the front panel. tered in the U.S. and other countries. By connecting a USB memory (not included) to the USB connector via a USB extension cable (USB 2.0, “Made for iPod”... -
Page 10: Controls Layout
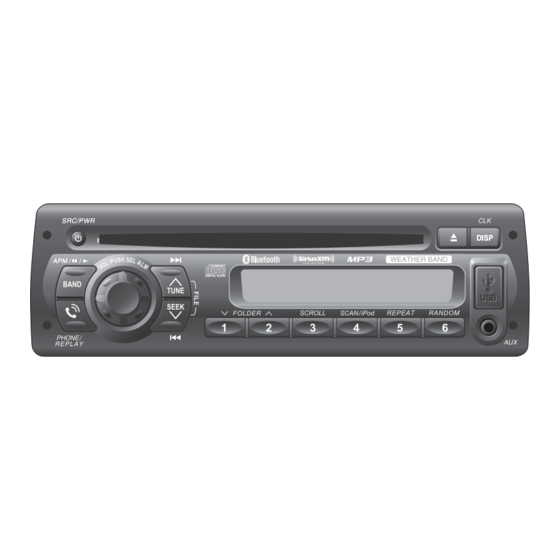
Controls Layout SRC Source page 12, 16, 18, 21, 24, 29) PWR Power page 12) u (Eject) page 18) BAND DISP Display page 11, 16, 17, 29, 30, 31, page 11, 16, 19, 22, 34 - 37) 25, 28, 35) y / 5 Pause/Play CLK Clock page 11) -
Page 11: Preparation
Preparation First time power on Notes: ¡ Clock time is displayed when the unit is power off. Turn the key in the ignition until the ac- ¡ “CLOCK ADJUST” is displayed when the clock is cessory indicator lights. not adjusted. ¡... -
Page 12: General
General [SRC] AUX Connector (3.5 mm ø stereo) selects a source. From line output of external sound/ [VOL] (Volume) [PWR] (Power) audio device (ex. Silicon audio toggles power on/off. player, HDD player, etc.) Power On/Off When no external device is connected to rear AUX terminal, Set your car’s ignition switch to the ACC or ON “AUX”... -
Page 13: Volume Adjustment
Volume Adjustment (Setting Range: 0 to 40, Default: 18) Turn [VOL] clockwise to increase the vol- ume, and counterclockwise to decrease the volume. Down Indication at connecting external amplifier lights when an external amplifier is con- nected. Note: When an anomaly of the external amplifier is detected, “AMP FAULT”... -
Page 14: Sound Controls
Sound Controls [VOL] selects a value in the audio menu. (PUSH SEL: Select) selects items in the audio menu. Audio modes (Bass/Treble/Balance/Fader/SQ) Push [SEL] (Select) to select the audio Turn [VOL] (Volume) clockwise mode in sequence. or counterclockwise to change each level or select a setting. - Page 15 SQ (Sound Quality) q, w: Select SQ is a function that can call up various sound types at the touch of button in accordance with your listen- ing music type. (FLAT) flat frequency response: (Selectable setting: FLAT/ROCK/POP/VOCAL default: does not emphasize any part. (default) FLAT) (ROCK) speedy and heavy sound: exaggerates bass and treble.
-
Page 16: Radio
Radio [DISP] (Display) (FM stereo) indicator Caution switches the information lights while receiving an FM on the display. stereo signal. To ensure safety, never at- tempt to preset stations while you are driving. [SRC] selects a source. [BAND] selects a band in the radio source. -
Page 17: Manual Preset Memory
Manual preset memory Note: Further and updated information about the National Weather Radio station listing, please visit Use manual or seek tuning to fi nd a the web site: station. http://www.nws.noaa.gov/nwr/nwrbro.htm Press and hold one of the preset but- Occasionally the frequency of an existing or planned tons [1] through [6] until the display station must be changed because of unexpected blinks once. -
Page 18: Disc Player
Disc Player Caution ¡ A disc which has both CD-DA data and MP3/WMA data on it may not be reproduced normally. ¡Do not insert a disc when the indicator lights. ¡Refer to the sections of “Notes on Discs” page 49) and “Notes on MP3/WMA” page 50). -
Page 19: Display Change
Display change Press [DISP] to change the display. Notes: ¡For scrolling text, press [3](SCROLL). ¡“NO TEXT” is displayed when there is no information on the disc. CD-DA MP3/WMA Track number/ Folder number/ Play time File number lights.) Play time Disc title* lights.) lights.) Folder name/... -
Page 20: Random, Scan, Repeat Play
Disc Player (continued) Random, Scan, Repeat Play Press [4] (SCAN) again to turn off scan play. Random Play Setting Press [6] (RANDOM) to select the random play setting. Scan off Return to regular play. Repeat Play Setting Random play Press [5] (REPEAT) to select the repeat All the available songs (tracks/files) are played in a play setting. -
Page 21: Usb (Mp3/Wma)
USB (MP3/WMA) Notes for USB device Operation Flow ¡This unit plays back MP3/WMA files stored on a Press [SRC] to select the USB mode. USB memory. ¡Back up any important data beforehand. We can- Open the USB connector cover. not accept responsibility for any lost data. ¡Refer to the section on “Compatible USB devices”... -
Page 22: Display Change
USB (MP3/WMA) (continued) [DISP] (Display) (Repeat)/ indicator switches the (Random)/ lights when a USB information on the (Folder) device is loaded. display. indicator [SRC] selects a source. [BAND] (h/ 5 ) (Pause/Play) toggles between pause and play with the USB source. [4] (SCAN)/[5] (REPEAT)/[6] USB (Universal (RANDOM) -
Page 23: Random, Scan, Repeat Play
Random, Scan, Repeat Play Press [4] (SCAN) again to turn off scan play. Random Play Setting Press [6] (RANDOM) to select the random play setting. Scan off Return to regular play. Random play Repeat Play Setting All the available songs (files) are played in a random Press [5] (REPEAT) to select the repeat sequence. -
Page 24: For Use With Ipod
For use with iPod By connecting compatible with iPod devices to USB connector via a USB extension cable for iPod (USB 2.0, not included), you can enjoy music fi les stored on the compatible with iPod devices in your vehicle. Note: Refer to the section on “USB (MP3/WMA)”... -
Page 25: Display Change
Display change Setting the iPod Control When an iPod/iPhone is connected, operate it from Press [DISP] to change the display. its own controls or from this head unit can be select- Notes: able. ¡For scrolling text, press [3](SCROLL). Press [4] (SCAN) to switch iPod control ¡“NO TEXT”... - Page 26 For use with iPod (continued) Shuffle Play Setting Repeat, Shuffle Play The shuffle function of an iPod corresponds to the Repeat Play Setting RANDOM function of this unit. Press (RANDOM) to select the shuffle Press (REPEAT) to select the repeat play setting.
- Page 27 Notes: ¡The shuffle function for iPod corresponds to the RANDOM function of this unit. ¡Please make sure to detach the iPod after turning off the vehicle engine (turning the ACC to OFF). The iPod devices may not shut down while still connected, which may result in bat- tery depletion.
-
Page 28: Bluetooth ® - General
® Bluetooth - General [DISP] (Display) (Bluetooth ® ) indicator switches the lights when a Bluetooth ® device is con- [SRC] information on the nected, and blinks during a call. selects a source. display. [BAND] connect, or discon- nect a Bluetooth ®... -
Page 29: Setting Of Pin (Personal Identity Number)
Notes: ¡Even when the Bluetooth ® device that is con- ¡We shall not guarantee all the functions of the nected to this unit is located near this unit, ® Bluetooth device to be connected. When opera- sound may be interrupted or noise may be tions cannot be performed via this unit, operate generated. -
Page 30: Bluetooth ® - Hands-Free Phone
® Bluetooth - Hands-Free Phone [BAND] switches between the private mode and hands- free mode. [PHONE] picks up the phone, makes a call, or rejects the call. [VOL] switch the record (PUSH SEL :Select) selects items in the selection activates the voice dial. mode. -
Page 31: Use Of Receiving/Calling Records Or Tele
Note: To have a mobile phone conversation with use of this unit, the mobile phone shall be compatible with the Hands-Free Profile. Use of receiving/calling records or telephone directory (phonebook) Press [BAND] at the standby state. Push [SEL] (Select). The display changes as follows: Receiving record with no responding The record of receiving calls (up to 5 records) that have not been taken is displayed. -
Page 32: Bluetooth ® - Music Player
® Bluetooth - Music Player Note: The Bluetooth ® audio devices that can be played with this unit must be compatible with A2DP (Advanced Audio Distribution Profi le) or AVRCP (Audio/ Video Remote Control Profi le). [BAND] (h/ 5 ) (Pause/Play) toggles between pause and play... -
Page 33: Notes On Bluetooth
® Notes on Bluetooth Frequency band used Application limitations This product uses the 2.4 GHz frequency band, ¡To use this product for listening to music or for a but other wireless devices may also use the same Hands-Free call, the Bluetooth ®... -
Page 34: Siriusxm Satellite Radio Control
SiriusXM Satellite Radio Control [DISP] (Display) switches the information on the display. Signal strength indicator Preset buttons [1] through [6] [TUNE {] [TUNE }] [BAND] select a preset channel in the SiriusXM source, preset the cur- selects a band selects an available/sub- rent channel (by holding it down for more than 2 seconds). -
Page 35: Channel Selection
Category selection Repeat the steps 2 and 3 to enter a 4-digit number code. [FOLDER }]: Next category When a 4-digit number code is correctly entered [FOLDER {]: Preceding category and [BAND] is finally pressed, the all locked channels are unlocked and start to be received. Channel selection (Once turns ACC ON/OFF, the channels return to previous locked status) -
Page 36: System Control Mode Selection
SiriusXM Satellite Radio Control (continued) [BAND] [d] [s] Signal strength indicator shifts to the next digit. selects a number. selects the code entry mode. exits code entry mode. changes a channel to be locked or unlocked. [VOL] opens the function setting. (PUSH SEL :Select) opens or exits the function setting. - Page 37 Function settings (continued) Parental lock setting mode This function disables the audience from selecting To set parental lock ON/OFF: the locked channel. Push [SEL] to open lock ON/OFF Hold down [SEL] for more than 2 mode after step 3. seconds to open SXM function setting screen.
-
Page 38: Alarm Setting
Alarm Setting [ALM] selects items in the alarm time setting. [s]/[d] sets the hour and minute Alarm time setting Push [ALM] to complete. The 12-hour system is used for example. Hold down [ALM] (Alarm) for more than 2 seconds. Completed The alarm is set to ON automatically after com- plete alarm time setting. -
Page 39: Turning On/Off The Alarm
Turning ON/OFF the alarm Hold down [ALM] for more than 2 sec- onds. (Alarm time display) Push [ALM]. (Alarm ON/OFF setting) Turn [VOL] (Volume) clockwise or counterclockwise to select alarm ON or OFF, then push [ALM] again to confirm the setting. (Select alarm ON, lights.) Notes:... -
Page 40: Troubleshooting
Troubleshooting If you suspect something wrong Warning Check and take steps as described below. If the described suggestions do not solve the prob- ¡Do not use the unit in an irregular condition, for lem, it is recommended to take the unit to your example, without sound, or with smoke or a foul dealership. -
Page 41: Radio
The speaker wiring is confused between right and left. The speaker channels are reversed between Perform the speaker wiring in accordance with the wiring right and left. diagram. The plus and minus terminals at right and left channels of speak- The sound field is not clear in ers are connected reversely. -
Page 42: Mp3/Wma
Troubleshooting (continued) MP3/WMA The disc has unplayable formatted data. No playback or disc ejected Check the file format. The playability of some CD-Rs/RWs may depend on the combina- tion of media, recording software and recorder to be used even if The CD-R/RWs that are playable these CD-Rs/RWs are playable on other devices such as a PC. -
Page 43: Bluetooth
Bluetooth ® Devices incompatible with HFP (Hands-Free Profile) cannot be used. Use devices compatible with HFP (Hands-Free Profile). The mobile phone is not registered on this product. Connecting and calling with an unregistered mobile phone is not possible. Register the mobile phone on this product. The mobile phone is not connected. - Page 44 Troubleshooting (continued) ® Bluetooth ® The main unit is not in the Bluetooth music mode. Check and switch to the Bluetooth ® music mode. ® The Bluetooth audio is not output from mobile phone or Blue- tooth ® audio device. Switch OFF and ON with mobile phone or Bluetooth ®...
-
Page 45: Siriusxm Satellite Radio Control
SiriusXM Satellite Radio Control No contract with Sirius XM Radio Inc. Channel unselectable Refer to page 34 of this book and the SiriusXM’s website to sign up for SiriusXM Radio service. SiriusXM Antenna is disconnected or damaged. Check antenna Make sure the antenna is properly connected to this main unit. -
Page 46: Error Display Messages
Error Display Messages Disc Player Display Possible cause Possible solution The disc is dirty, or is upside down. Check the disc. The disc has scratches. Check the disc. No operation by some cause. Unplug the power cord and plug it again. In case the unit is still out of order, consult your dealership. -
Page 47: For Use With Ipod
USB (MP3/WMA) No operation by some cause aTurn off the power and turn on the power again, or turn the key to the ACC OFF position and turn the key to ACC ON position again. If this does not solve the problem, unplug the power cord and plug it in again. -
Page 48: Siriusxm Satellite Radio Control
Error Display Messages (continued) SiriusXM Satellite Radio Control No operation by some cause. Switch the power or ACC ON/OFF. If this does not solve the problem or this unit is still out of order, consult your dealer to ask repairs. The subscription information was updated. -
Page 49: Notes On Discs
Notes on Discs How to hold the disc Disc insert ¡Do not touch the underside of the disc. The surfaces of new discs tend to be slippery. There- ¡Do not scratch the disc. fore, when using such a disc for the first time, it may ¡Do not bend disc. -
Page 50: Notes On Mp3/Wma
Notes on MP3/WMA MP3 (MPEG Audio Layer-3) is a format for compressed audio file. These formats allow users to save all the files contained in approximately 10 pieces of existing CDs on one piece of CD-R/RW. Note: Each of encoding software is not included with this unit. *MPEG Layer-3 audio coding technology licensed from Fraunhofer IIS and Thomson. -
Page 51: Copyright
Recording MP3/WMA Files on a CD-Media/USB-Device ¡If the selected folder does not contain any MP3/ Compressed audio file writing WMA files, the nearest MP3/WMA files in the ¡Do not save an audio file (CD-DA file) and a order of playback will be played. compressed audio file on the same disc. -
Page 52: Maintenance
Maintenance Cleaning this unit Your product is designed and manufactured to To remove stubborn stains ensure a minimum of maintenance. Use a dry soft qMoisten the soft cloth in dish- cloth for routine exterior cleaning. Never use benzine, washing soap diluted with water thinner or other solvents. -
Page 53: Specifications
Specifications General AM Radio Power Supply: 12 V DC (11 V – 16 Frequency range: 530 kHz – 1 710 kHz V), test Voltage 14.4 V, Usable sensitivity: 28 dB/µV (25 µV, S/N 20 Negative @ ground Current consumption: Less than 2.5 A (CD Weather Band Radio mode, 0.5 W x 4 chan- nels) -
Page 54: Specification From The Terminal End (Rear Connector Of This Unit)
Specification from the Terminal End (Rear Connector of This Unit) Specification from the terminal end Cavity Pin # Function (Rear connector of this unit) J1939 CAN-H* J1939 CAN-L* Park Lights ACC (Ignition) Amp Control Cavity C 15 18 Dim PWM Battery Cavity B Power Ground... - Page 55 Memorandum...
- Page 56 YFM264C297ZA PTW0812-0 Printed in Taiwan...
Need help?
Do you have a question about the PP105160 and is the answer not in the manual?
Questions and answers