
Related Manuals for Harmopool ZWMX7510-P

Summary of Contents for Harmopool ZWMX7510-P
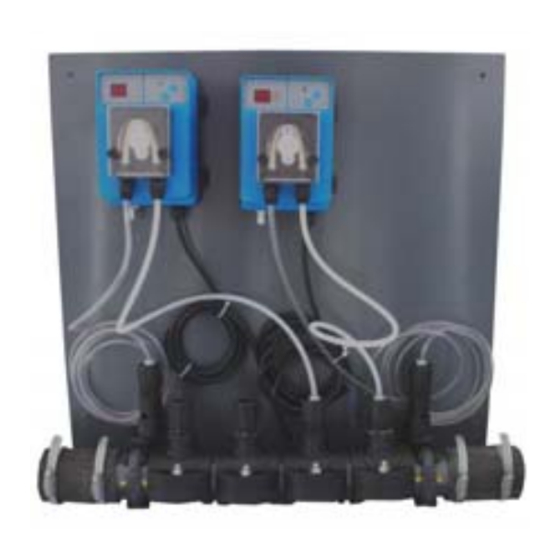
- Page 1 Microdos Pool twin watertreatment on plate ZWMX7510‐P Geassembleerd door: Zwembad BVBA Industrieweg 9 3190 Boortmeerbeek België www.harmopool.eu ...
-
Page 2: Table Of Contents
Table of contents Introduction .......................... 3 Specifications ........................... 4 Installation .......................... 5 Installation items ......................... 5 Installation of the water treatment plate ................ 6 Winter ready ........................ 8 Spring startup ........................ 8 Maintenance ........................ 9 Warnings .......................... 9 ... -
Page 3: Introduction
Introduction This manual contains all the necessary information for installation, error messages, discharge and maintenance. Read the manual carefully before you open the unit. The manufacturer of this product will not be held responsible for injuries or damage to the product resulting from an incorrect installation, discharge or unnecessary maintenance. It is essential that the instructions in this manual are always followed carefully. Qualified personnel must install this product. ○ Only a qualified installer, center, personnel or a recognized dealer may repair this product. ○ Maintenance and service must respect the recommended time and frequency, as mentioned in the manual. ○ Only use the original spare parts. Failure to do so will void the warranty. Characteristics ○ Durability: The most frequently used products are chlorine, acid (sulfuric acid) and base resistant. These can resist long‐term exposure to swimming pool water (even with salt for salt electrolysis). These peristaltic pumps are not to be used with sulfuric acid (HCI) ○ Easy‐use: The unit is very easy to use: Turn it on and set the pH (acid) or redox value (chlorine). ○ Low cost: With correct use the swimming pool water will never turn green, keeping operational costs low. ... -
Page 4: Specifications
Specifications ZWWX7510‐P pH regulation Microdos Speedy pH Chlorine regulation Microdos Speedy Chlorine Pool connection 50mm rubber Flow switch safety Optional Plate measurements 50 x 50 cm ... -
Page 5: Installation
Installation Installation items The factory only provides the plate with water treatment appliances without plugs. Warning! ○ The electrical configuration should be as follows: ‐ The chlorine and acid pumps can’t work if the filter pump is disabled. ‐ Being able to disable the chlorine and acid pumps if the filter pump is enabled. ○ Chemicals should be added downstream of pool accessories such as heating, UV‐ lighting, filters etc. ○ Combining chlorine and acid can result in chlorine gas. Ensure that the chemicals are placed outside and they don’t come in contact. ○ It is recommended to set the water treatment unit to bypass mode. ○ Install the water treatment unit on a stable platform. ○ Always keep the unit straight. If the unit has been tilted or placed on its side, the electrodes can’t function correctly. ○ The unit must be installed inside. If you wish to install your unit outside, please contact your supplier. ○ Do not place sulfuric acid in the dispensers (HCl) ○... -
Page 6: Installation Of The Water Treatment Plate
Installation of the water treatment plate 1 Connect the water treatment plate to a stable wall. 2 Connect the inlet and the outlet so the water passes by the pH and redox measurement electrodes, then past the dispenser caps. If the water in the unit is heading the opposite way, simply unclick the measurement and dispenser tubes, turn them around and reclick. Bypass configuration is preferred: 3 Connect the electrical components as follows : ‐ The chlorine and acid pumps can’t work if the filter pump is disabled. ‐ Being able to disable the chlorine and acid pumps if the filter pump is enabled. ... - Page 7 4 Place pH and chlorine electrodes in the electrode holders. 5 Start the filter pump 6 Verify that the installation is not leaking 7 Calibrate pH and redox electrodes, consult the Standard automatic pH‐dosage manuals (only pH min) ‐ ZWMX2140 and the Standard automatic chlorine dosage ‐ ZWMX2152. If you have no bypass configuration, you should place two rubber caps ZFPX4640 in the electrode holders to prevent water from spraying out during configuration. 8 Configure the set points for the installation. PH will be set to 7.4 and redox at 700 mV. After the primary startup, measure the pH and chlorine levels with a color method. Change the set point for redox if necessary (lower if chlorine levels are too high, increase if chlorine levels are too low). Consult the following manuals: Standard automatic pH‐ dosage (only pH min) ‐ ZWMX2140 and Standard automatic chlorine dosage ‐ ZWMX2152. 9 Place the chlorine and pH suction caps in the correct chlorine and acid tubes. Avoid letting the cap sink to the bottom of the tube. This way, the entire tube of chlorine or acid won’t get pumped into the pool in case of an error. 10 Start the installation by enabling the electricity for the pump and the dosage appliance. ...
-
Page 8: Winter Ready
Winter ready Warning! Failure to protect your product against the winter can result in damage and the warranty does not cover this. In areas with a lot of frost, make sure to protect the pump, filter and dosage application from freezing. It is recommended to store the appliances in a warm and dry area. The electrodes must be stored frost‐free, in KCl liquid. De pvc‐tubes must be dried. The white dosing hose in the dosing device must be replaced preventively every year. In the event of hose breakage, the chemicals flow into the dosing pump with the risk of irreparable damage to the dosing pump. In general there are 5 mechanisms through which the dosing tube can break: A. The tube is at the end of its life (with chemical compatibility) after 500/600 hours of performance B. Determination of incompatible products with the "Santoprene" material of the tube (PH regulation with HCI) C. Increase of chemicals. Bottle with cling and acid on the pumps / pumps mounted on the vertical bus. D. Backflow blocks of the pump or injection blocked by limestone (more often in calcareous waters. E. Empty dosing vessel, as a result of which the peristaltic pump keeps running and the 500/600 hours of running time can be reached very quickly. Spring startup If your unit was protected against the winter, use the following steps prior to restarting your product for spring: 1. Recalibrate the electrodes 2. Verify that the check valves in the dosage nipple isn’t stuck. 3. ... -
Page 9: Maintenance
Maintenance and inspection Maintenance o Regularly verify the functionality of the electrodes and the settings by measuring pH and chlorine levels with an alternative method (color measurement) If necessary, adjust the settings. o Regularly verify the tube inside of the peristaltic pump. Immediately replace this tube if there is any leakage present. It is recommended to replace his tube on a 2‐year basis. o Regularly check the nozzles for leaks. Immediately replace if they leak. o Regularly check the nozzles for blockage. Immediately replace if they leak. o Check the power supply and cable connection frequently. If the pump starts functioning abnormally, disable it and call a technician. Warnings ○ Incorrect installation can cause a chemical or electrical risk, which can result in serious injuries. ○ Never mix acid with liquid chlorine. ○ Keep the unit and chemicals out of the reach of children. Always wear safety gloves and glasses when configuring the unit. ○ DO NOT ATTEMPT to adjust the dosage apparatus internally. ○ If you’re unfamiliar with swimming pool filters and dosage apparatus: Do not attempt to adjust anything without consulting your supplier or a technician. Read the entire guide thoroughly before adjusting the dosage apparatus. ...
Need help?
Do you have a question about the ZWMX7510-P and is the answer not in the manual?
Questions and answers