Hisense HS218 User Manual
2.1 ch soundbar with wireless subwoofer
Hide thumbs
Also See for HS218:
- User manual (226 pages) ,
- Quick start manual (65 pages) ,
- User manual (44 pages)

Subscribe to Our Youtube Channel
Related Manuals for Hisense HS218


Summary of Contents for Hisense HS218
- Page 1 USER MANUAL Before using the sound bar, please read this manual thoroughly and retain it for future reference.
-
Page 2: Table Of Contents
Contents Important Safety Instructions Safety ......................................3 Warning .......................................4 What’s in the Box Identifying the Parts Main Unit ....................................6 Wireless Subwoofer ................................6 Remote Control ..................................7 Preparations Prepare the Remote Control ..............................7 Replace the Remote Control Battery ..........................7 Placement and Mounting ..............................8 Wall Mounting (if using option-B) .............................8 Connections Connect to HDMI (ARC) Socket ............................9... -
Page 3: Important Safety Instructions
Important Safety Instructions third prong is provided for your safety. If the C AUT I ON provided plug does not fit into your outlet, RISK OF ELECTRIC SHOCK consult an electrician for replacement of the DO NOT OPEN obsolete outlet. AV IS 10 Protect the power cord from being walked on or pinched particularly at plugs, convenience... -
Page 4: Warning
Caution: Do not mix old and new batteries. Do not mix alkaline, standard (Carbon-Zinc) or Use of controls or adjustments or performance rechargeable (Ni-Cd, Ni- MH, etc.) batteries. of procedures other than those described Remove batteries when the unit is not used for herein, may result in hazardous radiation a long time. -
Page 5: What's In The Box
What’s in the Box Main Unit Remote Control / Wireless Subwoofer AAA Batteries x 2 AC Power Cord User Manual/Quick Start Guide/ Optical Cable Wall Mount Guide Wall Mounting Screws (x2) / Brackets (x2) / Bracket Screw (x2) / Wall Anchors (x2) * Power cord quantity and plug type vary by regions. -
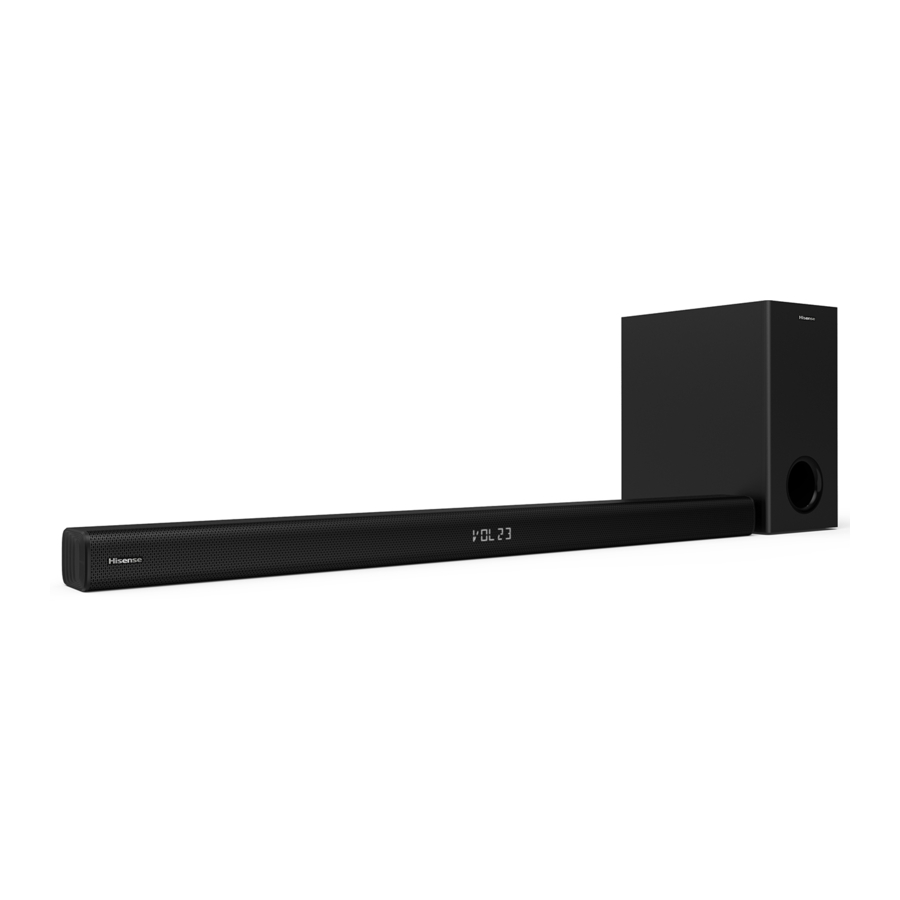
Page 6: Identifying The Parts
Identifying the Parts Main Unit 1 Remote Control Sensor Receive signal from the remote control. 2 Display Window Show the current status. 3 Screws Remove the screws then install the wall mounting screws into the back of the unit. (ON/OFF) Button Switch the unit between ON and Standby mode. -
Page 7: Remote Control
Remote Control Switch the unit between ON and STANDBY mode. (MUTE) Mute or resume the sound. 3 SOURCE Select the play function. (BT) Select the Bluetooth mode. 5 VOL+/VOL- Increase/decrease the volume level. Skip to previous/next track in BT/USB mode. /PAIR Play/pause/resume playback in BT/USB mode. -
Page 8: Placement And Mounting
Placement and Mounting Placement A If your TV is placed on a table, you can place the unit on the table directly in front of the TV stand, centered with the TV screen. B If your TV is attached to a wall, you can mount the unit on the wall directly below the TV screen. -
Page 9: Connections
Connections Connect to HDMI (ARC) Socket Your Soundbar supports HDMI with Audio Return Channel (ARC). If your TV is HDMI ARC compliant, you can hear the TV audio through your Soundbar by using a single HDMI cable. 1 Using a High Speed HDMI cable (not included), connect the HDMI OUT (ARC)-TO TV connector on your Soundbar to the HDMI ARC connector on the TV. -
Page 10: Connect To Line In Socket
Connect to LINE IN Socket A Use a RCA to 3.5mm audio cable (not included) to connect the TV’s audio output sockets to the LINE IN socket on the unit. B Use a 3.5mm to 3.5mm audio cable (not included) to connect the TV’s or external audio device headphone socket to the LINE IN socket on the unit. -
Page 11: Basic Operation
2 Then press on the unit or remote control to • Please turn the unit off completely to save switch the unit ON. energy when not in use. 3 The Pair indicator on the subwoofer will become solid when successful. Select Modes 4 If the Pair indicator still keeps blinking, repeat Press the... -
Page 12: Line In / Optical / Coaxial / Hdmi Arc Operation
"Pairing" from the unit. 2 Press the button repeatedly on the unit or the 3 Select “Hisense HS218” in the pairing list. After SOURCE button on the remote control to select successful pairing, you will hear "Paired" from the LINE, OPTICAL, COAXIAL, HDMI ARC mode. -
Page 13: Usb Operation
• Insert the battery with its polarities (+/-) USB Operation aligned as indicated. • Replace the battery. 1 Insert the USB device. • Aim the remote control directly at the sensor on the front of the unit. No sound Increase the volume. Press Volume Up on the remote control or on the soundbar. -
Page 14: Specifications
Specifications Model Name HS218 Soundbar Power Supply AC100-240V~ 50/60Hz Power Consumption Standby Power < 0.5 W USB port for playback 500mA USB Compatibility Hi-Speed USB (2.0) / FAT32 USB Playback support / file formats 32G (max) , MP3/WAV/WMA Dimension (WxHxD) 37.8 x 2.3 x 3.2 inches / (960 x 58 x 82 mm) - Page 15 HS218...
- Page 16 Bară de sunet cu 2.1 canale și subwoofer wireless Model: HS218 MANUAL DE UTILIZARE Înainte de a utiliza bara de sunet, citiți cu atenție acest manual și păstrați-l pentru consultare ulterioară.
- Page 17 Conţinut Instrucțiuni importante de siguranță Siguranță ....................................3 Avertizare ....................................4 Conținutul cutiei Identificarea pieselor Unitatea principală..................................6 Subwoofer wireless .................................6 Telecomandă .....................................7 Pregătire Pregătirea telecomenzii ................................7 Înlocuirea bateriilor telecomenzii ............................7 Poziționare și montare ................................8 Montare pe perete (dacă se utilizează opțiunea B) .....................8 Conexiuni Conectarea la mufa HDMI (ARC) ............................9 Conectarea la mufa OPTICAL ..............................9...
-
Page 18: Instrucțiuni Importante De Siguranță
Instrucțiuni importante de siguranță borne și un conector de împământare. Borna C AUT I ON lată, sau conectorul de împământare, este RISK OF ELECTRIC SHOCK prevăzută pentru siguranța dvs. Dacă ștecherul DO NOT OPEN furnizat nu se potrivește în priză, adresați-vă unui electrician pentru înlocuirea prizei vechi. -
Page 19: Avertizare
Atenție: Utilizarea bateriilor ATENȚIE Utilizarea comenzilor sau reglajelor sau Pentru a preveni scurgerea bateriilor, care poate efectuarea altor proceduri decât cele descrise duce la vătămări corporale, la pagube materiale în acest document poate duce la expunerea sau la deteriorarea aparatului: la radiații periculoase sau la alte operațiuni Instalați corect toate bateriile, respectând nesigure. -
Page 20: Conținutul Cutiei
Conținutul cutiei Unitate principală Telecomandă / Subwoofer wireless Baterii AAA × 2 Manual de utilizare/Ghid de Cablu de alimentare c.a. × 2 Cablu optic pornire rapidă/Ghid de montare pe perete Șuruburi de montare pe perete (× 2) / Suporturi (× 2) / Șurub de fixare (× 2) / Ancore de perete (×... -
Page 21: Identificarea Pieselor
Identificarea pieselor Unitatea principală 1 Senzor de telecomandă Primirea semnalului de la telecomandă. 2 Fereastră de afișare Afișarea stării curente. 3 Șuruburi Scoateți șuruburile, apoi instalați șuruburile de montare pe perete în partea din spate a unității. Buton PORNIRE/OPRIRE Comutați unitatea între modul PORNIT și modul Stare de veghe. -
Page 22: Telecomandă
Telecomandă Comutați unitatea între modul PORNIT și modul STARE DE VEGHE. (FĂRĂ SUNET) Dezactivați sau reactivați sunetul. SOURCE Selectați funcția de redare. Selectați modul Bluetooth. (BT) VOL+/VOL- Măriți/reduceți nivelul volumului. Treceți la piesa anterioară/următoare în modul BT/USB. /PAIR Redare/pauză/reluare redare în modul BT/ USB. -
Page 23: Poziționare Și Montare
Poziționare și montare Amplasare A Dacă televizorul dvs. este așezat pe o masă, puteți așeza unitatea pe masă direct în fața suportului televizorului, centrată cu ecranul televizorului. B Dacă televizorul dvs. este fixat pe un perete, puteți monta unitatea pe perete, direct sub ecranul televizorului. -
Page 24: Conexiuni
Conexiuni Conectarea la mufa HDMI (ARC) Bara dvs. de sunet acceptă HDMI cu Canal de retur audio (ARC, Audio Return Channel). Dacă televizorul dvs. este compatibil HDMI ARC, puteți auzi sunetul televizorului prin bara de sunet utilizând un singur cablu HDMI. 1 Utilizând un cablu HDMI de mare viteză... -
Page 25: Conectarea Mufei Line In
Conectarea mufei LINE IN A Utilizați un cablu audio RCA - 3,5 mm (nu este inclus) pentru a conecta mufele de ieșire audio ale televizorului la mufa LINE IN a unității. B Utilizați un cablu audio 3,5 mm - 3,5 mm (nu este inclus) pentru a conecta mufa pentru căști a televizorului sau a dispozitivului Cască... -
Page 26: Funcționarea De Bază
Selectarea modurilor 4 Dacă indicatorul de asociere continuă să clipească, repetați pasul 1-3. Apăsați în mod repetat butonul (SOURCE) de pe unitate sau butoanele SOURCE de pe telecomandă pentru a selecta modul LINE IN, OBSERVAȚIE: OPTICAL, COAXIAL, HDMI ARC, USB și BT •... -
Page 27: Funcționarea În Modul Line In / Optical / Coaxial / Hdmi Arc
2 Apăsați în mod repetat butonul de pe „Asociere” din unitate. unitate sau butoanele SOURCE de pe 3 Selectați „Hisense HS218” în lista de asociere. telecomandă pentru a selecta modul LINE IN, După o asociere reușită, veți auzi „Asociat” din OPTICAL, COAXIAL, HDMI ARC. -
Page 28: Funcționarea În Modul Usb
Telecomanda nu funcționează 3 Utilizați telecomanda furnizată pentru a controla redarea (dacă acceptă AVRCP). • Înainte de a apăsa orice buton de control al Pentru a întrerupe/relua redarea, apăsați redării, selectați mai întâi sursa corectă. /PAIR de pe telecomandă. butonul •... -
Page 29: Specificații
Specificații Numele modelului HS218 Bara de sunet Sursa de alimentare 100-240 V CA~, 50/60 Hz Consum de energie 30 W Consum în stare de veghe < 0,5 W Port USB pentru redare 5 V 500 mA Compatibilitate USB USB de mare viteză (2.0)/FAT32 Suport pentru redare USB / formate de 32 GB (max), MP3/WAV/WMA fișiere... - Page 30 HS218...
Need help?
Do you have a question about the HS218 and is the answer not in the manual?
Questions and answers