Table of Contents

Related Manuals for Pyle PLDNAND623


Summary of Contents for Pyle PLDNAND623
- Page 1 User’s Manual PLDNAND623 Android Stereo Receiver & Dual Camera System HD DVR Dash Cam, Rearview Backup Camera, 6'' Touchscreen Display, Wi-Fi Web Browsing, App Download, GPS Navigation, Bluetooth Streaming, HD 1080p Support, Double DIN...
-
Page 2: Table Of Contents
System descriptions and features re ected as herein stated by this user manual serves to express the Pyle Audio Headunit Receiver features at the current production period. We reserve the right to change terms and conditions of system speci cations, features and descriptions at any time, as we continue to improve and provide our customers with upgrades in safety, performance and system operation in general. -
Page 3: Precautions
COMPATIBILITY This unit is a standard “Double Din” sized radio. Check to see that your vehicle accepts a double din sized radio. This unit conforms to the standard size and dimensions of a double din radio. Your vehicle may require a vehicle speci c or 3rd. -
Page 4: Installation Guide
SYSTEM INSTALLATION: Before starting: To prevent short circuits, be sure to disconnect the battery terminal before starting. Installation Guide - Double Din Fitting: Caution: 1. This screen opens up. Install the unit within 30 degrees of the horizontal plane. Check that the screen has enough room to fully open. -
Page 5: Installing Steering Wheel Control
This unit has the ability to wire directly to your vehicle’s steering wheel column and does not, but may, require a 3 party steering wheel control interface. Pyle Audio Technical support can assist you in interfacing into vehicles with existing steering wheel controls. For additional help, contact Pyle Technical Support and be sure to supply Year Make Model and options of vehicle so that proper instructions can be supplied. -
Page 6: Front Panel And Buttons
FRONT PANEL AND BUTTONS Hold to open screen and eject disk. Return Switch between apps/radio interface, Press while in GPS interface to return to radio apps Volume up Volume down Hold to power up Use a pin to insert into reset port to trigger unit reset. (Hold for 20 secs . to reset) Microphone port IR remote receiver port Tips: Navi----You might have several maps in this device, by pressing Navi button, you will enter into the map... -
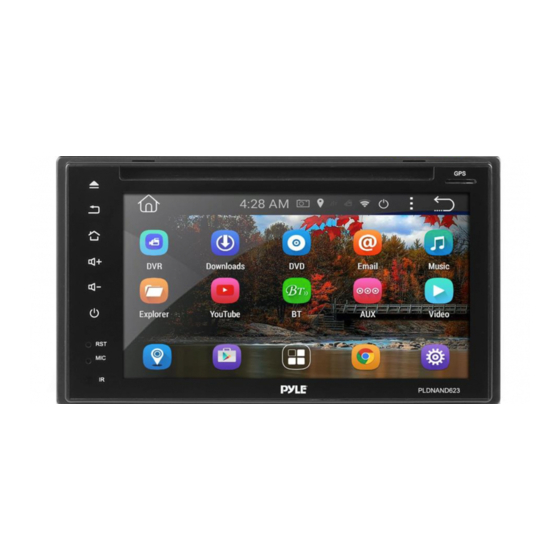
Page 7: Graphics User Interface
*Please Note: - Navigation and CD/DVD options and applications may only be found in select head unit receiver stereo systems, which include these, and other, additional/special features -- not all Pyle stereo models come equipped with GPS Navigation and/or CD/DVD players. -
Page 8: Settings
SETTINGS 1. Scrolling Use the red bar to scroll through the list of all available options. 2. Turn on/o Many settings can be toggled on or o in this screen *Note: Factory setup is not adjustable by user. Do not attempt to enter this setup menu. SET TIME 1. -
Page 9: Calendar
CALENDAR • Displays the day, month and year. • Use forward and back arrows the view past or future months. • Selected dates are highlighted in blue Note: Calendar does not allow entry of appointments. Date must be set within system settings CALCULATOR •... -
Page 10: Radio
RADIO 1. Scanning: Press, hold, and drag the slider to quickly tune the radio. 2. Current Station: The currently selected station will be displayed in the center. Press the forward and back arrows to change the current station. 3. Favorite Stations: Press and hold one of the six preset slots to set and save a selection for later. -
Page 11: Third Party Apps
THIRD PARTY APPS For the detailed operation instruction for a certain 3rd party App, such as Google map, Youtube etc., please contact your 3rd party App provider for further service. TROUBLE SHOOTING Q: Unit doesn’t power up A: Use a multi-meter to check for 12v+ to red and yellow wires. Check for proper Ground on the Black wire. Q: My video does not play A: Attach “PARK”... - Page 12 Q: My Map card no longer loads (COCKPIT ERROR DISPLAYED) A: This is caused by bug in map software. Please contact Tech Support: Pyle, go to www.PyleUSA.com the “contact us” page. A: You may be able to ix the software on your own - Insert GPS card into computer - Open text ile under Primo\save\pro iles\01\system.ini...
- Page 13 WIRING BACK PANEL WIFI ANTENNA 3G/USB/DVR 3G/USB/DVR 3G/USB/DVR GPS ANT BT/MIC SUBWOOFER OUTPUT RADIO ANT A. Video Input B. Video Output 1 C. Video Output 2 D. Left Audio Input E. Front Left Audio Output F. Rear Left Audio Output G.
- Page 14 WIRING COLOR WIRING GROUND BACK UP CAMERA Radio Antenna Radio antenna receptacle Subwoofer Output Pre amp subwoofer output (5V) Audio / Video Input Auxiliary input for external hardware Audio / Video Output 1 Connect to headrest display (Optional) Audio / Video Output 2 Connect to headrest display (Optional) SW KEY Steering wheel control Key 1 interface wire...
- Page 15 DVD app will only open if a compatible DVD disc is detected. 1. Scrubbing Press and drag along the time line to quickly skip through DVD times line. (Note: DVD formatting does not allow scrubbing through previews and warnings) 2. Menu Options & Controls: Subtitle switch Root menu Fast Backward...
- Page 16 BLUETOOTH Bluetooth app allows Bluetooth pairing with compatible devices for making calls and music playback. To pair your phone, ensure Bluetooth is enabled in your phone’s system settings and that you are disconnected from all other devices. In the Bluetooth app of your radio, press the “Gear” icon in the left column to access Bluetooth settings. Next, press the “Magnifying glass”...
- Page 17 HOW TO ACCESS INTERNET How to access internet? You have three ways to access internet. 1. Use a 3G dongle Insert USB type 3G dongle to one of the rear USB port, wait for few seconds, then 3G signal icon will be shown on status bar, and you can access internet now.
- Page 18 Output Setup Auto Segmentation: The video le recorded should not be too large, otherwise it will increase memory consumption when opening le which may cause playback failure. When you choose high-resolution, the video le recorded will be larger, so it may be appropriate to shorten the split time. Auto Delete Old Video: When there is not enough free space in the storage, it will automatically delete the oldest recorded video to clear space for newly recorded video.
- Page 19 INSTALLATION /MUTE HOME NAVI VOL- VOL+ www.PyleUSA.com...
- Page 20 REAR VIEW BACKUP CAMERA INSTALLATION: Please read all of the installation instructions carefully before installing the product. Improper installation will void manufacturer’s warranty. The installation instructions do not apply to all types of vehicles, and are written as guidelines to assist in installing the system. Please consult an experienced technician if you are not comfortable installing the product.
- Page 21 System Installation and Wiring Note: Camera System installation on diesel vehicles may require a slightly di erent wiring install. Caution: Connecting to other types of electrical systems will cause damage to your vehicle. Please contact the manufacturer if you are unaware of the system type in your vehicle. Refer to the model's power requirements prior to connection and installation.
- Page 22 Angle Adjustable Camera Lens • Located on the camera housing are 2 screws which lock the camera lens angle in position. • The screws may be loosened to allow camera lens angle adjustment • Loosen the screws, adjust the camera lens into the desired angle. then tighten the screws securely. •...
- Page 23 PHONE LINK SOFTWARE This phone link software is developed by a 3rd party Apps developer, which we provided to our valued customers free of charge. As mobile phones manufacturers are keeping on upgrading their system, this device may not be compatible with their upgraded operating system, we will not be responsible for these incompatibility.
- Page 24 3.3. Transmit mobile phone sound to vehicle navigator Transmit the sound to the vehicle navigator to facilitate receiving and making a call. At the same time, the mobile phone audio can be transmitted to the vehicle terminal through A2DP protocol, and is played by the car loudspeaker.
- Page 25 Remarks: Wi-Fi connection to IOS mobile phone only supports reverse control in Drivemode client . The performance of Wi-Fi connection to Android mobile phone and IOS mobile phone is related to the wireless signal strength. 5.2. Connection Manner 5.2.1.Android USB connection Enable the USB debugging of mobile phone according to the prompt Connect with USB cable Check and con rm Allow USB Debugging on the mobile phone during connection for the irst time, and check...
- Page 26 Allow to install Phone Link service and Drivemode software on the mobile phone according to the prompts (not required to con rm on some mobile phones). 5.2.2.Android Wi-Fi Connection Enable the network share and portable hotspot function of mobile phone, record the name of mobile phone hotspot, and use the mobile phone Wi-Fi as hotspot for vehicle navigator connection.
- Page 27 Select the mobile phone hotspot enabled just now from the box on the left side, and enter a password for connection. Enter connection authentication by USB connection manner for mobile phone connection for the rst time or after mobile phone restart to ensure the connection security. Refer to [Android USB Connection]. Enter the welcome interface of Drivemode successfully, which means successful connection.
- Page 28 5.2.3. IOS Wi-Fi Connection Enable the personal hotspot function of mobile phone, record the name of mobile phone hotspot , and use the mobile phone Wi-Fi as hotspot for vehicle navigator connection. Slide on the screen of mobile phone to open the control bar, click Airplay to select EC-Mirror-**, and then enable mirror switch.
- Page 29 5.3. Pop-up Function Menu Pop up the function menu by clicking the key ( ) at the bottom left corner of screen, and the function keys are de ned as follows: Interface Name Function icon Return Return to the previous level, the same as Return key on Android mobile phone Setting Enter the setting page of Easyconnected software...
- Page 30 7. FAQ 7.1. How to enable USB debugging switch of Android mobile phone The method for enabling [USB debugging switch] will be di erent for di erent versions of Android system. Please select the connection wizard according to the system version of mobile phone to operate on the phone in sequence.
- Page 31 7.2. Checklist of Connection Problems Mobile Problem Cause analysis Solution phone type Android Physical USB connection 1. Check whether the mobile phone has Debugging fails. enabled [USB Debugging mode] mobile icon does not phone 2. Check and replace USB cable appear on the 3.
Need help?
Do you have a question about the PLDNAND623 and is the answer not in the manual?
Questions and answers