Advertisement
Quick Guide
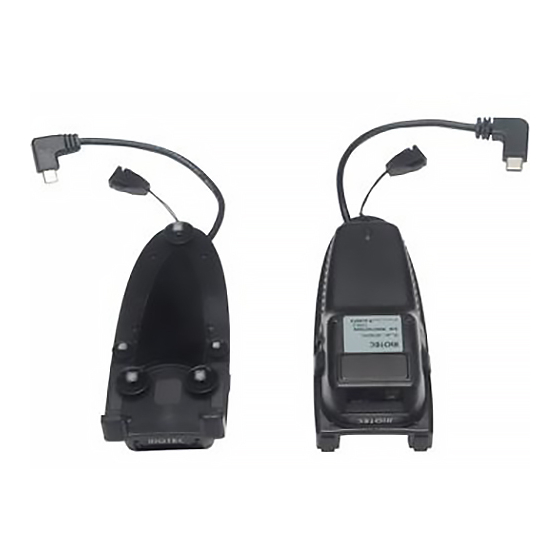
- iDC9272N
1
Suction Cup
Exit Window
PU Glue
(Can be used
repeatedly)
Micro USB
cable (OTG)
Connect to micro USB port of
Smartphone
2
Li- Ion Battery inside
Indicator (LED)
3
C=Charge mode
O=Operation mode
Before you use scanner, please switch to "C- Charge
*
mode" and charge inside battery for 3~4 hours first.
Under "C- Charge mode", you can raise/lower
*
soft-keyboard easily. (For HID profile only)
4
Charge port
iDC9272N is with Li-Ion battery inside. When in charging,
please use the original USB power adaptor of Smartphone
(recommended). Through it, it charges both smartphone
& iDC9272N batteries at the same time.
When in low battery
(Orange LED flashing, beep once /per
4
seconds), please charge it immediately.
In case the power consumed out totally; the RTC (Real
Time Clock) will back to original setting 01012000.
Attention: Please don't charge iDC9272N when in Operation
mode. Otherwise, the smartphone's battery will charge back
to iDC9272N's battery.
1
5
Left Button
Under BT HID Profile, press Left button to raise/lower
soft-Keyboard; press the left button for 4 seconds to
un-pair. Then, scanner can be connected with other
BT devices (Please check page #2, left column)
Indicator
(LED)
Touch Trigger Area
SCAN/ Power ON
Press 1 second to wake it
up from power saving
mode
** When pressing Left button + Right button for 8~9 seconds,
iDC9272N
will enter deep sleeping mode.
** Please press Left button + Right button + Touch trigger for
8~9 seconds to activate iDC9272N.
** The touch sensor area is around the central area.
Please check the above drawing for your reference.
LED Indicator Information
Orange LED ON
Orange and Red LED Flashing
Orange LED Flashing
Red LED ON
Green LED ON
Orange LED ON
Right Button
Power Saving button:
Press the button for 4 second
then enter power saving mode
Full charged
Charging
Low battery
Off line / out of service
Good read
Good read (Batch mode)
Advertisement
Table of Contents

Related Manuals for RIOTEC iDC9272N


Summary of Contents for RIOTEC iDC9272N
- Page 1 8~9 seconds to activate iDC9272N. ** The touch sensor area is around the central area. iDC9272N is with Li-Ion battery inside. When in charging, Please check the above drawing for your reference. please use the original USB power adaptor of Smartphone (recommended).
-
Page 2: Reset Configuration To Defaults
Reset Configuration to Defaults 1. click the “Settings” 2. click “General” How to Connect to Smartphone Make sure your device has BT HID or SPP profile (scan from A1 to A2 for HID profile or B1 to B3 for SPP profile) Turn off Power-Saving mode on your smartphone first Then, choose HID or SPP profile and scans the following 2 setting codes before connecting to smartphone. -
Page 3: Trigger Mode
Trigger Mode RTC (Real-time clock), please set the punctuation mark at the same time There are two operating modes on the scanner Trigger always You must scan the below configuration barcode to set the date & time (Trigger available at any time) 1.Data Transmission mode (Default) stamp on the scanner. -
Page 4: Numeric Barcode For Settings
Prefix & Suffix TABLE How to append a “prefix” or a “suffix” to the Date and Time setting barcode data (SPP) (SPP) Scan the SET DATE barcode, then, scan the six CTRL A CTRL Y SPACE numeric digits in the format mm/dd/yy, from the (SOH) (EM) numeric barcode. - Page 5 1D Symbologies -2 1D Symbologies -3 Code 39 1D Symbologies -1 ENABLE FULL ASCII DISABLE Code 39 ENABLE DISABLE Trioptic ENABLE Code 39 DISABLE Chinese 25 ENABLE DISABLE UPC-A ENABLE DISABLE Code 32 ENABLE DISABLE ENABLE Matrix 25 DISABLE UPC-E ENABLE DISABLE ENABLE...
- Page 6 DISABLE Data Matrix ENABLE DISABLE Maxicode ENABLE DISABLE QR CODE ENABLE DISABLE Micro QR CODE ENABLE DISABLE Aztec ENABLE DISABLE Information in this document is subject to change without notice. For more information, please visit: www.riotec.com.tw R_181228_01 6 ...
Need help?
Do you have a question about the iDC9272N and is the answer not in the manual?
Questions and answers