
Related Manuals for EdgeStar CWBD1760FD


Summary of Contents for EdgeStar CWBD1760FD
- Page 1 Built-in Wine and Beverage Cooler CWB1760FD Owner’s Manual For more information on other great EdgeStar products on the web, go to http://www.edgestar.com...
-
Page 2: Important Safety Information
Important Safety Information Improper handling can cause serious damage to the EdgeStar wine and beverage cooler and/or injury to the user. This wine and beverage cooler is designed for domestic indoor use only. Do not use the unit for industrial or commercial use. -
Page 3: Important Safety Information (Continued)
Vent the room in which the appliance is located for several minutes. Contact the EdgeStar Customer Service Department for advice. The more coolant there is in an appliance, the larger the room it should be installed in. In the event of a leak, if the appliance is in a small room, there is the danger of combustible gases building up. -
Page 4: Table Of Contents
Table of Contents IMPORTANT SAFETY INFORMATION ..............I IMPORTANT SAFETY INFORMATION (CONTINUED) ........II INTRODUCTION ....................1 PARTS IDENTIFICATION ..................2 ......................2 RONT INSTALLING THE WINE AND BEVERAGE COOLER ........3 ..................3 YPES OF NSTALLATION Free Standing Installation: ................3 Built-in Installation: .................. -
Page 5: Introduction
Introduction Thank you for purchasing this EdgeStar wine and beverage cooler. We are glad you chose us. We believe that your purchase of this product opens a relationship between you and EdgeStar. We will provide the customer support needed to nurture that relationship. -
Page 6: Parts Identification
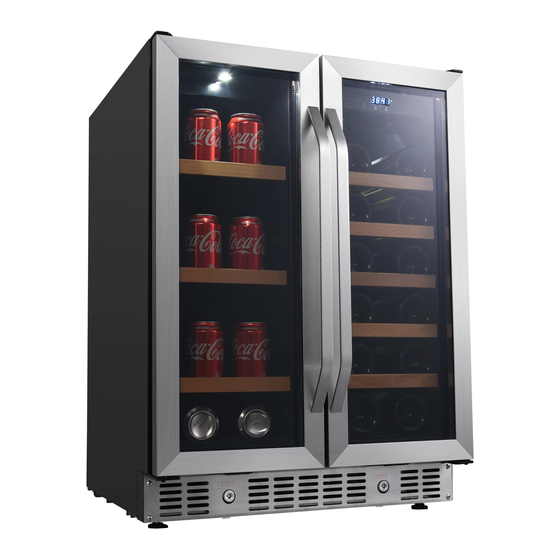
Parts Identification Tip: Gather the model and serial number from the product label and write them down before installing the wine and beverage cooler. Front View Control Panel Shelf Handle Lock Kick Plate Leveling Leg EdgeStar Wine and Beverage Cooler... -
Page 7: Installing The Wine And Beverage Cooler
Installing the Wine and Beverage Cooler The wine and beverage cooler should be installed in accordance with local electrical code requirements. The wine and beverage cooler should also be placed in a location that is strong enough to support its total weight, keeping in mind that it will weigh substantially more when fully loaded than when empty. -
Page 8: Installation Clearance Requirements
See the “Leveling the Wine and the cooler and wall or cabinet. beverage cooler” section. • A standard electrical supply (115 VAC only, 60 Hz), properly grounded in accordance with National Electrical Code and local codes and ordinances is required. EdgeStar Wine and Beverage Cooler... -
Page 9: Electrical Requirements
Electrical Requirements ELECTRIC SHOCK HAZARD! Plug into a grounded 3-prong outlet. Never remove the grounding prong from the plug. Never use an adapter to bypass the grounding prong. DO NOT use an extension cord. Failure to follow these instructions can result in fire, electrical shock, or death. -
Page 10: Installing And Removing The Shelves
3. Pull the shelf forward until the notch aligns with the plastic post on each side of the shelf track. 4. Lift the shelf until both notches pass through the posts. 5. Continue to pull the shelf forward until it is completely removed from the inner compartment. EdgeStar Wine and Beverage Cooler... -
Page 11: Installing The Handles
Installing the Handles To install the shelves: 1. Remove the door gasket (1) on the side you wish to install the handle. You can see two designated holes for handle installation. 2. Install the handle (4) tightly as shown above with two screws (3) and flat washers (2) provided. -
Page 12: Operation
5 minutes before powering it back on. Press and hold the power button for approximately five (5) seconds to turn the unit’s power on or off. EdgeStar Wine and Beverage Cooler... - Page 13 Advanced Functions Allow at least 24 hours before storing your This unit is equipped with a temperature alarm. The alarm will sound and beverages to allow the the temperature display will flash under the following conditions: temperature to acclimate. - The door has been left open for more than 60 seconds. - There has been a lengthy interruption to the power supply.
-
Page 14: Normal Sounds
CAUTION: Store the unit out of the reach of children. If you have children, pulling on the plug. you may want to take additional precautions such as removing the door to prevent a child from being trapped inside the cooler! EdgeStar Wine and Beverage Cooler... -
Page 15: Cleaning And Maintenance
CLEANING AND MAINTENANCE Periodic cleaning and proper maintenance will ensure efficiency, top performance and long life. Exterior Cleaning The door and cabinet may be cleaned with a mild detergent and lukewarm water solution such as two (2) tablespoons of baking soda to one (1) quart of water. -
Page 16: Troubleshooting Continued
The door gasket is dirty. Clean the door gasket. The door will not shut properly. The door gasket is not Make sure the door gasket is properly installed. installed correctly. The shelves are incorrectly Correctly install the shelves. installed. EdgeStar Wine and Beverage Cooler... -
Page 17: Specifications
Specifications Description of product Built-in Wine And Beverage Cooler Model CWB1760FD Voltage/Frequency AC 115V~60Hz Amperage 1.0A Input Power 100W Color Black Cabinet; Stainless Steel Doors Storage Capacity 17 Bottles*, 60 standard 12oz. cans Refrigerant R600a, 0.85 oz. Temperature Range 36 - 43ºF Left Zone 41 - 72ºF Right Zone 32”... - Page 18 Once an EdgeStar authorized representative has confirmed that your product is defective and eligible for warranty service, the product must be returned to an EdgeStar authorized repair facility. EdgeStar is not responsible for damage resulting from shipper mishandling or improper packaging. Do not return a defective product to the place of purchase.
- Page 19 Web: http://www.edgestar.com E-mail: service@edgestar.com Register your product, download owner’s manuals, access additional troubleshooting resources, and obtain more information on other great EdgeStar products on the web at: http://www.edgestar.com Product contents and specifications may change without notice. Copyright © 2014 Living Direct, Inc. All rights reserved.
Need help?
Do you have a question about the CWBD1760FD and is the answer not in the manual?
Questions and answers