Table of Contents

Related Manuals for Abus PPIC31020


Summary of Contents for Abus PPIC31020
- Page 1 PPIC31020 Operating instructions Important information and FAQs about this product and other products can be found on the website http://www.abus.com/ Version 1.0 Original operating instructions in German language. Keep for future use!
- Page 2 Dear Customer, Thank you for purchasing this product. ABUS Security Center hereby declares that the PPIC31020 camera complies with the RED Directive 2014/53/EU. The devices also meet the requirements of the following EU Directives: EMC Directive 2014/30/EU as well as RoHS Directive 2011/65/EU. The full text of the EU Declaration of Conformity is available at the following Internet addresses: http://www.abus.com/product/PPIC31020...
- Page 3 ABUS Security Center shall not be liable or responsible for any direct or indirect consequential damages in connection with the equipment, performance and use of this product. No guarantee is given for the content of this document.
-
Page 4: Table Of Contents
English Content 1. Scope of delivery ..........................6 1.1. PPIC31020 ........................... 6 2. Hardware description ........................7 2.1. WiFi Privacy Indoor Camera ......................7 2.2. Flap positions ..........................9 3. Assembly / Installation ........................10 3.1. Mounting the camera with wall bracket ..................10 3.2. - Page 5 English 4.9.8. Motion Detection Settings ....................36 4.9.9. Notification Settings......................37 4.9.10. Storage settings ......................... 39 4.9.11. Schedule settings ....................... 41 4.9.12. Device settings ........................42 4.9.13. Device information......................43 5. Update firmware ..........................44 5.1. Update via server ........................44 5.2.
-
Page 6: Scope Of Delivery
English 1. Scope of delivery 1.1. PPIC31020 PPIC31020 PPIC31020 • WiFi Privacy Indoor Camera (1) • Power supply, 5V DC / 2A (2) • Wall mount (3) • Drilling template (4) • Mounting material (5) • Reset tool (6) •... -
Page 7: Hardware Description
English 2. Hardware description 2.1. WiFi Privacy Indoor Camera... - Page 8 English...
-
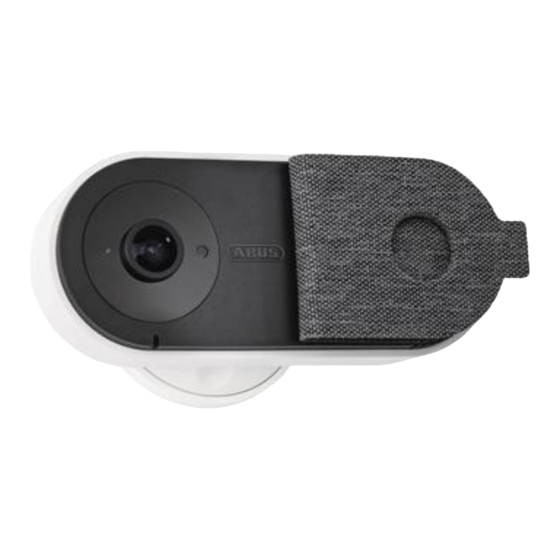
Page 9: Flap Positions
English 2.2. Flap positions The camera basically consists of two parts: the camera housing made of plastic, and a cover/flap in fabric optics. The flap is magnetically attached to the camera housing and is completely removable if required. Through the flap and its integrated magnets, you control the privacy mode of the camera. Flap is completely closed;... -
Page 10: Assembly / Installation
English 3. Assembly / Installation ATTENTION! During installation, the camera must be disconnected from the mains voltage. Site The camera is suitable for indoor use only. Do not place the camera near heaters, stoves, other heat sources or in direct sunlight. Operate only in locations with temperatures within the allowable ambient temperature range -10°~50°C. -
Page 11: Mounting The Camera Without Wall Mount
English Screw on the camera and align it to the desired detection area. Tighten the fixing ring to secure the camera in this position. Attention! The camera should not be pointed directly at a light source or at the sun. 3.2. - Page 12 English The camera can also be placed on a flat surface without a wall mount. The following points should be noted: • The position of the camera is not fixed when it is set up and can be moved unintentionally, thus changing the detection range.
-
Page 13: Restore Factory Settings
Note You can obtain information about compatible WiFi repeaters from your network operator or the manufacturer of your router. ABUS Security Center GmbH & Co KG will not make any recommendations for WiFi repeaters. Pay close attention to the installation recommendations of the WiFi repeater. The positioning should ideally be between the router and the camera. -
Page 14: App2Cam Plus: First Access
English 4. App2Cam Plus: First access 4.1. System requirements Please note the following points to ensure easy commissioning: • 2.4 or 5GHz WiFi network with password and encryption . • The WiFi password must not exceed 31 characters in length. •... -
Page 15: Camera Setup
English To access the app for the first time, download the "App2Cam Plus" app from the Google Playstore or Apple Appstore. During the installation, help pages are available for the various steps. Click on the icon to access the help pages. 4.3. - Page 16 English If you have not already done so: Activate Bluetooth in the settings of the mobile device. Then tap on "Next". Now supply the camera with power and wait 2 minutes until the camera has started. Then tap on "Next". Select your camera by its identification number.
-
Page 17: Wifi Setup
English 11. The camera will now restart. If the start-up was successful up to this point, the app displays the camera's article number in the "Overview" screen. This can take up to 60 seconds. 12. You have successfully completed the startup. All settings and functions can be accessed via the menu bar at the bottom of the screen. - Page 18 English Supply the camera with power and then click on "Search camera in network". Click on "Switch to WiFi settings". Connect to the WiFi access point of the camera. You can recognize this by the name "HD- XXXXXX". The password for the camera's WiFi access point is: "12345678". Switch back to the App2Cam Plus app and click "Next".
-
Page 19: Setup Via Network Cable
English 4.3.3. Setup via network cable Launch the App2Cam Plus and select "Add new device" to start the startup process. Option 1: Scan the QR code on the back of the camera. Option 2: Select your camera model. Select "Installation via network cable". Connect the Micro USB - RJ45 adapter cable to the camera and use a RJ45 connector for the connection with a network cable. -
Page 20: Add Cameras That Are Already Set Up
English 4.3.4. Add cameras that are already set up To set up a camera that is already connected to the network, please follow the steps below. Open the app and click the "+" to add a camera, click "Add Connected Device". Enter a name for your camera. -
Page 21: App2Cam Plus: Compatibility
• PPIC32020 / PPIC32520 / PPIC34520 • PPIC35520 / PPIC36520 • PPIC42520 / PPIC44520 • PPIC31020 • TVAC19000A-B / TVAC19100A-B • TVAC16000/TVAC16001 Note Please note that some functions explained or shown in this manual may not be compatible with older generation cameras or the functionalities of the cameras may differ due to hardware differences. -
Page 22: Menu Bar
English 4.5.1. Menu bar Set up new camera / Add camera Enable / disable camera bar Activation of the 4-fold view Connection update Updating the connections to the cameras Info / Open app settings 4.5.2. Camera bar Open camera settings Delete device Open event list 4.5.3. -
Page 23: App2Cam Plus: Live View
English Notify Activation / deactivation of push notifications (Android only) App rating Guess Me! Rate our app and send us your suggestions for improvement. 4.6. App2Cam Plus: Live View Various functions are available in Live View depending on the camera model. The functions are additionally available in landscape mode. -
Page 24: Live View Functions
English 4.6.1. Live View Functions 4.6.2. Camera indicators WiFi indoor camera Connected Camera name WiFi indoor camera You can change the name of the camera in the advanced settings. Connected Connection status of the cameras. -
Page 25: Stream Indicators
English 4.6.3. Stream indicators Display of the resolution of the current stream Full HD Display of the current connection status Direct: The Peer2Peer server was able to establish a direct connection between your Directly terminal and the camera. Relay server Relay server*: The Peer2Peer server could not establish a direct connection. -
Page 26: App2Cam Plus: Event List / Playback
English 4.7. App2Cam Plus: Event list / Playback 4.7.1. Event list In the event list, you can set a start and end time. For this filter, the app shows you all recorded events in this time. The timeline at the top shows the frequency of triggers for the last seven days. Images with object detection are displayed with icons for the detection. -
Page 27: Playback
English 4.8. Playback In the playback of the events, different functions are available depending on the camera model. In landscape mode a full view is displayed, by tapping the screen the playback bar can be hidden. Please note that the playback of the recordings is done in the 180° view. The events usually need a short buffer time until the event can be played. -
Page 28: Playback Functions
English 4.8.1. Playback functions Create snapshot Here you have the option to take a snapshot of your playback. The picture is then saved in your photo gallery on your mobile device. The saved images are time-stamped and stored in the photo gallery. Enable/disable audio Here you have the option to activate or deactivate audio for playback. -
Page 29: Advanced Settings
English 4.9. Advanced settings 4.9.1. Open advanced settings To open the advanced settings, click on the 1) menu icon at the bottom and then on the 2) settings icon in the camera image. Use the admin password that you assigned during the initial installation. Note The admin password is a purpose password, not a security password, and is intended to help you allow other people to view the camera live and receive notifications, but to prevent... -
Page 30: Automatic Login
English The "Search" button allows you to automatically replace the DID of the camera with another found camera. Discard changes with the "Cancel" button or save them with the "Save" button. 4.9.3. Automatic login When entering the admin password, you can use the "Auto login" button to save the admin password on your terminal device so that you do not have to enter it the next time you call up the advanced settings on your terminal device. -
Page 31: Security Settings
English 4.9.5. Security settings Security settings Make the security settings for your camera here. The changes in the settings are only applied after exiting the menu. Reset security code The security code is used to set up the camera in the app. During installation, replace the default security code with your own security code of choice. -
Page 32: Video Settings
English End Auto Login If you have already activated Auto Login, you can deactivate the function here. This menu item is only displayed if the function has already been activated. 4.9.6. Video settings Video settings Make the video settings for your camera here. - Page 33 English Exposure frequency Here you have the possibility to select the mains frequency for your camera. The following selections are available: Indoor (50Hz), Indoor (60Hz) and Outdoor. Standard value Germany: 50 Hz Improve night vision Here you can adjust the brightness of the night image.
- Page 34 English Privacy masking A preview of the live image and the privacy zone set up is displayed here. Drawing privacy zones is done directly in the preview area. You can activate up to 5 areas and place and adjust them individually by drag and drop.
-
Page 35: Wifi Settings
English 4.9.7. WiFi settings WiFi settings Under the WiFI settings, you can select the desired network to which the camera is to be connected. When you select the menu item, all networks in the vicinity are displayed. Select your network and enter your in- house WiFi password. -
Page 36: Motion Detection Settings
English 4.9.8. Motion Detection Settings Motion Detection Settings Make settings for motion detection here. Click Detection Mode for more settings. If "Off" is selected, there will be no motion detection. The changes in the settings are only applied after exiting the menu. Motion detection is reliable at a range of up to 4 meters. -
Page 37: Notification Settings
English 4.9.9. Notification Settings Enable PUSH notification / Enable notifications to receive PUSH messages to your smartphone when Notification language motion is detected. You have the option to change the language of the notification under Notification language. Please note that only the language of the PUSH notifications will be changed. - Page 38 English Recipient: Enter the recipient's e-mail address here. e.g. xxxx123@test.com Save the settings by pressing OK. When exiting the advanced settings, press "Confirm". Only then will the e-mail settings be applied. We recommend using "googlemail" to send e-mails. Activate the e-mail notification afterwards. Please check with your email provider if certain permissions may need to be enabled.
-
Page 39: Storage Settings
English 4.9.10. Storage settings Storage settings Make settings for the storage here. The changes in the settings are only applied after exiting the menu. Format memory card Format the SD card. For permanent use of an SD card, please use an SD card of class 10 or U1. - Page 40 English Ring buffer function There are several ways to overwrite the events on the SD card. Once the SD card is full, no more recordings will be saved. If this function is Enabled activated, the oldest recordings are overwritten with newer ones as soon as the SD card is full.
-
Page 41: Schedule Settings
English 4.9.11. Schedule settings Activation / deactivation Schedule Settings schedule Press the plus icon add a schedule. Separate activations are created for the start time and the end time. Select the start time and assign a schedule name for it. Select the days for the recurrence and the action (Enable / Disable) for the start time. -
Page 42: Device Settings
English 4.9.12. Device settings Device settings Make the device settings for your camera here. The changes in the settings are only applied after exiting the menu. Camera name Change the camera name here. The name is displayed in the live view as well as in the push notifications. -
Page 43: Device Information
English Check now for firmware By selecting the menu item "Check now update for firmware update " you can check for current firmware updates. Please note that an SD card is required for this! The firmware update is downloaded in the background and stored on the microSD card. -
Page 44: Update Firmware
English 5. Update firmware You can update your camera's firmware in two different ways. Please note that both methods retain the camera's settings, so you do not need to set them again. Please note that a microSD card is required for both variants. Updating the camera takes about 3-5 minutes. -
Page 45: Current Firmware Version
English Option 2: If you do not want to wait for the 6-hour interval, you can also let the camera actively search for a newer firmware. To do this, press the menu item "Check for firmware updates now" in the advanced settings if a firmware has not already been downloaded, the camera will now actively search for a newer version and then save it to the SD card, this can take up to 5 minutes, exit the settings of the camera. -
Page 46: Troubleshooting Tips
English 6. Troubleshooting tips Camera image is not displayed Check the signal strength in the live view Is the camera connected? Is there an Internet connection? Is the flap open ? Is the camera powered? Push messages are not received Is the camera disabled? Also check the schedules. -
Page 47: Open Source License Notes
The Open Source Licenses take precedence over all other license terms and contractual agreements with ABUS with respect to the corresponding OSS software components contained in the product. In general, license information for ABUS products can be found at www.abus.com...
Need help?
Do you have a question about the PPIC31020 and is the answer not in the manual?
Questions and answers