Abus PPIC32020 User Manual
Hide thumbs
Also See for PPIC32020:
- User manual (28 pages) ,
- Quick manual (8 pages) ,
- Quick manual (9 pages)
Table of Contents
Advertisement
Quick Links
PPIC32020 / PPIC32520 / PPIC34520 /
You can find important information and FAQs about this and other
Version 1.2
Firmware: 1.1.0.21 (PPIC32020, PPIC32520, PPIC34520)
Firmware: 1.1.1.21 (PPIC35520)
English translation of the original German instruction manual.
PPIC35520
User guide
products online at:
www.abus-smartvest.com
Retain for future reference.
Advertisement
Table of Contents

Related Manuals for Abus PPIC32020


Summary of Contents for Abus PPIC32020
- Page 1 PPIC32020 / PPIC32520 / PPIC34520 / PPIC35520 User guide You can find important information and FAQs about this and other products online at: www.abus-smartvest.com Version 1.2 Firmware: 1.1.0.21 (PPIC32020, PPIC32520, PPIC34520) Firmware: 1.1.1.21 (PPIC35520) English translation of the original German instruction manual.
- Page 2 ABUS Security-Center GmbH is not liable or responsible for direct or indirect damage resulting from the equipment, performance and use of this product. No guarantee is made for the contents of this...
-
Page 3: Table Of Contents
English Contents 1. Scope of delivery ..........................5 2. Description of the hardware ......................... 6 2.1. PPIC32020 ........................... 6 2.2. PPIC32520 ........................... 6 2.3. PPIC34520 ........................... 7 2.4. PPIC35520 ........................... 8 3. Description of hardware functions ....................... 9 3.1. Status LEDs ..........................9 3.2. - Page 4 English 9.1.2. Mode (iOS only) ........................25 9.2. Playback ............................. 26 9.2.1. Playback functions ....................... 26 10. Camera settings ..........................27 10.1. Login details ..........................27 10.2. Email notification ........................27 10.3. Open advanced settings ......................27 10.4. Automatic log-in ........................28 11.
-
Page 5: Scope Of Delivery
English 1. Scope of delivery PPIC32020 PPIC32520 Wi-Fi pan / tilt camera Wi-Fi pan / tilt outdoor camera Power supply unit, 5 V DC/1.5 (EU, UK) Power supply unit, 5 V DC/1.5 (EU, UK) ... -
Page 6: Description Of The Hardware
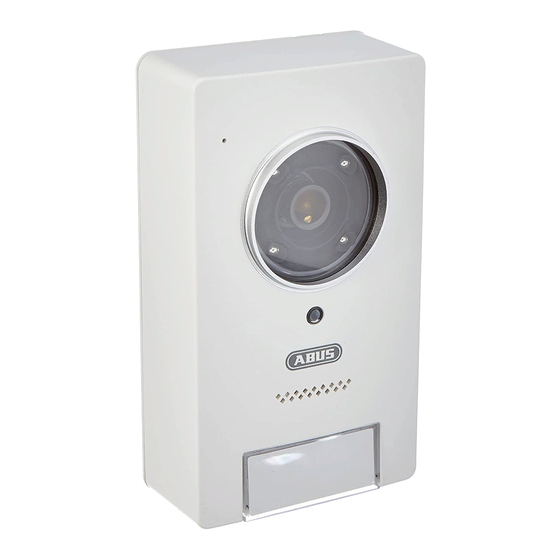
English 2. Description of the hardware 2.1. PPIC32020 IR LEDs Photo sensor Lens Microphone Loudspeaker LAN interface Reset button MicroSD card slot (max. 128 GB) Power / Status LED Power supply (5 V DC) Antenna connection (RP-SMA) 2.2. PPIC32520 Internal MicroSD card slot... -
Page 7: Ppic34520
English 2.3. PPIC34520 Lens Photo sensor IR LEDs Power and status LED PIR sensor Microphone Antenna connection (RP-SMA) Reset button Internal MicroSD card slot Internal (max.128 GB) micro USB interface for LAN connection Power supply (5 V DC) -
Page 8: Ppic35520
English 2.4. PPIC35520 Lens White light LED ring Microphone Antenna connection (RP-SMA) IR LEDs Photo sensor Loudspeaker RFID reader Call button MicroSD card slot (max. 128 GB) Adjustable lens (V: 7.5 %, H: 2.5 %) Reset button B2/B1 connector block: C2/C1 connector block: Potential-free relay for connection for, Potential-free relay for connection for an... -
Page 9: Description Of Hardware Functions
English 3. Description of hardware functions 3.1. Status LEDs PPIC32020 Status Description Camera connected to power Lights up green Camera connected to network Camera set to the factory settings Flashes green Camera firmware is being updated Power and status Flashes... -
Page 10: White Light Led
3.5. RFID Reader (PPIC35520 only) You can program and use the ABUS AZ5502 proximity chips in the intercom with the help of the built- in RFID reader. The RFID reader is located behind the loudspeaker, just above the call button. -
Page 11: Mounting / Installation
IMPORTANT! The camera must be disconnected from the power supply during installation. 4.1. PPIC32020 Position the mount where you intend to install the camera. Mark up and drill the required holes. Next, use the screw anchors and screws provided to fasten the mount in place. -
Page 12: Ppic34520
English Cabling tips If you do not have the option of feeding the cable through the wall, the following alternatives are available: 1. Cable duct: Feed the cable downwards and out from the mount. Use a cable duct (width at least 40 mm, depth at least 30 mm) to protect the laid cable. -
Page 13: Ppic35520
English 4.4. PPIC35520 This intercom is particularly well suited to retrofitting. It can usually be wired using the existing cabling if the existing doorbell is replaced. Use an ammeter to check whether there is sufficient voltage in the existing cables. Otherwise, the power supply will have to be installed separately. You will find further details and illustrations of the exact wiring below. -
Page 14: Cabling
English 4.4.3. Cabling Should you wish to use the intercom with the accessories provided, connect the power supply by connecting the two wires from the mains power cable to the connector block. Connect the red wire to DC+ and the black wire to DC- by pressing down the relevant pin and inserting the cable. Finally, connect the power supply unit provided to the power supply cable. - Page 15 English Connecting an external doorbell and / or an actuator (e.g. door opener) To connect an existing doorbell or actuator via existing cabling you will need to have at least two pairs of wires available. These might come from an additional power supply unit or from the bell transformer (1).
-
Page 16: Adjustable Lens
English 4.4.4. Adjustable lens The door station’s lens can be adjusted on the back by up to 7.5 % vertically and 2.5 % horizontally. To adjust the lens, loosen the screw using the triangle screwdriver provided. We recommend you first connect your intercom to the App2Cam Plus on your network before final installation in order to ensure it is perfectly positioned. -
Page 17: App2Cam Plus: First Access
English 5. App2Cam Plus: First access 5.1. Download app Download the ‘App2Cam Plus’ app from the Google Play Store or Apple App Store before your initial access. 5.2. Setting up the camera Connect the camera to the power to begin set-up. If you would like to connect the camera to your home network (router) using the network cable, attach the network cable to the camera before connecting the camera to the power. -
Page 18: Wi-Fi Set-Up (Ios)
English 5.2.2. Wi-Fi set-up (iOS) Before opening the app, go to your device's network settings and connect to your camera's Wi-Fi access point. This will have the name 'HD-XXXXXX'. The password for the camera's Wi-Fi access point: '12345678'. Once the connection is set up, open the app and select option 1 to set up the camera on your Wi- Fi network. -
Page 19: Lan Set-Up / Adding A Camera That Is Already Set-Up
If the camera has already been set up via another smartphone or user, select this method to add cameras that are already set up. 6. App2Cam Plus: Compatibility The App2Cam Plus is compatible with the following devices: PPIC32020 / PPIC32520 / PPIC34520 PPIC35520 TVAC19000A-B / TVAC19100A-B... -
Page 20: App2Cam Plus: Overview
English 7. App2Cam Plus: Overview Note The screenshots and icons shown here are from the iOS app. The text, layout or functions may differ slightly from the Android app. If this is the case, this will be flagged up in the respective items or as an addendum – (iOS only) or (Android only). -
Page 21: Camera Bar
English 7.2. Camera bar Open camera settings Delete camera Open event list 7.3. Info / app settings App PIN PIN settings Menu in which you can assign an app pin. If enabled and assigned, this will be requested every time you open the app. About About This section provides information about the current version of the app,... -
Page 22: App2Cam Plus: Live View
English 8. App2Cam Plus: Live view In the live cast, a variety of different functions are available to you, depending on the model of camera. A full screen view, without functions, is shown in landscape mode. 8.1. Live cast functions Create capture Enable / disable audio output Start manual recording... -
Page 23: Pan / Tilt Function
English 8.2. Pan / tilt function For pan / tilt cameras, you can either use a 'swipe' command to control the camera or long-press and release one point to bring the camera to that point. Pan / tilt menu Save or retrieve point 1 / starting point Save or call up point 2 Save or retrieve point 3 Calibration... -
Page 24: Stream Indicators
English 8.5. Stream indicators Display of the current stream's resolution Full HD Display of the current connection status Direct: The Peer2Peer Server was able to set up a direct connection between your Direct end device and the camera. Relay server Relay server*: The Peer2Peer Server was unable to set up a direct connection. -
Page 25: App2Cam Plus: Event List / Playback
English 9. App2Cam Plus: Event list / playback 9.1. Event list In this event list, you can set a start and end time. With this filter, the app will show you all recorded events in this period. 9.1.1. Event list functions Create capture Enable / disable audio output Start manual recording... -
Page 26: Playback
English 9.2. Playback In the playback of results, a variety of different functions are available to you depending on the model of camera. A full screen view, without functions, is shown in landscape mode. The results usually need a short buffer time until the event can be played back. Note During the playback of events, the event is automatically downloaded to your end device. -
Page 27: Camera Settings
English 10. Camera settings 10.1. Login details You can change the camera's login details manually in the camera settings: Camera name: Change the camera name here. DID: Change the camera's DID manually. Security code: You can change the camera's security code here. You can use the 'Search' button to automatically replace the camera's DID with another camera found. -
Page 28: Automatic Log-In
English 10.4. Automatic log-in When entering the admin password, you can use the 'Automatic log-in' button to save the admin password on your end device, meaning this does not need to be entered on your end device the next time you access the advanced settings. This does not apply when you are accessing the system from other end devices. -
Page 29: Video Settings
English 11.2. Video settings Video quality: Standard quality / better quality / best quality You can change the camera's preset video quality to VGA, HD or Full HD here. The value set here has no effect on the recording, which is always made in Full HD. Environment mode: Outdoor / Indoor 50 Hz / Indoor 60 Hz Change the environment mode here to adjust the camera to the... -
Page 30: Sound Settings (Ppic35520 Only)
English 11.4. Sound settings (PPIC35520 only) Melody track : Track 1–5 Change the melody the intercom plays when the call button is pressed. Melody volume: Level 1–3 Change the melody volume here Melody activated: Enable or disable melody playback at the intercom. Loudspeaker volume: Level 1–4 You can change the volume of the loudspeaker during two-way... -
Page 31: Motion Detection Settings
English 11.7. Motion detection settings Detection mode: Off / Software / PIR You can change the detection mode here. If it is switched off, no recording or notification will take place if motion is detected. The choice between Software and PIR detection modes is only available if your camera has an integrated PIR sensor. -
Page 32: Device Settings
English 11.10. Device settings Camera name: You can change the camera's name here. This is used on the time stamp and notifications. Time zone: You can adjust the time zone of the camera here. Summer time: You can enable or disable summer time. If summer time is enabled, the time is put forward by one full hour. -
Page 33: Updating Firmware
Alternatively, you can download the latest firmware from the ‘Downloads’ tab on the product website: www.abus.com/product/article number. (Example: www.abus.com/product/PPIC32020) Copy both files (rootfs-cpio_master.squashfs.img, rootfs-cpio_master.squashfs.md5) on to an empty MicroSD card and insert the card into your camera. To start the update, restart your camera manually by briefly disconnecting it from the power.
Need help?
Do you have a question about the PPIC32020 and is the answer not in the manual?
Questions and answers