Smiths Medical CADD-Prizm VIP Manual
Ambulatory infusion pump
Hide thumbs
Also See for CADD-Prizm VIP:
- Manual (32 pages) ,
- Quick start manual (8 pages) ,
- Quick start manual (2 pages)

Subscribe to Our Youtube Channel
Related Manuals for Smiths Medical CADD-Prizm VIP


Summary of Contents for Smiths Medical CADD-Prizm VIP
- Page 1 CADD-Prizm® VIP Ambulatory Infusion Pump Model 6100 and 6101 TPN Total Parenteral Nutrition Delivery Mode Patient Information...
-
Page 2: Table Of Contents
Contents Introduction ....................1 Warnings ...................... 2 Cautions ....................... 4 ® CADD-Prizm Pump (Diagram) ............5 Description of the Keys ................6 Installing a New Battery ................. 7 Using the Power Pack or AC Adapter ..........9 The Main Screen ..................11 Description of the Infusion Profile ............ -
Page 3: Introduction
Introduction ® Your doctor has recommended that you use the CADD‑Prizm pump as part of your treatment. ® The CADD-Prizm pump can be carried with you and is designed to deliver medication into your body. Your physician will prescribe your medication specifically for you. -
Page 4: Warnings
Failure to properly follow warnings, cautions, and instructions could result in damage to the pump or death or serious injury. Warnings • Do not use the pump in the presence of flammable anesthetics or explosive gasses. • If the pump is used to deliver life-sustaining medication, an additional pump must be available. ® • Use of a syringe with the CADD Administration Set may result in UNDER-DELIVERY of medication. Syringe function can be adversely affected by variations in plunger dimension and lubricity, which can result in greater force required to move the syringe plunger. - Page 5 • Prior to starting infusion, inspect the fluid path for kinks, a closed clamp, or other upstream obstructions, and remove all air to prevent air embolism. • Per general rules of safe practice, always close the tubing clamp before removing the cassette from the pump to prevent unregulated gravity infusion. ® • If you are using a CADD Administration Set or CADD™ Medication Cassette Reservoir that does not have the flow stop feature (reorder number does not start with 21-73xx): You must use ®...
-
Page 6: Cautions
Cautions • To avoid damaging the pump’s electronics, do not operate the pump at temperatures below + 2˚C (36˚F) or above 40˚C (104˚F). • To avoid damaging the pump’s electronics, do not store the pump at temperatures below -20˚C (-4˚F) or above 60˚C (140˚F). Do not store the pump with a CADD™ Medication Cassette Reservoir or ® CADD Administration Set attached. • To avoid damaging the pump’s electronics, do not expose the pump to humidity levels below 10% or above 90% relative humidity. • Do not immerse the pump in cleaning fluids or water or allow solution to soak into the pump, accumulate on the keypad, or enter the battery compartment, Data In/Out jack, accessory jack, or Air Detector Port area. -
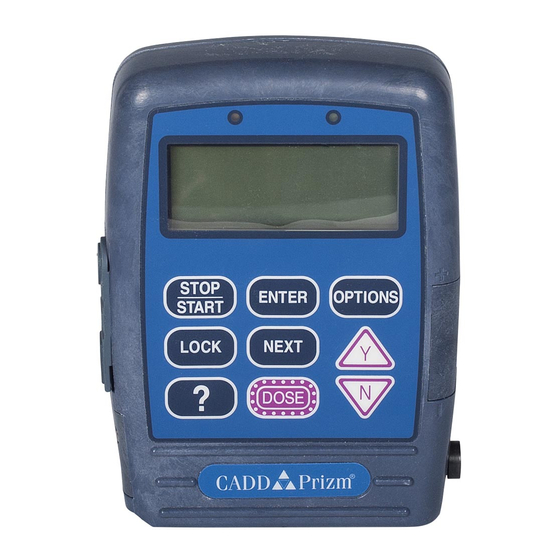
Page 7: Cadd-Prizm ® Pump (Diagram)
CADD‑Prizm ® Pump (Diagram) Green Light Amber Light Display Keypad Power Jack (for the Power Pack Battery or AC Adapter) Compartment Data In/Out Jack Air Detector (Optional) Cassette (the part of the CADD™ Medication Cassette Reservoir or CADD®Administration Set that attaches to the pump) Green Light Blinks every 3 seconds when the pump is running and delivering fluid. -
Page 8: Description Of The Keys
Description of the Keys ⁄ Starts and stops the pump and silences alarms. Œ Used by the clinician. Å The “Help” Key — explains what you see on the display. ¤ Used by the clinician. Advances you from one screen to the next and silences „... -
Page 9: Installing A New Battery
Installing a New Battery A 9 volt (9V) battery may be used to power the pump. Even if you are using a Power Pack or AC Adapter to power the pump, you must have a 9V battery installed. If 9-volt Battery Low or 9-volt Battery Depleted appears in the display, or if Battery Low appears on the main screen, you should change the battery. - Page 10 To install a new battery: Stop the Pump? 1. Stop the pump by pressing ⁄ 2. When you see Stop the pump?, Press Y or N 2000-03-08 D. Zurn ´ press «Prizm Open Door w/Button» 3. Press the button on the battery door and slide the battery door forward.
-
Page 11: Using The Power Pack Or Ac Adapter
Using the Power Pack or AC Adapter Depending on your delivery, your clinician may give you a rechargeable Power Pack or an AC Adapter to power your pump. For complete instructions, you should also read the Instructions for Use that come with the Power Pack or AC Adapter. The cord from the Power Pack or AC Adapter plugs directly into the “Power”... - Page 12 NOTE: If necessary, you can recharge the Power Pack while it is still attached to the pump. Just attach the AC Adapter connector to the Power Pack input jack. Or, if you want to operate the pump on AC power, you can attach the AC Adapter directly to the pump’s Power jack. POWER PACK ADAPTER Detaching the Power Pack 1. Grasp the connector. 2. Pull the connector back using a straight, steady motion. DO NOT twist or turn the connector.
-
Page 13: The Main Screen
The Main Screen The following screen is what you will see on the pump’s display most of the time. It is called the Main Screen and shows the following: Status of Infusion Period. See the next page. If the pump is stopped, this will show STOPPED. Battery Status TPN 6230X Low Battery... -
Page 14: Description Of The Infusion Profile
Description of the Infusion Profile The illustration below shows what an infusion profile may look like. You can tell where you are in your infusion profile by looking at the main screen. • During taper up, the main screen shows RUNNING ¤ • During the plateau rate, the main screen shows RUNNING ≥... -
Page 15: How To Use The Help Key
How to Use the HELP Key Å Å If you have a question about a screen, press for more information. A description of the screen will appear. For example, if you want information about the Reservoir Volume screen, you can press and this screen will appear: Å The symbol (?≥) in the lower right This is the corner means there are more help calculated amount of... - Page 16 Starting the Pump When you start the pump, it will review the program, and then begin delivering medication. If the pump will not start, a message should appear on the display. Refer to the Messages and Alarms section on page 24. WARNING: Prior to starting infusion, inspect the fluid path for kinks, a closed clamp, or other upstream obstructions, and remove all air bubbles to prevent air embolism.
-
Page 17: Stopping And Restarting The Pump
Stopping and Restarting the Pump Stopping the pump stops delivery of medication. Whenever the pump is stopped, the amber light will blink. • If you stop the pump during the Infusion Profile, delivery will stop, but will continue from the same point when you restart the pump. -
Page 18: Removing A Cassette
Removing a Cassette WARNING: Per general rules of safe practice, always close the tubing clamp before removing the cassette from the pump to prevent unregulated infusion, which could result in death or serious injury. To remove a cassette: ⁄ 1. Press to stop the pump. -
Page 19: Attaching A Cassette
Attaching a Cassette WARNING: ® • If you are using a CADD Administration Set or CADD™ Medication Cassette Reservoir that does not have the flow stop feature (reorder number does not start with 21‑73xx): ® You must use a CADD Extension Set with Anti-Siphon Valve ® or a CADD Administration Set with either an integral or add on Anti-Siphon Valve to protect against unregulated gravity infusion that can result from an improperly attached cassette. - Page 20 2. Insert the cassette hooks into the hinge pins on the pump. 3. Place the pump upright on a firm, flat surface. Press down so the cassette fits tightly against the pump. 4. Insert a coin into the latching button, push in, and turn counterclockwise until the mark on the latch lines up 2000-03-08 D.
- Page 21 7. Reset Reservoir Volume to — ? Reset Reservoir ´ may appear. Press to reset Volume to 3000.0 ml? the Reservoir Volume to the originally programmed value. Press Y or N This will also reset the Infusion Profile. Infusion Profile has been reset...
-
Page 22: Priming The Tubing And Starting The Pump
Priming the Tubing and Starting the Pump When the new cassette is attached, the pump may automatically Prime Tubing? prompt you to prime the tubing. 1. If Prime Tubing? appears, press Press Y or N ´ Disconnect tubing 2. This screen will appear. Make from patient sure you are not connected to Open clamps... - Page 23 When the new cassette is attached, the pump will automatically prompt you to start the pump. 5. When Start the Pump? appears, Start the Pump? check to see if the fluid path is free of air. If your clinician has instructed you to use the Air Press Y or N Detector, go to the next section.
-
Page 24: Inserting The Tubing Into The Air Detector
Inserting the Tubing into the Air Detector The Air Detector is designed to detect air bubbles in the fluid path. When the tubing is inserted into the Air Detector, an air bubble exceeding the specified size will cause an alarm to sound and the pump to stop. -
Page 25: What If I Drop Or Hit The Pump
What if I drop or hit the pump? What should I do if I drop the pump in water? If you accidentally drop the pump in water, retrieve it quickly, dry it off with a towel, and call your clinician. What if I drop the pump or hit it against a hard surface? Immediately do the following: D. -
Page 26: Alarms And Messages
Alarms and Messages If there are alarms or special messages you need to be aware of, the pump will beep or sound an alarm. Look at the screen and follow the Å steps in this table, or press for help. When you see: Take this action: The 9 volt battery is low but the 9 volt Battery... - Page 27 Alarms and Messages When you see: Take this action: There is air in the tubing or the Air in line detected tubing is not threaded through „ the air detector. Press Pump will not run to stop the alarm. Then follow NEXT to silence your clinician’s instructions for priming.
- Page 28 Alarms and Messages When you see: Take this action: The Reservoir Volume has Reservoir Volume „ reached 0.0 ml. Press is zero stop the alarm. Then change the fluid container if appropriate. NEXT to continue The Reservoir Volume value is Reservoir Volume low, indicating that the level of fluid in the fluid container is low.
- Page 29 Alarms and Messages When you see: Take this action: Fluid is not flowing from the Upstream Occlusion fluid container to the pump. Check for a kink, a closed clamp, Press STOP to stop or an air bubble in the tubing Press NEXT to restart between the fluid container and (Model 6101 only) ⁄...
- Page 30 Your Clinician’s Name: ____________________________________________________ Phone Number: ___________________________________________ Instructions: Pump placement during bathing/showering: __________________ __________________________________________________________ Pump placement during sleep: _______________________________ __________________________________________________________ Storage of medication: _____________________________________ __________________________________________________________ Notes...
- Page 32 CADD, CADD-Prizm, and the CADD and Smiths Medical design mark are trademarks of ® Smiths Medical. The symbol indicates the trademark is registered in the U.S. Patent and Trademark Office and certain other countries . All other names and marks mentioned are the trademarks or service marks of their respective owners.
Need help?
Do you have a question about the CADD-Prizm VIP and is the answer not in the manual?
Questions and answers