Table of Contents
Advertisement
Quick Links
Advertisement
Table of Contents

Related Manuals for Pyle PLCD6MRKT


Summary of Contents for Pyle PLCD6MRKT
- Page 1 PLCD6MRKT OWNER’S MANUAL Mobile Audio System PLL Synthesizer Stereo Radio CD/MP3/WMA Player Automatic Memory Storing Full Detachable Panel Preset Equalization Electronic Shockproof (ESP) Function USB Interface SD Interface www.pyleaudio.com...
-
Page 2: Table Of Contents
CONTENTS Installation ........... 3 Selecting tracks in single step ... 11 Take out screw before installation ..3 Selecting directory up/down ....11 DIN Front-Mount (Method A) ....3 Pausing playing ......... 11 Previewing all tracks ......11 Installing the unit ....... 3 Repeating the same track .... -
Page 3: Installation
INSTALLATION Notes: TAKE OUT SCREW BEFORE INSTALLATION Choose the mounting location where Before install the unit, please remove the the unit will not interfere with the two screws. normal driving function of the driver. Before finally installing the unit, connect Take out screw before installation. -
Page 4: Removing The Unit
INSTALLATION back of the unit in place. Use the supplied they will go (with the notches facing up) hardware (Hex Nut (M5mm) and Spring into the appropriate slots at the middle Washer) to attach one end of the strap to left and right sides of the unit. -
Page 5: Din Rear-Mount (Method B)
INSTALLATION To fasten the unit to the factory radio 4. Lift the top of the outer trim ring then pull mounting brackets. it out to remove it. Align the screw holes on the bracket with 5. Insert both of the supplied keys into the the screw holes on the unit, and then tighten the screws (5x5mm) on each side. -
Page 6: Using The Detachable Front Panel
USING THE DETACHABLE FRONT PANEL REMOVING THE FRONT PANEL 1. Press the release button ( ) on the Precautions when handling front panel and pull off the front panel. 1. Do not drop the front panel. 2. Do not put pressure on the display or control buttons when removing or installing the front panel. -
Page 7: Wiring Connection
WIRING CONNECTION ISO CONNECTION... -
Page 8: Operation
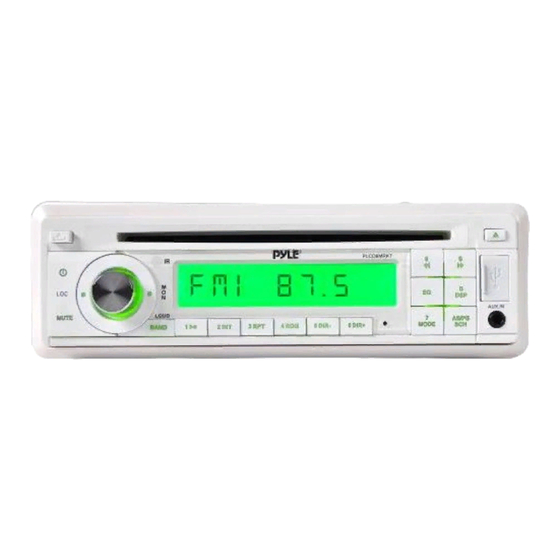
OPERATION LOCATION OF KEYS 16.6 DIR+ (release button) 17.5 DIR- 18. 4 RDM 4.MON 19. 3 RPT 5. disc slot 20. 2 INT 6. LCD 21.1 7.EQ 22. BAND/LOUD 8.8/ 23. SEL/VOL 9.9/ 24. MUTE (eject button) 25.IR 11. USB interface 26. -
Page 9: Switching On/Off The Unit
OPERATION SWITCHING ON/OFF THE UNIT stereo mode. You can sometimes improve Long Press button (1) to turn on the reception of distant stations by selection unit. When the unit is on. Press and hold EQUALIZATION button (1) for 2 seconds to turn the Press EQ button (7) shortly to turn on unit off. -
Page 10: Radio Operation
OPERATION following reasons: Press AS/PS button (14) shortly to Initial installation of the unit when all scan preset station. The radio is wiring is completed. holding at that preset number for All the function buttons do not operate. several seconds with release mute, then searches again. -
Page 11: Playing All Tracks In Random
OPERATION Repeat all the tracks. player. Press it again to resume play. PLAYING ALL TRACKS IN RANDOM PREVIEWING ALL TRACKS Press RDM button (18) to play all tracks Press INT button (20) to play first on CD in random order. Press again to several seconds of each track on the cancel the function. -
Page 12: Display Information
OPERATION Press AS/PS button for two times. It KEY Assigned IN Searching mode (Table 1) enters into “Searching Directory or AS/PS Mode Select File Name” in Digital Audio CD. ENTER unit searches files directories that have the same A, B, C, 1 character which is inputted by the D, E, F, 2 user pressing the corresponding... -
Page 13: Sd Operation
OPERATION approved by Microsoft. Bit Rate Supports USB MP3 player is not a standard Standard (kbps) Mode which means different brand name or MPEG1 Audio 32,48,64,96, Stereo different models have their Layer 3 128,192,256, standard. product cannot (44.1kHz) support every MP3 player. Windows 64,96,128,192 Stereo... - Page 14 OPERATION 2. The unit cannot play a CD-R and CD-RW that is not finalized. (Please refer manual your CD-R/CD-RW recorder CD-R/CD-RW software for more information on finalization process). 3. Depending on the recording status, conditions of the disc and the equipment used for the recording, some CD-Rs/CD-RWs may not be played on this unit.
-
Page 15: Remote Control
REMOTECONTROLHANDSET(OPTIONAL) FUNCTION KEY & CONTROL 1. POWER Power ON/OFF Button 2. 7/MODE Mode Botton(S,T,U,7,For MP3/WMA Operation) 3. TUNE/SKIP Tune/SKIP Down Button(V,W,X,8 For MP3/WMA Operation) 4. BND(LOU/ENT) Band Select Button(When pressed shortly) Loudness Button (When pressed long) (Enter Button For MP3/WMA Operation) 5. -
Page 16: Specification
SPECIFICATION GENERAL Power Supply Requirements : DC 12 Volts, Negative Ground Chassis Dimensions : 178 (W) x 160 (D) x 50 (H) Tone Controls Bass (at 100 Hz) : ±10 dB Treble (at 10 kHz) : ±10 dB Maximum Output Power Version V : 4x50 watts Current Drain... -
Page 17: Trouble Shooting
TROUBLE SHOOTING Before going through the checklist, check wiring connection. If any of the problems persist after checklist has been made, consult your nearest service dealer. Symptom Cause Solution The car ignition switch is power supply No power. not on. connected to the car accessory circuits, but the engine is not moving, switch the ignition key...
Need help?
Do you have a question about the PLCD6MRKT and is the answer not in the manual?
Questions and answers