Table of Contents
Advertisement
Quick Links
Advertisement
Table of Contents

Related Manuals for URC HDA-I/O


Summary of Contents for URC HDA-I/O
- Page 1 HDA-I/O Total Control Owner’s Manual HDA–I/O Owner’s Manual...
-
Page 2: Table Of Contents
Rear Panel Description - Using as a Stream Injector ..........5 Contact Support: Rear Panel Description - Using as a Stream Receiver ..........6 Total Control is a URC product sold direct only. For questions or assistance contact Installation Instructions ....................7 your Custom Installer/Programmer. -
Page 3: Overview
As a Stream Injector, this device distributes any connected audio source (digital or analog) over the network to any available HDA controlled zone. As a Stream Receiver, the HDA-I/O connects to your favorite 3rd party audio device and provides it with access to all HDA audio streams on the network. -
Page 4: Parts & Pieces
HDA-I/O Total Control Owner’s Manual Parts & Pieces Included with the HDA-I/O are the following:... -
Page 5: Front Panel Descriptions
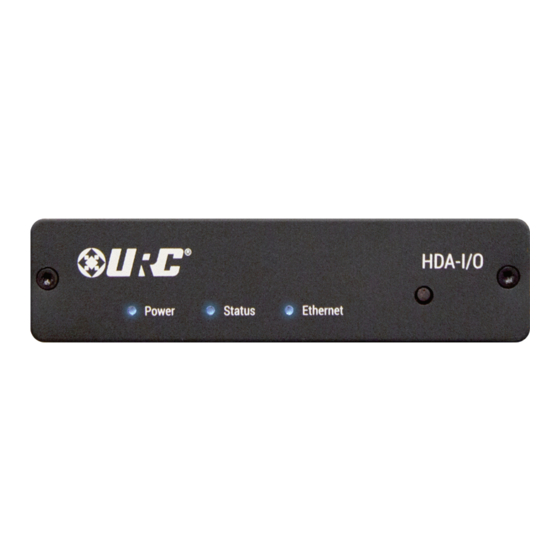
HDA-I/O Total Control Owner’s Manual Front Panel Descriptions 2. Status LED: Indicates one (1) of the following: There are three (3) LEDs on the front panel of the HDA-IO: • Solid Blue: The device has been programmed with Total Control software and is ready for operation. - Page 6 HDA-I/O Total Control Owner’s Manual 3. Ethernet LED: Indicates one (1) of the following: 4. Reset Button: There are two (2) ways to press this button: • Solid Blue: The device has received an IP address from the local network.
-
Page 7: Rear Panel Description - Using As A Stream Injector
HDA-I/O Total Control Owner’s Manual Rear Panel Description - Using as a Stream Injector 4. Analog/Digital Inputs: Both of the following inputs can be used to Below are the available connections on the rear of the HDA-IO: provide HDA “high-definition” audio streams. Only one input can be in use at any given time. -
Page 8: Rear Panel Description - Using As A Stream Receiver
HDA-I/O Total Control Owner’s Manual Rear Panel Description - Using as a Stream Receiver Below are the available connections on the rear of the HDA-IO: 4. Analog/Digital Outputs: All three (3) available outputs can be used. The HDA-IO as a stream receiver provides 3 party audio zones with access to audio sources streaming via HDA. -
Page 9: Installation Instructions
HDA-I/O Total Control Owner’s Manual Installation Instructions The HDA-IO amplifier is supplied with two (2) “L” shaped brackets for mounting on the wall or secure vertical surface. 1. Insert the supplied screws into the two (2) keyed slots on the L shaped bracket (as displayed on the image at the right). - Page 10 HDA-I/O Total Control Owner’s Manual 3. Assure that all screws have been installed securely.
-
Page 11: Network Setup
HDA-I/O Total Control Owner’s Manual Network Setup When using more than one (1) HDA devices, URC’s HDA-SW5 Network Switch is REQUIRED on the local network. For more information of the HDA-SW5 Network Switch, please refer to the HDA-SW5 Owner’s Manual. -
Page 12: Hda Modules
Total Control Owner’s Manual HDA Modules URC’s HDA line of products contains several two-way modules that are accessible from any graphical user interface. These modules serve a variety of residential and commercial applications providing end-users with advanced functionality directly from any URC interface. -
Page 13: Specifications
HDA-I/O Total Control Owner’s Manual Specifications Audio Limited Warranty Statement ■ 96 kHz / 24-bit streaming Connections https://www.urc-automation.com/legal/warranty-statement/ ■ Dolby Digital® and DTS® 5.1 Audio Inputs: End User Agreement channel Downmixing (digital The terms and conditions of the End User Agreement available at inputs only) ■... - Page 14 • CE conformity Notice Products with “CE” marking comply EMC Directive 2014/30/EU issued by the commission of the European Community. 1. EMC Directive • Emission • Immunity • Power • Declaration of Conformity “Hereby, Universal Remote Control Inc. declares that this HDA-I/O is in compliance with the Essential requirements.”...
Need help?
Do you have a question about the HDA-I/O and is the answer not in the manual?
Questions and answers