Table of Contents
Advertisement
Available languages
Available languages
Quick Links
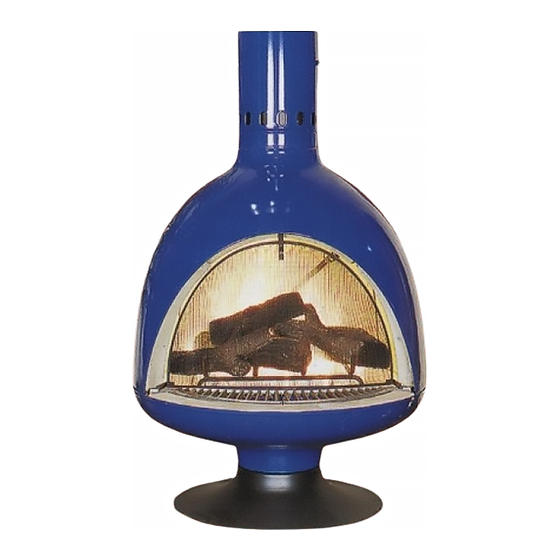
368 Yolanda Avenue, Santa Rosa, CA 95404 (707) 546-8955 - Fax: (707) 577-8036
Assembly And Installation Instructions
Read Instructions carefully before starting. Installation must comply with all local and na-
tional codes. A building permit must be obtained before starting installation. All parts must
be in place or listing will be void.
Carefully unpack all parts from cartons as directed below carefully inspecting all parts. If any
parts are damaged or missing, contact shipper or dealer immediately. Do not install unit us-
ing damaged parts.
1. Open the larger carton and remove the corner supports and packing material. Carefully
remove the hood, sliding it upward and slightly forward (toward the opening in the hood). Set
the hood aside.
Refer ro illustration No. 1.
Connector Shield
Damper Housing
Top Refractory Casting
Side Wall Refractory Casting
Bottom Refractory Casting
Firebowl Assembly
Malm Fireplaces, Inc.
Fire Drum 3
Listed By LabTest
Tested to U/L Standards
Tested to UL737 & ULC-S627-00
Assembly Instructions
Hood
Certifi ed for use in USA & Canada
Certifi é pour une utilisation aux
Etats-Unis et Canada
Illustration No. 1.
Advertisement
Table of Contents

Related Manuals for Malm Fireplaces Fire Drum 3


Summary of Contents for Malm Fireplaces Fire Drum 3
- Page 1 Malm Fireplaces, Inc. 368 Yolanda Avenue, Santa Rosa, CA 95404 (707) 546-8955 - Fax: (707) 577-8036 Fire Drum 3 Listed By LabTest Certifi ed for use in USA & Canada Certifi é pour une utilisation aux Tested to U/L Standards Etats-Unis et Canada Tested to UL737 &...
- Page 2 Fire Drum 3 Continued 2. Lift out the top refractory casting and the four side wall castings. Be careful not to drop these refractory pieces. Set these pieces aside; but remember how they were assembled in the carton. The larger carton is now light enough to be removed from the smaller carton and should be set aside.
- Page 3 Fire Drum 3 Continued Illustration No. 2 Seat the fl ue pipe with the damper section into the top spinning collar making sure that the slots around the circumference of the pipe are immediately above the collar at the top of the body.
-
Page 4: Installation Instructions
Fire Drum 3 Continued Illustration No. 3 Installation Instructions Do Not Install In A Mobile Home. READ ALL INSTRUCTIONS CAREFULLY BEFORE STARTING THE INSTALLATION. 1. Position unit to comply with the minimum clearances to combustible materials. Minimum clearances are shown from the chimney connector. It is recommended that no overhead cross members in the ceiling or roof be cut. - Page 5 Note: We do NOT recom- System mend use of the 8 inch chimney system with elbowed single- story installations of the Fire Drum 3, as more height is needed for adequate draft. Elbows aren't normal- ly necessary in single Chimney...
- Page 6 Fire Drum 3 Continued 3. A non-combustible hearth exten- sion (floor protector) must be installed under the unit. This extension must be a minimum of 5 1/2" 5 1/2" 3/8 inch thick non-combustable material such as brick, concrete, 5 1/2"...
- Page 7 Fire Drum 3 Continued Insulated Pipe Insulated Class "A" Ceiling Chimney System Single Wall Chimney Adapter Sheet Metal Screw 9" to 8" Slip Connector. Sheet Metal Screw to Chimney Connector. 8" to 9" Slip Connector DuraVent 8DVL-ADC or 8878 Adapter...
- Page 8 Fire Drum 3 Continued 2" Clearance From Studs To Chimney Wall Header 12" Of Brick From Liner To Combustibles 5/8" Fireclay Liner Minimum or Equivalent 12" Minimum Sill/Support 12" Minimum MASONRY THIMBLE Masonry Chimney If using a masonry chimney, it must meet the minimum standards of the National Fire Protection Association (NFPA) Standard 211.
- Page 9 Fire Drum 3 Continued OPERATING INSTRUCTIONS Failure to properly use and maintain this appliance may void the manufacturer's warranty and could result in a house fi re. WARNING: This free standing fi replace is a heat producing appliance and may cause severe burns if touched.
-
Page 10: Maintenance Instructions
Fire Drum 3 Continued MAINTENANCE INSTRUCTIONS Failure to properly use and maintain this appliance may void the manufacturer's warranty and could result in a house fi re. 1. Always keep the area around the unit clean and clear of furniture and other objects. Keep all furniture a minimum of 48 inches away from the heater. -
Page 11: Notice De Montage
Malm Fireplaces, Inc. 368 Yolanda Avenue, Santa Rosa, CA 95404 (707) 546-8955 - Fax: (707) 577-8036 Fire Drum 3 Listed By LabTest Certifi ed for use in USA & Canada Certifi é pour une utilisation aux Tested to U/L Standards Etats-Unis et Canada Tested to UL737 &... - Page 12 Fire Drum 3 Suite 2. Soulevez la coulée réfractaire haut et les quatre coulées de paroi latérale. Veillez à ne pas laisser tomber ces pièces réfractaires. Défi nissez ces pièces de côté; mais rappelez- vous comment ils ont été assemblés dans le carton. Le carton plus grand est maintenant assez léger pour être retiré...
- Page 13 Fire Drum 3 Suite Illustration No. 2 Seat le conduit de fumée avec la section d'amortissement dans le haut col de fi lature en veillant à ce que les fentes autour de la circonférence de la conduite sont immé- diatement au-dessus du col au haut du corps.
-
Page 14: Instructions D'installation
Fire Drum 3 Suite Illustration No. 3 Instructions d'installation Ne pas installer dans une maison mobile. LIRE ATTENTIVEMENT TOUTES LES INSTRUCTIONS AVANT DE COMMENCER L'INSTALLATION 1. Unité de mesure de respecter les distances minimales aux matériaux combustibles. Les dégagements minimaux sont indiqués à partir du connecteur de cheminée. Il est recom- mandé... - Page 15 Fire Drum 3 Suite 610mm B. Installation en coin: a. 495mm minimales mesurées à partir 203mm du côté du conduit de raccordement à 495mm la paroi la plus proche. 610mm voir Illustration No. 5. 2. Installer la cheminée et d'accessoires à...
- Page 16 Fire Drum 3 Suite 3. Une extension de l'âtre non-com- bustible ( protection de plancher ) doit être installé sous l'unité 140mm . Cette extension doit être un 140mm minimum de épais matériau non - combustable 9.525mm comme la brique, le béton, l'ardoise, les 140mm carreaux de céramique, ou une...
- Page 17 Fire Drum 3 Suite Isolé Tuyaux "A" Système Chimney classe isolée Plafond Adaptateur mural simple Cheminée Sheet Metal 229mm to 203mm Glis- Screw sez connecteur. Sheet Metal vis de raccord de cheminée. 229mm to 203mm Glissez connecteur. DuraVent 8DVL - ADC ou 8878 Adaptateur...
- Page 18 Fire Drum 3 Suite 2" Clearance From Studs To Chimney Wall Header 12" Of Brick From Liner To Combustibles 5/8" Fireclay Liner Minimum or Equivalent 12" Minimum Sill/Support 12" Minimum MASONRY THIMBLE Cheminée de maçonnerie Si vous utilisez une cheminée de maçonnerie, il doit répondre aux normes minimales de la National Fire Protection Association (NFPA) Norme 211.
- Page 19 Fire Drum 3 Suite MODE D'EMPLOI MODE D'EMPLOI Manquement à utiliser correctement et de maintenir cet appareil peut annuler la la garantie du fabricant et pourrait entraîner un incendie d'une maison . ATTENTION: Cette cheminée debout libre est un appareil produisant de la chaleur et peut causer de graves brûlures en cas de contact.
-
Page 20: Instructions De Maintenance
Fire Drum 3 Suite INSTRUCTIONS DE MAINTENANCE Manquement à utiliser correctement et de maintenir cet appareil peut annuler la la garantie du fabricant et pourrait entraîner un incendie d'une maison . 1. Toujours garder la zone autour de l'unité propre et claire de meubles et d' autres objets. Gardez tous les meubles d'un minimum de 1219mm de l'appareil de chauff...
Need help?
Do you have a question about the Fire Drum 3 and is the answer not in the manual?
Questions and answers