Advertisement
Quick Links
數位扭力計操作手冊
DIGITAL TORQUE METER INSTRUCTION MANUAL
注意:
扭力計在長時間無使用狀態下,每三個月至少需定期活化電池一次,
預防電池續航力衰退。
Note:
To prevent battery life decline, for a long period of time without usetorque
meter, needs to activate the battery at least Every three months.
KTM-15
KTM-150
KTM-50S
KILEWS JAPAN CO., LTD.
http://www.kilews.com
Y2F143-003
Advertisement

Related Manuals for Kilews KTM-15


Summary of Contents for Kilews KTM-15
- Page 1 DIGITAL TORQUE METER INSTRUCTION MANUAL KTM-15 KTM-150 KTM-50S 注意: 扭力計在長時間無使用狀態下,每三個月至少需定期活化電池一次, 預防電池續航力衰退。 Note: To prevent battery life decline, for a long period of time without usetorque meter, needs to activate the battery at least Every three months. KILEWS JAPAN CO., LTD. http://www.kilews.com Y2F143-003...
- Page 2 1 安全注意事項 ◼ 為了事前預防火災、觸電、受傷等等事故,請務必遵守下述「安全注意事項」 。 ◼ 使用前,請確實閱讀此「安全注意事項」後,依照指示正確使用。 ◼ 閱讀後請保管在使用者可以隨時看到的地方。 警 告 ! 1. 請勿測試超過容許負載扭力。若測試超過容許負載扭力,檢測器會損壞且容易造成事故或受傷。 2. 測量高扭力時,請確實固定好,勿讓本體搖晃。 3. 工作場所請隨時保持乾淨。散亂的工作場所或工作台容易造成事故。 4. 注意工作場所周圍環境。 ◼ 請勿在高溫、潮濕、陽光直射的地方、垃圾或灰塵多的地方使用。 ◼ 最佳的工作場所溫度約 20℃,請盡量保持在這個溫度環境(約 20℃)下使用。 ◼ 工作場所需照明良好 ◼ 請勿在有可燃性液體或氣體的地方使用或充電。 5. 請勿讓孩童靠近。除作業人員以外其他人請勿靠近作業場所。 6. 請勿拉扯電線。從插座上插拔接頭時請勿用力拉扯電線。 7. 為了能夠安全且有效率的作業 ◼ 請定期檢查儀器本體、起子頭、測試座等等,請勿使用變形磨損的零部件。 ◼ 更換配件時請依操作手冊更換。 ◼...
- Page 3 11. 本產品為精密儀器,請勿拆解或是強烈撞擊、震動。 ◼ 過強的撞擊或震動導致機器故障時,除了無法充分發揮性能,也會引起事故或受傷。 12. 請正確充電。 ◼ 充電時請依照指示電壓進行充電。請勿使用直流供電機或發電機充電,會產生高熱而引發火災。 ◼ 請在通風良好的地方充電。充電時請勿用布等等覆蓋住。 13. 請小心觸電。請勿以潮濕的手碰觸電源插頭以免觸電。 14. 請勿將電池(裝於儀器本體內)丟入火中。可能會產生爆裂或是有毒物質。 15. 本產品使用的是鎳氫電池。屬再利用資源。請交由原廠處理。 16. 連接外部機器時,請將全部機器的電源關掉後再連接,否則可能造成觸電或機器損壞。 17. 發生操作手冊內容以外的狀況時,請馬上停止使用並連絡經銷商。 注 意 ! 1. 不使用時請妥善保管。請保管於乾燥且孩童無法碰觸的地方,或是保管於可上鎖的地方。 另外,運送時請用本產品原廠的包裝箱。 2. 請穿著整齊服裝使用機器。勿穿著太寬鬆的衣物或珠寶,以免操作工具時勾扯拉到。 3. 操作機器時請保持良好姿勢作業,請確實站好,保持平衡。 4. 謹慎操作。 ◼ 操作時,應小心使用,注意操作方式及工作場所安全。 ◼ 疲累時請勿使用。 (此安全注意事項通用於我司全系列產品,因此依產品別不同,會有部分項目不適用)...
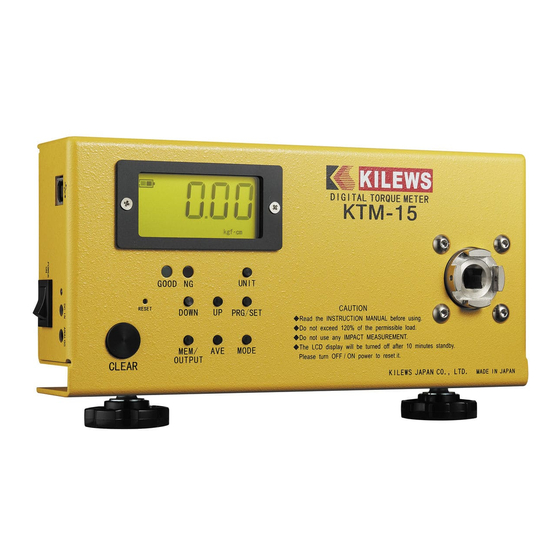
- Page 4 2-1. KTM-15/KTM-150 外觀 ①資料輸出埠(USB) ⑪測試底座 ②電源開關 ⑫功能設定鍵 ③充電指示燈(LED 紅) ⑬測量單位切換鍵 ④AC 充電孔 ⑭上選鍵 ⑤類比訊號輸出孔 ⑮下選鍵 ⑥歸零鍵(CLEAR) ⑯NG 燈 ⑦固定用旋鈕 ⑰GOOD 燈 ⑧顯示記憶資料/資料輸出鍵 ⑱液晶顯示器 ⑨計數平均功能鍵 ⑲系統重設鍵(RESET) ⑩測量模式選擇鍵 儀器本體 ⑲ ② ① ⑱ ⑮ ⑭ ⑬ ⑯ ⑰ ⑫ ③ ⑨ ⑥...
- Page 5 2-2. KTM-50S 外觀 ①資料輸出埠(USB) ⑪測試底座 ②電源開關 ⑫功能設定鍵 ③充電指示燈(LED 紅) ⑬測量單位切換鍵 ④AC 充電孔 ⑭上選鍵 ⑤類比訊號輸出孔 ⑮下選鍵 ⑥歸零鍵(CLEAR) ⑯NG 燈 ⑦固定用旋鈕 ⑰GOOD 燈 ⑧顯示記憶資料/資料輸出鍵 ⑱液晶顯示器 ⑨計數平均功能鍵 ⑲系統重設鍵(RESET) ⑩測量模式選擇鍵 儀器本體 彈簧測試座 AJ-50S...
- Page 6 3-1. KTM-15/KTM-150 規格 KTM-150 KTM-15 型 號 1.5~130.0 lbf・in 0.15~13.00 lbf・in 測 量 範 圍 1.5~150.0 kgf・cm 0.15~15.00 kgf・cm 0.15~15.00 N・m 0.015~1.500 N・m 精 度 ±0.5% 顯 示 方 式 LCD 4 位數 數位顯示 測 試 方 向 CW-CCW(順時針・逆時針) 峰值模式(PP) 顯示負荷力最高值...
- Page 7 3-2. KTM-50S 規格 型 號 KTM-50S 0.5 ~ 43.4 Lbf.in 測 量 範 圍 0.5 ~ 50.0 Kgf.cm 0.05 ~ 4.90 N.m 精 度 ±0.5% 顯 示 方 式 LCD 4 位數 數位顯示 測 試 方 向 CW-CCW(順時針・逆時針) 峰值模式(PP) 顯示負荷力最高值 測...
- Page 8 4 測量準備及測量方法 4.1 安裝 (4.1.1)測量大扭力時,檢測儀器可能會搖晃。請用固定旋鈕等器材確實固定住。 (4.1.2)KTM-50S 只能測試本公司產品半自動型號,不需要鬆開彈簧座,測試方式以直接打擊為主。 例如:SK-205LS;SK-215LS;SK-2125LS;SK-2135LS;SK-2145LS;SK-2205LS;SK2215LS;SK-2225LS;SK-2235LS SK-2245LS TKS-1300LS;TKS-1500LS;TKS-2500LS;TKS-3500LS;TKS-4500LS;TKS-2500LSF BSD-1000LS;BSD-1200LS;BSD-101;BSD-102 (4.1.3)KTM-15;KTM-150 皆可以測試電動起子全自動型號的扭力;但是必需慎選測試彈簧座(AJ) 4.2 MODE 模式選擇設定 更改測量模式時長按「MODE」鍵約 1 秒。 (為避免測量中誤動作去切換到測量單位,在做設定時秒數較長,此為正常現象。) 液晶螢幕顯示會切換到測量模式設定。 再按壓「MODE」鍵會照順序切換顯示的測量模式,請選擇要使用的測量模式。 峰值模式(PP)→初值模式(PD)→即時輸出模式(C)→校正模式(無顯示) 持續按壓此鍵,會照順序切換顯示的模式。 測量模式 顯示 內容 峰值模式 最常使用在測量電動起子的最高數值,若後面比前面數值來的 液晶螢幕下方「PP」 高則顯示最高數值。 (建議測試電動起子使用此模式)。 初值模式 測試時只顯示第一次打擊數的扭力值,第二次後的扭力皆不顯 液晶螢幕下方「PD」 示。 約每 1/180 秒就輸出一次負載扭力值資料。 即時輸出模式...
- Page 9 電量顯示 液晶螢幕顯示 内容 電量充足,可以不用充電 電量尚有100% 電量尚有50%。 電量10%,建議不要使用且進行緊急充電。否則隨時會斷電的可能 電量 0%,無法開機,所以液晶螢幕無法顯示 充電時,請使用原廠專用充電器。 若 10 分鐘內沒有按鍵操作,電源會自動轉為 OFF 狀態。(自動關機) ※有時候一連接充電器就顯示滿格,充電燈亮期間請持續充電。 4.6 歸零調整 此機種在以下狀況時,會自動歸零調整。 ①啟動電源時 ②切換測量模式時 在進行以上動作時,若在測試底座施加扭力的話,由於當下狀態設定為「零」,所以無法正常測量。 請確認啟動電源或是切換測量模式時沒有施加扭力在測試底座。 另外,測量時按清除鍵卻不會回到「零」時,可能是歸零跑掉。 此時請以下列方式調整歸零。 ①確認沒有施加扭力在測試底座。 ②按測量模式選擇鍵,將測量模式設為「TRACK」。 ③按「CLEAR 鍵」,將顯示設 0。 即可調整歸零。 4.7 測量電動起子 ①將彈簧測試座放在測試底座。 ②按電源開關開機。此時會進行歸零調整,請確認測試底座有無施加扭力。 ③確認測量模式是否為「PP」峰值模式。(液晶螢幕顯示為「PP」) 液晶螢幕未顯示「PP」時,請將測量模式改為「PP」。 ④將電動起子的起子頭裝入彈簧測試座,並啟動電動起子鎖附。 此時請確認測試座的彈簧有無放鬆。若無放鬆,請務必放鬆後再開始測量。 ⑤鎖緊動作結束後,確認螢幕的扭力值。 ⑥反轉啟動電動起子,放鬆測試座的彈簧。...
- Page 10 5 功能設定 5.1 設定方法 請依以下方法設定數值。 使用 PRG/SET、UP 及 DOWN 鍵設定。 DOWN 更改要改的地方 PRG/SET 確認數值 UP 增加數值 ①切換到設定模式及設定上限值 PRG/SET 鍵持續按壓一秒,綠色 LED 燈(GOOD 燈)亮起, 持續按壓 PRG/SET DOWN 鍵一秒,綠色 LED 顯示 之後,會顯示上限值。 燈(GOOD 燈)亮起 用 UP 鍵和 DOWN 鍵設定扭力測量值的上限值。 首先,按 DOWN 鍵後,第 4 位數就會閃爍,按 UP 鍵選擇數值。 假設上限值設定為...
- Page 11 ③設定初值模式的起始值 顯示 之後,會顯示初值模式的起始值 。 假設初值模式起始直設為 0.300 時 初值模式的起始值跟上限值一樣,按 UP 鍵及 DOWN 鍵來設定。 按 2 次 DOWN 鍵 第 3 位數閃爍 (超過設定值且扭力降低時,初值模式會動作(顯示)) 按 3 次 UP 鍵 設定完數值後,再按一次 PRG/SET 鍵。 第 3 位數閃爍 ④設定即時輸出起始值 顯示 之後,會顯示即時輸出起始值。 假設即時輸出起始值設定為 0.010 時 此值也會是設為即時輸出模式時,開始輸出的值。 按 3 次 DOWN 第...
- Page 12 5.2 蜂鳴器及訊號燈顯示的判斷方法 5.2.1 判斷是否合格 判斷測量結果在標準內或標準外,以燈號或蜂鳴器提示。 ①設定「上限值」「下限值」,作為標準。 ②確認測量模式是不是「PP」模式。(判斷是否合格只有在「PP」測量模式下有效) ③測量值在上下限值以內時,GOOD 燈會亮燈。 測量值未達下限值或是超過上限值時,NG 燈會閃爍且蜂鳴器會鳴叫。 ④測量完後,按 CLEAR 鍵將顯示歸 0。 此時,判斷是否合格的燈號及蜂鳴器會熄滅。 合格判斷只有在測量模式為「PP(峰值模式)」時才會實行。 PD(初值模式)時檢出初值時,綠色燈(GOOD)燈會亮燈告知。(測量值 10digit 以上) 合格判斷 ※低於下限值 上下限值以內 超過上限值 超出扭力計的扭力 燈號 紅色(NG)閃爍 綠色(GOOD)亮燈 紅色(NG)閃爍 紅色(NG)亮燈 斷續音 (慢) 蜂鳴器 連續音 連續音 斷續音(快) ※低於下限值:測量時的負載未達下限值,且幾乎沒有負載時判斷。 (扭力值未達 10digit 時不會判斷) 5.2.2 最大值、最小值、平均值...
- Page 13 5.2.3 自動清除數值 重複測量時,不須每次測量結束後按清除鍵也能自動清除數值。 ①設定「自動清除數值」功能。 ②測量結束後,從拿掉測試底座上的負載後開始計算時間,過了設定的時間後就會清除。 ※已設定自動清除時間時,在設定時間未到達前,就算按「CLEAR 鍵」也不會清除數值。 5.2.4 即時資料輸出 施加的負載可每 1/180 秒輸出一次資料。(即時輸出模式) (可切換成每 1/12 秒輸出一次。切換方法請參照 6.4 更改儲存資料的輸出速度) 1.將測量模式設定為「即時輸出」模式。 2.若扭力負載超過預先設定的 數值(即時輸出起始值),約每 1/180 秒就輸出負載扭力資料一次。 3.若扭力負載未達 數值,則停止輸出資料。 ※即時資料輸出時,由於螢幕的扭力顯示跳動速度很快,所以很難看到。 ※依 的設定而沒有輸出資料時,即使有施加扭力,扭力顯示也是維持「0」。 ※將 設定為「0」時,即時輸出模式時資料會持續輸出。 另外,測量範圍外的資料,請當參考值使用。 有時候「0」附近的數據在無負載時也會變動,此非資料處理上的故障。 6 資料儲存、顯示及輸出 測量資料可儲存於儀器本體內,並可顯示及輸出。 每次清除數字(按 CLEAR 鍵或是啟動自動清除),將資料記憶在記憶體的同時,也會輸出訊號到輸出端子。 統計資料會在顯示資料的同時,也會輸出資料到輸出端子。 6.1 測量資料 6.1.1 儲存測量資料...
- Page 14 6.1.2 顯示及刪除儲存的測量資料 ①按 MEM/OUTPUT 鍵,液晶螢幕下面顯示「MEM」,最後會交替顯示儲存 的資料號碼和測量值。 ②按 UP 鍵或 DOWN 鍵,更改記憶組別以搜尋資料。不操作按鍵閒置 6 秒後,「MEM」字體會消失,轉為測量模式。 ※刪除單筆資料 ③交替顯示記憶組別及扭力值時按 CLEAR 鍵, 會閃爍。 ④閃爍時再按一次 CLEAR 鍵,顯示 按 CLEAR 鍵 並刪除選擇的資料。 (後面的資料會往前遞補) CLR 閃爍 ⑤ 閃爍時閒置不動,則轉為可測量的狀態。(資料不會被刪除) 按 CLEAR 鍵 刪除資料 ※刪除指定範圍的記憶體資料 ③按 UP 鍵或是 DOWN 鍵,顯示想刪除的資料的第一筆資料。 要刪掉資料號碼...
- Page 15 ⑤顯示 按 MEM/OUTPUT 鍵 並輸出。輸出結束後回到測量狀態。 ※輸出中要停止輸出時,按壓 CLEAR 鍵約一秒。 6.2 資料輸出 資料以 USB 線輸出,格式為 ASCII 格式。 讀取資料需要另外安裝軟體驅動程式。 請參考 FTDI Chips Virtual COM Port Drivers http://www.ftdichip.com/Drivers/VCP.htm 資料輸出的規格 1 個啟動位元+8 個資料位元+2 個停止位元+無校驗位元 資料位元長度 19200bps USB(B TYPE) 速率 插頭類型 6.3 一次刪除全部已儲存資料 ①要一次刪除全部的資料的話,長按 CLEAR 鍵直到顯示 。(約...
- Page 16 7 系統設定 當鎳氫電池完全放電時(長期未使用),充電後,即使開機扭力計內的 CPU 也不會啟動的狀況。 發生此狀況時請按一次系統重設鍵(RESET)。 使用系統重設時,請勿在下列狀況以外時使用。 * 長期未使用的狀態下,接上 AC 充電器後即使開機也不會顯示數字在 LCD 上時。 * 其他狀態,扭力計無動作時。 執行系統重設時,會刪除所有的記憶內容,所以請重新設定一次。 8 點檢及校正 8.1 定期校正 為管理扭力計精度,因此需要定期校正。本司校正符合國家標準具高可靠性,為了能維持扭力計的精度, 建議一年校正一次。 (定期校正需另付費用。附校正證明書及追溯系統圖) 8.2 保固 本產品製造品管相當嚴謹,若是購買後一年內因本司生產、運輸過程等等原因發生故障, 將免費提供調整及維修服務。 若為以下狀況,即使在保固期間內,調整及維修仍須另外付費。 因不當使用、自行維修、改造而導致故障損壞 因天然災害、環境汙染、異常電壓而導致故障損壞 如有任何疑問,請與經銷商聯繫。 KILEWS JAPAN CO.,LTD. キリウスジャパン株式会社...
- Page 17 Operation Manual for Digital Torque Meter Model: KTM-150/KTM-15 1、Caution for safety Keep work area always clean. ◆ Cluttered areas and benches may cause injuries. Consider work area environment. ◆ Do not use torque meter in the rain or in the damp or wet place. Use the product at a place left at constant temperature (about 24℃).
- Page 18 Maintain torque meter with care. ◆ For better and safer performance, check screw joints regularly and use ones whose tips are free from deformation and wear down. For replacement of accessories follow the instruction manual. Inspect cords and extension cords periodically and if damaged, replace them. Do not handle cord violently.
- Page 19 2.1.1 Appearance KTM-15/KTM-150 ① USB ⑪ SOCKET ② POWER SWITCH ⑫ PRG/SET ③ AC ADAPTOR LED ⑬ UNIT ④ AC ADAPTOR TERMINAL ⑭ UP ⑤ ANALOG OUTPUT TERMINAL ⑮ DOWN ⑥ CLEAR SWITCH ⑯ NG LED ⑦ KNOB ⑰ GOOD LED ⑧...
- Page 20 2.1.2 Appearance KTM-50S ① USB ⑪ SOCKET ② POWER SWITCH ⑫ PRG/SET ③ AC ADAPTOR LED ⑬ UNIT ④ AC ADAPTOR TERMINAL ⑭ UP ⑤ ANALOG OUTPUT TERMINAL ⑮ DOWN ⑥ CLEAR SWITCH ⑯ NG LED ⑦ KNOB ⑰ GOOD LED ⑧...
- Page 21 3.1.1 Specifications KTM-15/ KTM-150 KTM-150 KTM-15 MODEL 1.5~130.0 lbf.in 0.15~13.00 lbf.in Measuring range 1.5~150.0 kgf.cm 0.15~15.00 kgf.cm 0.15~15.00 N.m 0.015~1.500 N.m Accuracy +/- 0.5% (Full Scale) Display 4 figures of LCD Measuring direction CW・CCW P-P (peak) Peak load value hold.
- Page 22 4、Setting and measuring mode for KTM-150/KTM-15 4.1 Mode setting Press the MODE key over one second. It means getting into setting mode when the words PP----PD shown on the below left on LCD screen. Please press the MODE key if needing to change measuring mode: maximum value (PP)----only indicating the first peak value (PD)----real-time value (C)----for calibration (TRACK).
-
Page 23: For Example
5.1 Setting procedure: 『1』 press PRG/SET key approximately one second, green LED light will be on and getting into set screen. LCD monitor will display “ ” and jump to 0.0. Press DOWN key, then the value of fourth digit can be set. The change of value is only allowed to increase. If needing increase, press UP key. - Page 24 『6』press PRG/SET once again, setting buzzer, UP/DOWN setting. (ON: normal sound, OFF: no sound, FF: sound comes only under abnormal situation) Setup of Buzzer: ※SETTING OK After displaying , an ON-OFF-FF setup of a buzzer is displayed. How to sound a buzzer is set up by UP/DOWN. :Sound altogether.
-
Page 25: Data Output
6.1 Data saving Whenever press CLEAR key, the system will automatically clear the data, meanwhile, the data will be saved in the memory according to serial number. The serial number is from 001 ~ 800 (no more than 800 datum) and the first data will be automatically covered as new data is over 800 6.1.1 Deleting the single data Torque value can be deleted. - Page 26 6.2 Date transfer 6.2.1 Data format Output data are outputted in the ASCII format with a USB cable. In addition, in order to take in data, driver software needs to be installed separately. About installation of driver software, please refer to http://www.ftdichip.com/Drivers/VCP.htm Data Format Data bit length start bit 1 + data bit 8 + stop bit 2 + no parity...
-
Page 27: Power Supply
7、Preparation and the measuring method Installation A measuring instrument may be brandished at the time of measurement of a large torque. Surely, a measuring instrument should use a fixed knob etc. and fix it firmly. A setup in the measurement mode The 3 following modes can be chosen with the setting to meet user's testing requirement. - Page 28 When there is sound etc. ※CAUTION※ The new model KTM-15/KTM-150 itself has temporary memory. The memory will be cleared automatically once the machine is not used for a long time. Moreover it is necessary to press “Reset” button after full-charged, then it can be on normally.
- Page 29 B.Choose a proper Torque Meter: KTM-15 can be measured torque at maximum 15 kgf.cm ; KTM-150 can be measured torque at maximum 150 kgf.cm; KTM-250 can be measured torque at maximum 250 kgf.cm select the Screw Joint (According to the basis of requiring torque measurement which can be parted with 6 items as following tables: Torque Range (kgf.cm)
- Page 30 ...
Need help?
Do you have a question about the KTM-15 and is the answer not in the manual?
Questions and answers